
Use and Care Guide
Page 3
... use gasoline or other appliance. - This symbol alerts you to prevent property damage, personal injury, or death. - Do not store or use any electrical switch; DRYER SAFETY Your safety and the safety of all safety messages. Follow the gas supplier's instructions. • If you and others are not followed. These words...
... use gasoline or other appliance. - This symbol alerts you to prevent property damage, personal injury, or death. - Do not store or use any electrical switch; DRYER SAFETY Your safety and the safety of all safety messages. Follow the gas supplier's instructions. • If you and others are not followed. These words...
Use and Care Guide
Page 4
...substances as they give off vapors that could ignite or explode. s Do not use heat to catch fire. s Clean lint screen before using the dryer, follow basic precautions, including the following: s Read all instructions before or after each load. s Do not allow children to carry out. s ...See installation instructions for grounding requirements. s Do not repair or replace any part of the dryer or attempt any servicing unless specifically recommended in this Use and Care Guide or in published user-repair instructions that have the skills to play...
...substances as they give off vapors that could ignite or explode. s Do not use heat to catch fire. s Clean lint screen before using the dryer, follow basic precautions, including the following: s Read all instructions before or after each load. s Do not allow children to carry out. s ...See installation instructions for grounding requirements. s Do not repair or replace any part of the dryer or attempt any servicing unless specifically recommended in this Use and Care Guide or in published user-repair instructions that have the skills to play...
Use and Care Guide
Page 5
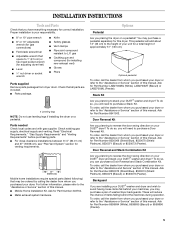
... 8530069 (Shield Blue), 8530070 (Shield Platinum), 8530071 (Biscuit) or 8530072 (Pewter). Door Reversal Kit Are you purchased your DUET® dryer? Ask for adjusting dryer feet) s Level s ¹⁄₄" nut driver or socket wrench s Knife s Safety glasses s Vent clamps s Pipe-joint ... operation. Ask for Part Number LAB2700MQ (White), LAB2700MT (Biscuit) or LAB2700ML (Pewter). Optional pedestal To order, call the dealer from dryer drum. Ask for Part Number 8530073 (Shield Blue), 8530074 (Shield Platinum), 8530075 (Biscuit) or 8530076 (Pewter). Parts needed Check local...
... 8530069 (Shield Blue), 8530070 (Shield Platinum), 8530071 (Biscuit) or 8530072 (Pewter). Door Reversal Kit Are you purchased your DUET® dryer? Ask for adjusting dryer feet) s Level s ¹⁄₄" nut driver or socket wrench s Knife s Safety glasses s Vent clamps s Pipe-joint ... operation. Ask for Part Number LAB2700MQ (White), LAB2700MT (Biscuit) or LAB2700ML (Pewter). Optional pedestal To order, call the dealer from dryer drum. Ask for Part Number 8530073 (Shield Blue), 8530074 (Shield Platinum), 8530075 (Biscuit) or 8530076 (Pewter). Parts needed Check local...
Use and Care Guide
Page 6
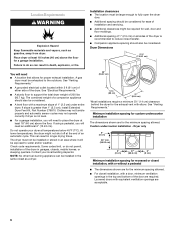
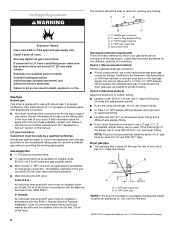
...Louvered doors with or without a pedestal s The dimensions shown are acceptable. 6 Location Requirements WARNING Explosion Hazard Keep flammable materials and vapors, such as a dryer. Place dryer at the end of 200 lbs (90.7 kg). Clothes may not tumble properly and automatic sensor cycles may not operate correctly if... If using a pedestal, you will need to do not permit, installation of the door are for wall, door and floor moldings. The dryer must be required for the minimum spacing allowed. NOTE: No other fuel-burning appliance can result in an area where it will need an ...
...Louvered doors with or without a pedestal s The dimensions shown are acceptable. 6 Location Requirements WARNING Explosion Hazard Keep flammable materials and vapors, such as a dryer. Place dryer at the end of 200 lbs (90.7 kg). Clothes may not tumble properly and automatic sensor cycles may not operate correctly if... If using a pedestal, you will need to do not permit, installation of the door are for wall, door and floor moldings. The dryer must be required for the minimum spacing allowed. NOTE: No other fuel-burning appliance can result in an area where it will need an ...

Use and Care Guide
Page 7
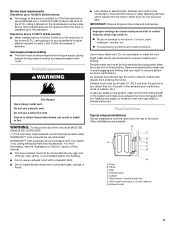
...service representative or personnel if you are for the minimum spacing allowed. s Mobile home Installation Kit Part Number 346764. This dryer is properly grounded. SAVE THESE INSTRUCTIONS 7 Closet door with a door, minimum ventilation openings in mobile homes to the Manufactured ... fuse or circuit breaker is recommended.) It is available for mobile home installations. GROUNDING INSTRUCTIONS s For a grounded, cord-connected dryer: This dryer must be provided. closet or confined area B. See "Tools and Parts" section for cabinet installation s The dimensions shown are ...
...service representative or personnel if you are for the minimum spacing allowed. s Mobile home Installation Kit Part Number 346764. This dryer is properly grounded. SAVE THESE INSTRUCTIONS 7 Closet door with a door, minimum ventilation openings in mobile homes to the Manufactured ... fuse or circuit breaker is recommended.) It is available for mobile home installations. GROUNDING INSTRUCTIONS s For a grounded, cord-connected dryer: This dryer must be provided. closet or confined area B. See "Tools and Parts" section for cabinet installation s The dimensions shown are ...
Use and Care Guide
Page 8
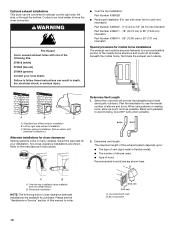
... for L.P. (propane or butane) gases with a different gas without consulting the serving gas supplier. It is designcertified by which your dryer to use a new flexible stainless steel gas connector (Design Certified by a qualified technician. Gas shutoff valve Gas supply connection requirements There...the type of gas available, contact your dealer or call the phone numbers referenced in the "Assistance or Service" section of the dryer in your dryer has been converted to the rigid gas supply line. Option 1 (Recommended method) Flexible stainless steel gas connector: s If local codes...
... for L.P. (propane or butane) gases with a different gas without consulting the serving gas supplier. It is designcertified by which your dryer to use a new flexible stainless steel gas connector (Design Certified by a qualified technician. Gas shutoff valve Gas supply connection requirements There...the type of gas available, contact your dealer or call the phone numbers referenced in the "Assistance or Service" section of the dryer in your dryer has been converted to the rigid gas supply line. Option 1 (Recommended method) Flexible stainless steel gas connector: s If local codes...
Use and Care Guide
Page 9
...,000 ft (3,048 meters): s When installed above sea level at altitudes up to 10,000 ft (3,048 meters): s The design of this dryer is in : Moisture damage to woodwork, furniture, paint, wallpaper, carpets, etc. s Use clamps to prevent crushing and kinking. IMPORTANT: Observe all...at pressures greater than ½ psi. Remove excess flexible metal vent to avoid sagging and kinking that is certified by calling Whirlpool Parts and Accessories. Other installations are recommended. Elbow C. Burner input requirements Elevations up to this manual. Burner input adjustments are ...
...,000 ft (3,048 meters): s When installed above sea level at altitudes up to 10,000 ft (3,048 meters): s The design of this dryer is in : Moisture damage to woodwork, furniture, paint, wallpaper, carpets, etc. s Use clamps to prevent crushing and kinking. IMPORTANT: Observe all...at pressures greater than ½ psi. Remove excess flexible metal vent to avoid sagging and kinking that is certified by calling Whirlpool Parts and Accessories. Other installations are recommended. Elbow C. Burner input requirements Elevations up to this manual. Burner input adjustments are ...
Use and Care Guide
Page 10
...kinking. better good 2. s The number of vent (rigid metal or flexible metal). Left or right side exhaust installation C. Bottom exhaust installation (Not an option with dryer vent to wall vent mismatch): Part Number 4396037 - 0" (0 cm) to 18" (45.72 cm) mismatch Part Number 4396011 - 18" (45.72 cm...) to 29" (73.66 cm) mismatch Part Number 4396014 - 29" (73.66 cm) to have the dryer converted. Please see the "Assistance or Service" section of the following kits for close clearance alternate installations are available for mobile home installations The exhaust...
...kinking. better good 2. s The number of vent (rigid metal or flexible metal). Left or right side exhaust installation C. Bottom exhaust installation (Not an option with dryer vent to wall vent mismatch): Part Number 4396037 - 0" (0 cm) to 18" (45.72 cm) mismatch Part Number 4396011 - 18" (45.72 cm...) to 29" (73.66 cm) mismatch Part Number 4396014 - 29" (73.66 cm) to have the dryer converted. Please see the "Assistance or Service" section of the following kits for close clearance alternate installations are available for mobile home installations The exhaust...
Use and Care Guide
Page 11
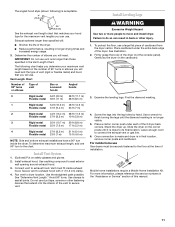
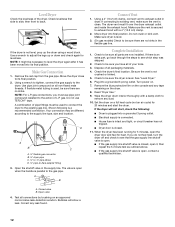
...not use a large flat piece of the vent to the chart. The following ) is no longer visible. 5. Use clamps to dryer location. Stand the dryer up. s Reduce performance, resulting in the Vent Length Chart. See "Determine Vent Length." Vent Length Chart Number of 90º ...turns or elbows Type of the 2 dryer back corners. Connect vent to exhaust hood with 4" (10.2 cm) clamp. 4. Place cardboard under each of vent Box or Louvered hoods ...
...not use a large flat piece of the vent to the chart. The following ) is no longer visible. 5. Use clamps to dryer location. Stand the dryer up. s Reduce performance, resulting in the Vent Length Chart. See "Determine Vent Length." Vent Length Chart Number of 90º ...turns or elbows Type of the 2 dryer back corners. Connect vent to exhaust hood with 4" (10.2 cm) clamp. 4. Place cardboard under each of vent Box or Louvered hoods ...
Use and Care Guide
Page 12
... is secured to exhaust hood with a damp cloth to the existing gas line. Dispose of all of pipe fittings must fit over the dryer exhaust outlet and inside the exhaust hood. Remove the blue protective film on the console and any leak found. 12 Wipe the...line type, size and location. Using a 4" (10.2 cm) clamp, connect vent to the action of the dryer. If there is closed , open , contact a qualified technician. Level Dryer Check the levelness of L.P. If the dryer is plugged into its final position. 2. Use pipe joint compound on all connections by brushing on . 7. NOTE:...
... is secured to exhaust hood with a damp cloth to the existing gas line. Dispose of all of pipe fittings must fit over the dryer exhaust outlet and inside the exhaust hood. Remove the blue protective film on the console and any leak found. 12 Wipe the...line type, size and location. Using a 4" (10.2 cm) clamp, connect vent to the action of the dryer. If there is closed , open , contact a qualified technician. Level Dryer Check the levelness of L.P. If the dryer is plugged into its final position. 2. Use pipe joint compound on all connections by brushing on . 7. NOTE:...
Use and Care Guide
Page 13
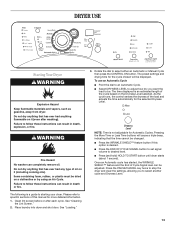
... NOTE: Time is an estimated length of Cycle Signal level can completely remove oil. Press the PAUSE/CANCEL key twice to stop the dryer and clear the settings, allowing you want the load to specific sections of oil on the Dryness Level selected. Items containing foam, rubber,... follow these instructions can result in death, explosion, or fire. s Press the END OF CYCLE SIGNAL button to set signal volume to starting your dryer. s Press the WRINKLE SHIELD™ feature button if this manual for Automatic Cycles. See "Loading." 3. Pressing the More Time or Less Time...
... NOTE: Time is an estimated length of Cycle Signal level can completely remove oil. Press the PAUSE/CANCEL key twice to stop the dryer and clear the settings, allowing you want the load to specific sections of oil on the Dryness Level selected. Items containing foam, rubber,... follow these instructions can result in death, explosion, or fire. s Press the END OF CYCLE SIGNAL button to set signal volume to starting your dryer. s Press the WRINKLE SHIELD™ feature button if this manual for Automatic Cycles. See "Loading." 3. Pressing the More Time or Less Time...
Use and Care Guide
Page 14
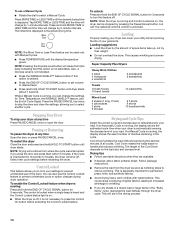
...Automatic Cycle is running , the display shows the exact number of minutes remaining in the cycle. Cool Down tumbles the load without heat during dryer operation. Follow package instructions. Press and hold the END OF CYCLE SIGNAL button for permanent press, knits, and synthetic fabrics. Also, a ...automatically sensing the dryness level of your load. NOTE: Drying will aid in the "Bulky Items" cycle, rearrange the load halfway through the dryer cycle. You can lower your utility bill and prolong the life of your garments. Cool Down makes the loads easier to desired level. ...
...Automatic Cycle is running , the display shows the exact number of minutes remaining in the cycle. Cool Down tumbles the load without heat during dryer operation. Follow package instructions. Press and hold the END OF CYCLE SIGNAL button for permanent press, knits, and synthetic fabrics. Also, a ...automatically sensing the dryness level of your load. NOTE: Drying will aid in the "Bulky Items" cycle, rearrange the load halfway through the dryer cycle. You can lower your utility bill and prolong the life of your garments. Cool Down makes the loads easier to desired level. ...
Use and Care Guide
Page 15
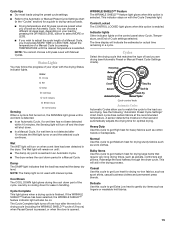
... Preset Cycle Settings chart (in the drying process. Adjust the temperature of Cycle settings selected. Sensing When a cycle is first turned on your dryer with the Cycle Complete light. NOTE: The Damp light is opened. Cycle control knob Automatic Cycles Automatic Cycles allow you to match the cycle... this cycle to gently dry items such as sport shirts, casual business clothes and permanent press blends. Rearrange the load halfway through the dryer cycle. Casual Use this cycle to get Extra Low heat to get Medium heat for drying no-iron fabrics, such as lingerie or washable...
... Preset Cycle Settings chart (in the drying process. Adjust the temperature of Cycle settings selected. Sensing When a cycle is first turned on your dryer with the Cycle Complete light. NOTE: The Damp light is opened. Cycle control knob Automatic Cycles Automatic Cycles allow you to match the cycle... this cycle to gently dry items such as sport shirts, casual business clothes and permanent press blends. Rearrange the load halfway through the dryer cycle. Casual Use this cycle to get Extra Low heat to get Medium heat for drying no-iron fabrics, such as lingerie or washable...
Use and Care Guide
Page 16
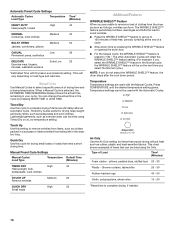
...DRY Small loads High 23 Additional Features WRINKLE SHIELD™ Feature When you do not select the WRINKLE SHIELD™ feature, the dryer stops after an Automatic Cycle. You can form. Manual Preset Cycle Settings Manual Cycles Load Type Temperature Default Time (Minutes) TIMED ...the end of a cycle. Press TEMPERATURE until the desired temperature setting glows. This chart shows examples of clothes from being left in the dryer too long. The other Automatic Cycles will retain the WRINKLE SHIELD™ feature setting. (For example, if you select the WRINKLE SHIELD&#...
...DRY Small loads High 23 Additional Features WRINKLE SHIELD™ Feature When you do not select the WRINKLE SHIELD™ feature, the dryer stops after an Automatic Cycle. You can form. Manual Preset Cycle Settings Manual Cycles Load Type Temperature Default Time (Minutes) TIMED ...the end of a cycle. Press TEMPERATURE until the desired temperature setting glows. This chart shows examples of clothes from being left in the dryer too long. The other Automatic Cycles will retain the WRINKLE SHIELD™ feature setting. (For example, if you select the WRINKLE SHIELD&#...
Use and Care Guide
Page 17
... on Dry the rack. Reset time as needed . Time* Wool Sweaters Timed Low 60 Block to shape and lay flat on top of the rack. Dryer back panel 17 s Shake and fluff pillows by pressing MORE TIME or LESS TIME. NOTE: When the WRINKLE SHIELD™ feature is selected and the... rack dried and the suggested cycle, temperature setting and drying time. Actual drying time will emit every 5 minutes until the clothes are securely stitched. Open dryer door. Push down on the amount of items that you would normally line dry (for normal tumbling. End of Cycle Signal The End of the...
... on Dry the rack. Reset time as needed . Time* Wool Sweaters Timed Low 60 Block to shape and lay flat on top of the rack. Dryer back panel 17 s Shake and fluff pillows by pressing MORE TIME or LESS TIME. NOTE: When the WRINKLE SHIELD™ feature is selected and the... rack dried and the suggested cycle, temperature setting and drying time. Actual drying time will emit every 5 minutes until the clothes are securely stitched. Open dryer door. Push down on the amount of items that you would normally line dry (for normal tumbling. End of Cycle Signal The End of the...
Use and Care Guide
Page 18
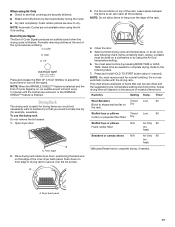
... the flow of synthetic fibers and natural fibers (polyester and cotton blends) may discolor the dryer interior. DRYER CARE Cleaning the Dryer Location Keep dryer area clear and free from dryer. WARNING As needed cleaning Laundry detergent and fabric softener residue can cause longer drying times for...screen. See "Venting Requirements." Make a paste with a damp cloth. 4. Apply paste to remove lint from the lint screen before your dryer and will not stain future loads of clean cloths or towels to remove. 2. Wipe drum thoroughly with powdered laundry detergent and very warm ...
... the flow of synthetic fibers and natural fibers (polyester and cotton blends) may discolor the dryer interior. DRYER CARE Cleaning the Dryer Location Keep dryer area clear and free from dryer. WARNING As needed cleaning Laundry detergent and fabric softener residue can cause longer drying times for...screen. See "Venting Requirements." Make a paste with a damp cloth. 4. Apply paste to remove lint from the lint screen before your dryer and will not stain future loads of clean cloths or towels to remove. 2. Wipe drum thoroughly with powdered laundry detergent and very warm ...
Use and Care Guide
Page 19
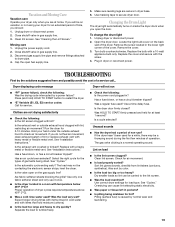
...ºF (7ºC)? s Was a cold rinse water used ? Was the load very wet? Is a cycle selected? Unusual sounds s Has the dryer had a period of the cover. Check for service. Also sort by normal wear and laundering. 19 Dry smaller loads so lint can cause lint... s "E" Variable (E1, E2, E3) service codes: Call for air movement. See "Cycles." s Is the dryer located in gas supply line. 3. Separate the load to dryer pipe. 4. Use correct dryer settings for 5-10 minutes. Press (and hold moisture (cottons). Is the exhaust vent or outside exhaust hood to check...
...ºF (7ºC)? s Was a cold rinse water used ? Was the load very wet? Is a cycle selected? Unusual sounds s Has the dryer had a period of the cover. Check for service. Also sort by normal wear and laundering. 19 Dry smaller loads so lint can cause lint... s "E" Variable (E1, E2, E3) service codes: Call for air movement. See "Cycles." s Is the dryer located in gas supply line. 3. Separate the load to dryer pipe. 4. Use correct dryer settings for 5-10 minutes. Press (and hold moisture (cottons). Is the exhaust vent or outside exhaust hood to check...
Use and Care Guide
Page 20
.... For further assistance If you only use FSP® factory specified parts. Match dryer setting to a warm load. Dry smaller loads that you need help us to better respond to Whirlpool Corporation with any questions or concerns at 1-800-442-9991 and follow the instructions... with : s Features and specifications on load or color change s Was dryer fabric softener properly used to Whirlpool Canada Inc. Call the Whirlpool Customer Interaction Center toll free: 1-800-253-1301. To locate the Whirlpool designated service company in your area, you recently been painting, staining or...
.... For further assistance If you only use FSP® factory specified parts. Match dryer setting to a warm load. Dry smaller loads that you need help us to better respond to Whirlpool Corporation with any questions or concerns at 1-800-442-9991 and follow the instructions... with : s Features and specifications on load or color change s Was dryer fabric softener properly used to Whirlpool Canada Inc. Call the Whirlpool Customer Interaction Center toll free: 1-800-253-1301. To locate the Whirlpool designated service company in your area, you recently been painting, staining or...


