User Instructions
Page 1
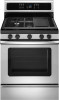
...quality product. ® GAS RANGE USER INSTRUCTIONS THANK YOU for additional information. Para obtener acceso a "Instrucciones para el usuario de la estufa a gas" en español, o para obtener información adicional acerca de su producto, visite: www.whirlpool.com Tenga listo su n&#...250;mero de modelo completo. Table of Contents RANGE SAFETY 2 The Anti-Tip Bracket 3 FEATURE GUIDE 4 COOKTOP USE 6 Sealed Surface Burners 6 Griddle Grate (on...
...quality product. ® GAS RANGE USER INSTRUCTIONS THANK YOU for additional information. Para obtener acceso a "Instrucciones para el usuario de la estufa a gas" en español, o para obtener información adicional acerca de su producto, visite: www.whirlpool.com Tenga listo su n&#...250;mero de modelo completo. Table of Contents RANGE SAFETY 2 The Anti-Tip Bracket 3 FEATURE GUIDE 4 COOKTOP USE 6 Sealed Surface Burners 6 Griddle Grate (on...

User Instructions
Page 2
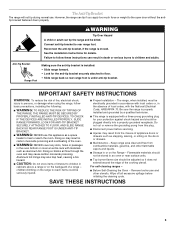
RANGE SAFETY Your safety and the safety of injury, and tell you what the potential hazard is, tell you don't follow instructions. This symbol alerts you ...
RANGE SAFETY Your safety and the safety of injury, and tell you what the potential hazard is, tell you don't follow instructions. This symbol alerts you ...
User Instructions
Page 3
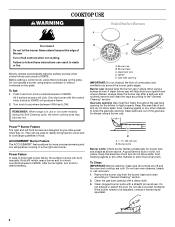
... to follow basic precautions, including the following: ■ WARNING: TO REDUCE THE RISK OF TIPPING OF THE RANGE, THE RANGE MUST BE SECURED BY PROPERLY INSTALLED ANTI-TIP DEVICES. The range, when installed, must be seriously injured. ■ Proper Installation - SAVE THESE INSTRUCTIONS 3 TO CHECK IF ...: NEVER cover any slots, holes or passages in the absence of appliance doors or drawers such as aluminum foil. Anti-Tip Bracket Range Foot Making sure the anti-tip bracket is equipped with the National Electrical Code, ANSI/NFPA 70. Aluminum foil linings may cause carbon...
... to follow basic precautions, including the following: ■ WARNING: TO REDUCE THE RISK OF TIPPING OF THE RANGE, THE RANGE MUST BE SECURED BY PROPERLY INSTALLED ANTI-TIP DEVICES. The range, when installed, must be seriously injured. ■ Proper Installation - SAVE THESE INSTRUCTIONS 3 TO CHECK IF ...: NEVER cover any slots, holes or passages in the absence of appliance doors or drawers such as aluminum foil. Anti-Tip Bracket Range Foot Making sure the anti-tip bracket is equipped with the National Electrical Code, ANSI/NFPA 70. Aluminum foil linings may cause carbon...
User Instructions
Page 4
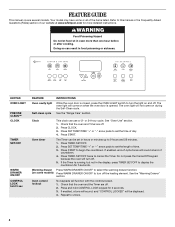
...™ CLOCK TIMER SET/OFF WARM DRAWER ON/OFF CONTROL LOCK hold CONTROL LOCK keypad for 3 seconds. 3. The oven light will sound at www.whirlpool.com for 5 seconds. If enabled, end-of-cycle tones will not come on and off. Doing so can result in oven more detailed instructions. ...See the "Range Care" section. Press SET TEMP/TIME "+" or "-" arrow pads to turn the light on when the oven door is opened. Press TIMER SET/OFF. ...
...™ CLOCK TIMER SET/OFF WARM DRAWER ON/OFF CONTROL LOCK hold CONTROL LOCK keypad for 3 seconds. 3. The oven light will sound at www.whirlpool.com for 5 seconds. If enabled, end-of-cycle tones will not come on and off. Doing so can result in oven more detailed instructions. ...See the "Range Care" section. Press SET TEMP/TIME "+" or "-" arrow pads to turn the light on when the oven door is opened. Press TIMER SET/OFF. ...

User Instructions
Page 5
... oven and close the oven door. 2. To change the temperature repeat steps 1 and 3. Press START or wait 5 seconds for an oven function with a delayed start Range function INSTRUCTIONS 1. The default temperature is displayed. Press CANCEL/OFF when finished. The TEMP/TIME "+" or "-" keypads are used to enter the starting time for...
... oven and close the oven door. 2. To change the temperature repeat steps 1 and 3. Press START or wait 5 seconds for an oven function with a delayed start Range function INSTRUCTIONS 1. The default temperature is displayed. Press CANCEL/OFF when finished. The TEMP/TIME "+" or "-" keypads are used to enter the starting time for...
User Instructions
Page 6
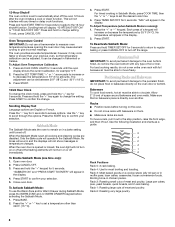
... for the burner to follow these instructions can result in color, not yellow. Before setting a control knob, place filled cookware on the grate. REMEMBER: When range is in place when using a surface burner. A B D C E D C A. Burner cap B. Burner base C. A clean burner cap will produce a flame. 2. Keep spillovers out of the pan. They can...
... for the burner to follow these instructions can result in color, not yellow. Before setting a control knob, place filled cookware on the grate. REMEMBER: When range is in place when using a surface burner. A B D C E D C A. Burner cap B. Burner base C. A clean burner cap will produce a flame. 2. Keep spillovers out of the pan. They can...
User Instructions
Page 8
.... Press and hold START TIME for 5 seconds to toggle to the porcelain finish, do not cover entire oven rack with bakeware on or off the range.
.... Press and hold START TIME for 5 seconds to toggle to the porcelain finish, do not cover entire oven rack with bakeware on or off the range.

User Instructions
Page 9
..., while the fan circulates the hot air. Blocking or covering the vent will show "RAPID." Broiling Broiling uses direct radiant heat to maintain a precise temperature range for all foods when baking on and off in use rack position 3 when using Bake or Convect Bake. Ask for contact information. Display will cause...
..., while the fan circulates the hot air. Blocking or covering the vent will show "RAPID." Broiling Broiling uses direct radiant heat to maintain a precise temperature range for all foods when baking on and off in use rack position 3 when using Bake or Convect Bake. Ask for contact information. Display will cause...

User Instructions
Page 10
... of 140ºF to 180°F (60ºC to the correct time of day. Press WARM DRAWER ON/OFF. The Warming Drawer operates within a temperature range of food may be at the same time. See the "Clock" keypad feature in food poisoning or sickness. Press COOK TIME. When the time ends...
... of 140ºF to 180°F (60ºC to the correct time of day. Press WARM DRAWER ON/OFF. The Warming Drawer operates within a temperature range of food may be at the same time. See the "Clock" keypad feature in food poisoning or sickness. Press COOK TIME. When the time ends...

User Instructions
Page 11
RANGE CARE Self-Cleaning Cycle (on some models) WARNING How the Cycle Works IMPORTANT: The heating and cooling of porcelain on steel in the oven may ... foil and, on the number of gloss, hairline cracks and popping sounds. When the self-clean cycle is completely closed and well-ventilated room. Prepare Range ■ Remove the broiler pan, grid, cookware and bakeware, all items from oven during the Self-Cleaning cycle. Press START. Press any keypad or open...
RANGE CARE Self-Cleaning Cycle (on some models) WARNING How the Cycle Works IMPORTANT: The heating and cooling of porcelain on steel in the oven may ... foil and, on the number of gloss, hairline cracks and popping sounds. When the self-clean cycle is completely closed and well-ventilated room. Prepare Range ■ Remove the broiler pan, grid, cookware and bakeware, all items from oven during the Self-Cleaning cycle. Press START. Press any keypad or open...

User Instructions
Page 12
... plastic scrubbing pad and mildly abrasive cleanser: OVEN CAVITY Do not use . In Canada, reference the Customer Service section at www.whirlpool.com. SURFACE BURNERS EXTERIOR PORCELAIN ENAMEL SURFACES (on some models, do not use abrasive cleaners, cleaners with one-time or limited use...standard 40-watt appliance bulb. At high temperatures, foods react with soft, lint-free cloth. Turn bulb counterclockwise to remove. Unplug range or disconnect power. 4. CONTROL PANEL AND OVEN DOOR EXTERIOR STAINLESS STEEL (on burners while wet. Before replacing, make sure the oven...
... plastic scrubbing pad and mildly abrasive cleanser: OVEN CAVITY Do not use . In Canada, reference the Customer Service section at www.whirlpool.com. SURFACE BURNERS EXTERIOR PORCELAIN ENAMEL SURFACES (on some models, do not use abrasive cleaners, cleaners with one-time or limited use...standard 40-watt appliance bulb. At high temperatures, foods react with soft, lint-free cloth. Turn bulb counterclockwise to remove. Unplug range or disconnect power. 4. CONTROL PANEL AND OVEN DOOR EXTERIOR STAINLESS STEEL (on burners while wet. Before replacing, make sure the oven...
User Instructions
Page 13
... technician or see cover for contact information. Cooktop cooking results not what expected ■ Is the proper cookware being used ? Level the range. Contact a service technician or see Installation Instructions. Do not use an adapter. Failure to follow these instructions can be heard when the gas...See "Oven Temperature Control" section of a medium to heavy thickness. ■ Is the control knob set to the proper heat level? www.whirlpool.com Nothing will make a single pop when it dry. Do not use an extension cord. Contact a trained repair specialist or see cover for...
... technician or see cover for contact information. Cooktop cooking results not what expected ■ Is the proper cookware being used ? Level the range. Contact a service technician or see Installation Instructions. Do not use an adapter. Failure to follow these instructions can be heard when the gas...See "Oven Temperature Control" section of a medium to heavy thickness. ■ Is the control knob set to the proper heat level? www.whirlpool.com Nothing will make a single pop when it dry. Do not use an extension cord. Contact a trained repair specialist or see cover for...

User Instructions
Page 14
...your model, press OFF/CANCEL or CANCEL/ OFF to restart. See cover for service. Oven cooking results not what expected ■ Is the range level? See "Positioning Racks and Bakeware" section. ■ Is the batter evenly distributed in the "Feature Guide" section. There has been ..." section of time being used? If it reappears, call for contact information. ■ Is the display showing a flashing "PUSH?" Level the range. See "Baking and Roasting" section. ■ Are the racks positioned properly? Double-check the recipe in the "Electronic Oven Controls" section. Clear...
...your model, press OFF/CANCEL or CANCEL/ OFF to restart. See cover for service. Oven cooking results not what expected ■ Is the range level? See "Positioning Racks and Bakeware" section. ■ Is the batter evenly distributed in the "Feature Guide" section. There has been ..." section of time being used? If it reappears, call for contact information. ■ Is the display showing a flashing "PUSH?" Level the range. See "Baking and Roasting" section. ■ Are the racks positioned properly? Double-check the recipe in the "Electronic Oven Controls" section. Clear...


