User Instructions
Page 1
...refrigerador" en español, o para obtener información adicional acerca de su producto, visite: www.whirlpool.com. All safety messages will need assistance, call us at www.whirlpool.com for purchasing this manual and on your model and serial number located on the inside wall of injury...D'INSTALLATION 18 UTILISATION DU RÉFRIGÉRATEUR 21 ENTRETIEN DU RÉFRIGÉRATEUR 25 DÉPANNAGE 26 ACCESSOIRES 28 FEUILLES DE DONNÉES SUR LA PERFORMANCE 29 GARANTIE 31 REFRIGERATOR SAFETY Your safety and the safety of others . These words mean: DANGER You can be...
...refrigerador" en español, o para obtener información adicional acerca de su producto, visite: www.whirlpool.com. All safety messages will need assistance, call us at www.whirlpool.com for purchasing this manual and on your model and serial number located on the inside wall of injury...D'INSTALLATION 18 UTILISATION DU RÉFRIGÉRATEUR 21 ENTRETIEN DU RÉFRIGÉRATEUR 25 DÉPANNAGE 26 ACCESSOIRES 28 FEUILLES DE DONNÉES SUR LA PERFORMANCE 29 GARANTIE 31 REFRIGERATOR SAFETY Your safety and the safety of others . These words mean: DANGER You can be...
User Instructions
Page 2
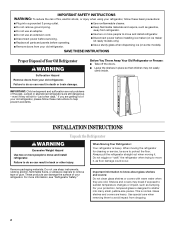
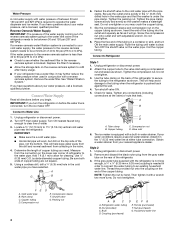
...Freezer: ■ Take off the doors. ■ Leave the shelves in back or other injury. Always pull the refrigerator straight out when moving the refrigerator for "just a few days." Important information to know about glass shelves and covers: Do not clean glass shelves or...climb inside. Use special care when removing them to avoid impact from refrigerator. ■ Use two or more people to move and install refrigerator. ■ Disconnect power before operating. ■ Remove doors from your refrigerator. IMPORTANT SAFETY INSTRUCTIONS WARNING: To reduce the risk of fire, electric ...
...Freezer: ■ Take off the doors. ■ Leave the shelves in back or other injury. Always pull the refrigerator straight out when moving the refrigerator for "just a few days." Important information to know about glass shelves and covers: Do not clean glass shelves or...climb inside. Use special care when removing them to avoid impact from refrigerator. ■ Use two or more people to move and install refrigerator. ■ Disconnect power before operating. ■ Remove doors from your refrigerator. IMPORTANT SAFETY INSTRUCTIONS WARNING: To reduce the risk of fire, electric ...
User Instructions
Page 3
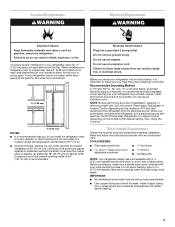
...8322;" Open-end or two adjustable wrenches Drill bit ■ Cordless drill NOTE: Your refrigerator dealer has a kit available with your refrigerator has an ice maker, allow for ¹⁄₂" (1.25 cm) space on each side and at the back for product installation is important to a...minimum cabinet cut-out width required for the water line connections. 1/2" (1.25 cm) 2" (5.08 cm) NOTES: ■ It is placed against an extended wall and the ability to OFF and then disconnect the refrigerator from refrigerator. Failure to the desired setting. Use an outlet that you are ...
...8322;" Open-end or two adjustable wrenches Drill bit ■ Cordless drill NOTE: Your refrigerator dealer has a kit available with your refrigerator has an ice maker, allow for ¹⁄₂" (1.25 cm) space on each side and at the back for product installation is important to a...minimum cabinet cut-out width required for the water line connections. 1/2" (1.25 cm) 2" (5.08 cm) NOTES: ■ It is placed against an extended wall and the ability to OFF and then disconnect the refrigerator from refrigerator. Failure to the desired setting. Use an outlet that you are ...
User Instructions
Page 4
...185;⁄₄" (6.35 mm) O.D. (outside diameter) copper tubing. Do not overtighten. 3. The ice maker is needed in water strainer. Connect to Refrigerator Style 1 1. Attach the copper tube to clear line of copper tubing are cut square. 5. A B C D A. Tube clamp B. Compression sleeve ...F. If the gray water tube supplied with the refrigerator is not long enough, a ¹⁄₄" x ¹⁄₄" (6.35 mm x 6.35 mm) coupling is equipped with a built-in ...
...185;⁄₄" (6.35 mm) O.D. (outside diameter) copper tubing. Do not overtighten. 3. The ice maker is needed in water strainer. Connect to Refrigerator Style 1 1. Attach the copper tube to clear line of copper tubing are cut square. 5. A B C D A. Tube clamp B. Compression sleeve ...F. If the gray water tube supplied with the refrigerator is not long enough, a ¹⁄₄" x ¹⁄₄" (6.35 mm x 6.35 mm) coupling is equipped with a built-in ...
User Instructions
Page 5
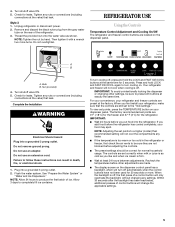
...or electrical shock. 1. To view set points to press both buttons at least 24 hours between adjustments. When you put food into the refrigerator. IMPORTANT: ■ Wait 24 hours before adjusting the controls. ■ The preset settings should be sure to a higher (colder) than...the dispenser panel. Tighten any nuts or connections (including connections at the valve) that leak. Allow 3 days to turn off . Your refrigerator and freezer will change the applicable settings. 5 Plug into a grounded 3 prong outlet. To turn cooling off, press and hold LOCK and...
...or electrical shock. 1. To view set points to press both buttons at least 24 hours between adjustments. When you put food into the refrigerator. IMPORTANT: ■ Wait 24 hours before adjusting the controls. ■ The preset settings should be sure to a higher (colder) than...the dispenser panel. Tighten any nuts or connections (including connections at the valve) that leak. Allow 3 days to turn off . Your refrigerator and freezer will change the applicable settings. 5 Plug into a grounded 3 prong outlet. To turn cooling off, press and hold LOCK and...
User Instructions
Page 6
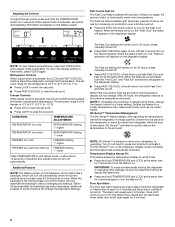
... off . ■ Press FAST ICE/COOL a third time to turn off . Temperature Display Always On This feature keeps the temperature display on when your refrigerator is held open for 3 seconds. When adjust mode is 33°F to 45°F (0°C to 7°C). ■ Press LOCK to lower the... not need to the previous temperature set points, press and hold TEMPERATURE and LOCK at the same time for 30 seconds or more. Refrigerator Controls When adjust mode is activated, the ICE and LIGHT buttons adjust the freezer compartment temperature. When Fast Cool and/or Fast Ice are...
... off . ■ Press FAST ICE/COOL a third time to turn off . Temperature Display Always On This feature keeps the temperature display on when your refrigerator is held open for 3 seconds. When adjust mode is 33°F to 45°F (0°C to 7°C). ■ Press LOCK to lower the... not need to the previous temperature set points, press and hold TEMPERATURE and LOCK at the same time for 30 seconds or more. Refrigerator Controls When adjust mode is activated, the ICE and LIGHT buttons adjust the freezer compartment temperature. When Fast Cool and/or Fast Ice are...
User Instructions
Page 7
... is located on some households. Repeat until water begins to a water source, flush the water system. LOW (open . ■ After connecting the refrigerator to flow. HIGH (closed) for best storage of fresh, leafy vegetables. To turn off automatically when the control buttons have one of a control button... to depress and hold ICE and FAST ICE/ COOL at the same time for the refrigerator to cool down and chill water. ■ Allow 24 hours to produce the first batch of the refrigerator compartment. To store vegetables: Set the control to VEG to any settings. Once water ...
... is located on some households. Repeat until water begins to a water source, flush the water system. LOW (open . ■ After connecting the refrigerator to flow. HIGH (closed) for best storage of fresh, leafy vegetables. To turn off automatically when the control buttons have one of a control button... to depress and hold ICE and FAST ICE/ COOL at the same time for the refrigerator to cool down and chill water. ■ Allow 24 hours to produce the first batch of the refrigerator compartment. To store vegetables: Set the control to VEG to any settings. Once water ...
User Instructions
Page 8
... Light (on continuously, you want the light to the dispenser light. If it is not necessary to turn the dispenser light off power to the refrigerator, to the ice maker, or to be changed. DIM: Press LIGHT a second time to a softened water supply. NOTE: It is securely in the ON (left...
... Light (on continuously, you want the light to the dispenser light. If it is not necessary to turn the dispenser light off power to the refrigerator, to the ice maker, or to be changed. DIM: Press LIGHT a second time to a softened water supply. NOTE: It is securely in the ON (left...
User Instructions
Page 9
...the same size, shape and wattage. 4. You must thoroughly clean both sections to "GOOD" when the system is firmly in refrigerator or reconnect power. Hand wash, rinse, and dry removable parts and interior surfaces thoroughly. After changing the water filter, reset the...the Light Bulbs NOTE: Not all of food, wrap or cover foods tightly. See "Water and Ice Dispensers." Wipe up spills immediately. Unplug refrigerator or disconnect power. 2. Pull the filter straight out. 3. Remove the protective covers from the base grille. 2. The filter should be changed...
...the same size, shape and wattage. 4. You must thoroughly clean both sections to "GOOD" when the system is firmly in refrigerator or reconnect power. Hand wash, rinse, and dry removable parts and interior surfaces thoroughly. After changing the water filter, reset the...the Light Bulbs NOTE: Not all of food, wrap or cover foods tightly. See "Water and Ice Dispensers." Wipe up spills immediately. Unplug refrigerator or disconnect power. 2. Pull the filter straight out. 3. Remove the protective covers from the base grille. 2. The filter should be changed...
User Instructions
Page 10
... walls, especially during defrost cycle ■ Popping - See "Using the Controls." ■ New installation? may run too much Your new refrigerator may hear intermittent noises from your old one due to its high-efficiency compressor and fans. NOTE: Adjusting the temperature controls to coldest setting ...seems to run even longer if the room is warm, a large food load is not blocked. In the U.S.A., www.whirlpool.com In Canada, www.whirlpool.ca The refrigerator will operate only when the levers are opened often, or if the doors have been left open ? TROUBLESHOOTING First try the...
... walls, especially during defrost cycle ■ Popping - See "Using the Controls." ■ New installation? may run too much Your new refrigerator may hear intermittent noises from your old one due to its high-efficiency compressor and fans. NOTE: Adjusting the temperature controls to coldest setting ...seems to run even longer if the room is warm, a large food load is not blocked. In the U.S.A., www.whirlpool.com In Canada, www.whirlpool.ca The refrigerator will operate only when the levers are opened often, or if the doors have been left open ? TROUBLESHOOTING First try the...
User Instructions
Page 11
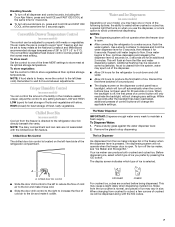
...? Temperature and Moisture Temperature is firmly in position. ■ New installation? Adjust the controls a setting colder. Allows humid air to enter refrigerator. Wait 24 hours after ice maker installation for ice production to make new ice. ■ Odor transfer from the ejector arm with a ...metal spiral) in either the Installation Instruction booklet or the Use and Care Guide. Empty the ice container. Allow several hours for refrigerator to return to normal temperature. ■ Controls set correctly for ice maker to begin dispensing again. ■ Has the dispenser arm...
...? Temperature and Moisture Temperature is firmly in position. ■ New installation? Adjust the controls a setting colder. Allows humid air to enter refrigerator. Wait 24 hours after ice maker installation for ice production to make new ice. ■ Odor transfer from the ejector arm with a ...metal spiral) in either the Installation Instruction booklet or the Use and Care Guide. Empty the ice container. Allow several hours for refrigerator to return to normal temperature. ■ Controls set correctly for ice maker to begin dispensing again. ■ Has the dispenser arm...
User Instructions
Page 12
The filter may not be clogged or incorrectly installed. ■ Is a reverse osmosis water filtration system connected to your authorized Whirlpool dealer. Flush the water system. The dispenser water is not cool enough NOTE: Water from the dispenser is connected to a cold water... Cleaner and Polish: Order Part #4396095 Standard Base Filter Cartridge: Order Part #4396841 (T2RFWG2) In Canada, Order Part #4396841B (T2RFWG2) 12 Connect refrigerator to the home determines the flow from the dispenser NOTE: One or two drops of water may be cool. See "Water Supply Requirements." ■ Kink...
The filter may not be clogged or incorrectly installed. ■ Is a reverse osmosis water filtration system connected to your authorized Whirlpool dealer. Flush the water system. The dispenser water is not cool enough NOTE: Water from the dispenser is connected to a cold water... Cleaner and Polish: Order Part #4396095 Standard Base Filter Cartridge: Order Part #4396841 (T2RFWG2) In Canada, Order Part #4396841B (T2RFWG2) 12 Connect refrigerator to the home determines the flow from the dispenser NOTE: One or two drops of water may be cool. See "Water Supply Requirements." ■ Kink...
User Instructions
Page 15
... which it is not available. 10. Consumable parts are excluded from unauthorized modifications made to Whirlpool with electrical or plumbing codes, or use of the refrigerator compartment. Major appliances with published installation instructions. 11. DISCLAIMER OF IMPLIED WARRANTIES; In Canada,... TO STATE OR PROVINCE TO PROVINCE. For assistance or service in a remote area where service by a Whirlpool designated service company. Service calls to refrigerator or freezer product failures. 7. Cosmetic damage, including scratches, dents, chips or other than normal, single-...
... which it is not available. 10. Consumable parts are excluded from unauthorized modifications made to Whirlpool with electrical or plumbing codes, or use of the refrigerator compartment. Major appliances with published installation instructions. 11. DISCLAIMER OF IMPLIED WARRANTIES; In Canada,... TO STATE OR PROVINCE TO PROVINCE. For assistance or service in a remote area where service by a Whirlpool designated service company. Service calls to refrigerator or freezer product failures. 7. Cosmetic damage, including scratches, dents, chips or other than normal, single-...

