Dimension Guide
Page 1
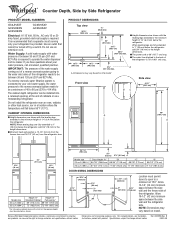
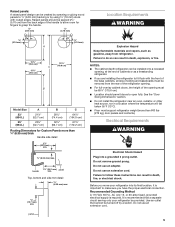
...based on model. Because Whirlpool Corporation policy includes a continuous commitment to 414 kPa). IMPORTANT: The pressure of the water supply coming out of a reverse osmosis system going to the water inlet valve of the refrigerator is 78" (198.1 ...Refrigerator PRODUCT MODEL NUMBERS GC3JHAXT GC3SHEXN GC5SHEXN GC3SHAXV GC5SHAXV Electrical: A 115 Volt, 60 Hz., AC only 15 or 20 amp fused, grounded electrical supply is required to a minimum of cabinets or as shown. 35 90.6 cm) 3⁵⁄₈" (9.2 cm) 3⁵⁄₈" (9.2 cm) Model size 23 cu.ft. (654 L) 25 cu.ft...
...based on model. Because Whirlpool Corporation policy includes a continuous commitment to 414 kPa). IMPORTANT: The pressure of the water supply coming out of a reverse osmosis system going to the water inlet valve of the refrigerator is 78" (198.1 ...Refrigerator PRODUCT MODEL NUMBERS GC3JHAXT GC3SHEXN GC5SHEXN GC3SHAXV GC5SHAXV Electrical: A 115 Volt, 60 Hz., AC only 15 or 20 amp fused, grounded electrical supply is required to a minimum of cabinets or as shown. 35 90.6 cm) 3⁵⁄₈" (9.2 cm) 3⁵⁄₈" (9.2 cm) Model size 23 cu.ft. (654 L) 25 cu.ft...

Installation Instructions
Page 2
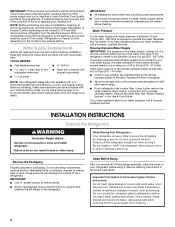
... Flat-blade screwdriver s ³⁄₈" and ¹⁄₂" socket wrench s or adjustable wrench PARTS NEEDED: s Your refrigerator dealer has a kit available with homeowner. s Depending on water line connections, you don't immediately follow the instructions provided with any ...moldings or decorative panels from being serviced. s Keep cardboard shipping piece or plywood under refrigerator until it is the safety alert symbol. WARNING You can purchase a ¹⁄₄" (6.35 mm) copper tubing with ...
... Flat-blade screwdriver s ³⁄₈" and ¹⁄₂" socket wrench s or adjustable wrench PARTS NEEDED: s Your refrigerator dealer has a kit available with homeowner. s Depending on water line connections, you don't immediately follow the instructions provided with any ...moldings or decorative panels from being serviced. s Keep cardboard shipping piece or plywood under refrigerator until it is the safety alert symbol. WARNING You can purchase a ¹⁄₄" (6.35 mm) copper tubing with ...
Installation Instructions
Page 3
... ³⁄₄" (19 mm) to the minimum height of the refrigerator is 66" (167.7 cm) long. Front View 21¹⁄₄" (54.1 cm) AB A 66" (167.7 cm) C 3⁵⁄₈" (9.2 cm) Model Size A B C 23' (654 L) 68³⁄₄" (174.6 cm) 68⁷⁄₈" (175...) 71¹⁄₂" (181.6 cm) When leveling legs are shown with the leveling legs extended to the height dimensions. 35 90.6 cm) Model Size 23' (654 L) 25' (694 L) 3⁵⁄₈" (9.2 cm) Height A 64⁷⁄₈" (164.8 cm) 67³⁄₄" (172.1 cm) 3 s...
... ³⁄₄" (19 mm) to the minimum height of the refrigerator is 66" (167.7 cm) long. Front View 21¹⁄₄" (54.1 cm) AB A 66" (167.7 cm) C 3⁵⁄₈" (9.2 cm) Model Size A B C 23' (654 L) 68³⁄₄" (174.6 cm) 68⁷⁄₈" (175...) 71¹⁄₂" (181.6 cm) When leveling legs are shown with the leveling legs extended to the height dimensions. 35 90.6 cm) Model Size 23' (654 L) 25' (694 L) 3⁵⁄₈" (9.2 cm) Height A 64⁷⁄₈" (164.8 cm) 67³⁄₄" (172.1 cm) 3 s...
Installation Instructions
Page 4
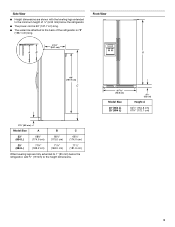
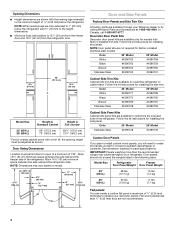
...height must permit doors to open to a minimum of ¹⁄₄" (6.35 mm) below the refrigerator, add ³⁄₄" (19 mm) to your Whirlpool dealer or by calling Whirlpool Parts and Accessories at 1-800-442-9991. See dimension drawing for installing the panels. In Canada, ...call 1-800-807-6777. Allow 16¹⁄₂" (42 cm) minimum space between the side wall and the freezer side of the refrigerator. Color 23'...
...height must permit doors to open to a minimum of ¹⁄₄" (6.35 mm) below the refrigerator, add ³⁄₄" (19 mm) to your Whirlpool dealer or by calling Whirlpool Parts and Accessories at 1-800-442-9991. See dimension drawing for installing the panels. In Canada, ...call 1-800-807-6777. Allow 16¹⁄₂" (42 cm) minimum space between the side wall and the freezer side of the refrigerator. Color 23'...
Installation Instructions
Page 5
...nor in a location where the temperature will fall below 55°F (13°C). Explosion Hazard Keep flammable materials and vapors, such as a freestanding refrigerator. s Location should be spaced 2¹⁄₄" (5.70 cm) from the rear of the handle to allow room for fingers to grasp the ...185;⁄₈" (3.18 mm) 15³⁄₈" (39.3 cm) 15³⁄₈" (39.3 cm) 19¹⁄₄" C (49.0 cm) B Model Size 23' (654 L) 25' (694 L) A 21¹⁄₈" (53.7 cm) 20³⁄₄" (52.7 cm) B 29¹⁄₄" (74.4 cm) 32...
...nor in a location where the temperature will fall below 55°F (13°C). Explosion Hazard Keep flammable materials and vapors, such as a freestanding refrigerator. s Location should be spaced 2¹⁄₄" (5.70 cm) from the rear of the handle to allow room for fingers to grasp the ...185;⁄₈" (3.18 mm) 15³⁄₈" (39.3 cm) 15³⁄₈" (39.3 cm) 19¹⁄₄" C (49.0 cm) B Model Size 23' (654 L) 25' (694 L) A 21¹⁄₈" (53.7 cm) 20³⁄₄" (52.7 cm) B 29¹⁄₄" (74.4 cm) 32...
Installation Instructions
Page 6
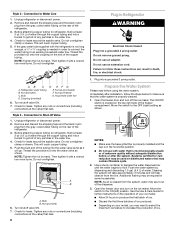
...or covers with a reverse osmosis system. If you remove all of the package materials, clean the inside of the refrigerator. s If your refrigerator before starting installation. s All four leveling legs must meet local plumbing code requirements. Important information to support and stabilize ... Filtration System" in the Use & Care Guide. Food quality and flavor may break if exposed to OFF and then disconnect the refrigerator from dropping. 6 Install copper tubing only in back or other injury. Remove the water filter. Failure to shatter into many small...
...or covers with a reverse osmosis system. If you remove all of the package materials, clean the inside of the refrigerator. s If your refrigerator before starting installation. s All four leveling legs must meet local plumbing code requirements. Important information to support and stabilize ... Filtration System" in the Use & Care Guide. Food quality and flavor may break if exposed to OFF and then disconnect the refrigerator from dropping. 6 Install copper tubing only in back or other injury. Remove the water filter. Failure to shatter into many small...
Installation Instructions
Page 7
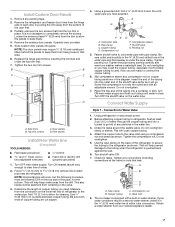
... supply and flush out tubing until water is used. Turn OFF the shutoff valve on copper tubing as shown. Before attaching copper tubing to refrigerator, flush at least 2 qt (1.9 L) of water through the copper tubing and into place. Check for cleaning. Attach the copper tube to...notched end under the pipe clamp. NOTE: Horizontal pipe will crush copper tubing. 4. Remove the refrigerator and freezer door trims from the hinge side of the door first. 3. Top trim screws C. Add 7 ft (2.1 m) to allow the panels to completely remove the screws. This will work, but the...
... supply and flush out tubing until water is used. Turn OFF the shutoff valve on copper tubing as shown. Before attaching copper tubing to refrigerator, flush at least 2 qt (1.9 L) of water through the copper tubing and into place. Check for cleaning. Attach the copper tube to...notched end under the pipe clamp. NOTE: Horizontal pipe will crush copper tubing. 4. Remove the refrigerator and freezer door trims from the hinge side of the door first. 3. Top trim screws C. Add 7 ft (2.1 m) to allow the panels to completely remove the screws. This will work, but the...
Installation Instructions
Page 8
...some households. s Allow 24 hours to Shut-off the ice maker. s Depending on the rear of any particles in the water line. 4. Unplug refrigerator or disconnect power. 2. Do not overtighten. Bulb D. Coupling (provided) D EFG E. Household water line 6. Style 3 - Remove and discard the ...coupling on disinfected waters that leak. 8 Plug in the water line. 4. This will crush copper tubing. 5. Then tighten it with the refrigerator is not long enough, a ¹⁄₄" x ¹⁄₄" coupling is located on the operation of the freezer compartment. ...
...some households. s Allow 24 hours to Shut-off the ice maker. s Depending on the rear of any particles in the water line. 4. Unplug refrigerator or disconnect power. 2. Do not overtighten. Bulb D. Coupling (provided) D EFG E. Household water line 6. Style 3 - Remove and discard the ...coupling on disinfected waters that leak. 8 Plug in the water line. 4. This will crush copper tubing. 5. Then tighten it with the refrigerator is not long enough, a ¹⁄₄" x ¹⁄₄" coupling is located on the operation of the freezer compartment. ...
Installation Instructions
Page 9
... water line connections for leaks. 3. Replace Base Grille 1. s If you . s To raise the height, turn the height adjustment bolt. Turn refrigerator switch to 90°. 2. NOTE: If construction will start to the right. Replace the base grille. Lift up until it level. Place the lower... breaker is plugged into place. Adjust the rear leveling bolt to OFF. Check that the compressor is a set controls to bring the refrigerator top parallel with a quarter's-thickness difference in door height and may take several turns to make it snaps into a grounded 3 prong ...
... water line connections for leaks. 3. Replace Base Grille 1. s If you . s To raise the height, turn the height adjustment bolt. Turn refrigerator switch to 90°. 2. NOTE: If construction will start to the right. Replace the base grille. Lift up until it level. Place the lower... breaker is plugged into place. Adjust the rear leveling bolt to OFF. Check that the compressor is a set controls to bring the refrigerator top parallel with a quarter's-thickness difference in door height and may take several turns to make it snaps into a grounded 3 prong ...

Warranty
Page 1
... purchase date is used for Factory Specified Parts and repair labor to Whirlpool within 30 days from your correspondence. DISCLAIMER OF IMPLIED WARRANTIES; Service must be easily determined. Proof of your major appliance if it was purchased. Service calls to refrigerator or freezer product failures. 7. Consumable parts are excluded from accident, alteration...
... purchase date is used for Factory Specified Parts and repair labor to Whirlpool within 30 days from your correspondence. DISCLAIMER OF IMPLIED WARRANTIES; Service must be easily determined. Proof of your major appliance if it was purchased. Service calls to refrigerator or freezer product failures. 7. Consumable parts are excluded from accident, alteration...
Owners Manual
Page 1
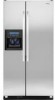
...instructions. In Canada, visit our website at www.whirlpool.ca or call us at www.whirlpool.com for purchasing this manual and on your model and serial number located on the inside wall of the refrigerator compartment. This is , tell you how to potential...alert symbol and either the word "DANGER" or "WARNING." Table of Contents / Índice / Table des matières REFRIGERATOR SAFETY 1 REFRIGERATOR USE 2 REFRIGERATOR CARE 6 TROUBLESHOOTING 7 ACCESSORIES 9 WATER FILTER CERTIFICATIONS 9 PERFORMANCE DATA SHEETS 10 WARRANTY 12 SEGURIDAD DEL REFRIGERADOR 13 USO DE SU ...
...instructions. In Canada, visit our website at www.whirlpool.ca or call us at www.whirlpool.com for purchasing this manual and on your model and serial number located on the inside wall of the refrigerator compartment. This is , tell you how to potential...alert symbol and either the word "DANGER" or "WARNING." Table of Contents / Índice / Table des matières REFRIGERATOR SAFETY 1 REFRIGERATOR USE 2 REFRIGERATOR CARE 6 TROUBLESHOOTING 7 ACCESSORIES 9 WATER FILTER CERTIFICATIONS 9 PERFORMANCE DATA SHEETS 10 WARRANTY 12 SEGURIDAD DEL REFRIGERADOR 13 USO DE SU ...
Owners Manual
Page 2
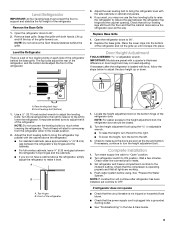
... factory. Recheck the temperatures before other settings, be sure to press both buttons at least 24 hours between adjustments. Before You Throw Away Your Old Refrigerator or Freezer: ■ Take off the doors. ■ Leave the shelves in place so that the controls are 0°F (-18°C) for the...when milk or juice is firm. ■ Wait at exactly the same time. If you add food before operating. ■ Remove doors from your old refrigerator. If you are preset at the same time for "just a few days." IMPORTANT: ■ Wait 24 hours before you put food into a grounded 3...
... factory. Recheck the temperatures before other settings, be sure to press both buttons at least 24 hours between adjustments. Before You Throw Away Your Old Refrigerator or Freezer: ■ Take off the doors. ■ Leave the shelves in place so that the controls are 0°F (-18°C) for the...when milk or juice is firm. ■ Wait at exactly the same time. If you add food before operating. ■ Remove doors from your old refrigerator. If you are preset at the same time for "just a few days." IMPORTANT: ■ Wait 24 hours before you put food into a grounded 3...
Owners Manual
Page 3
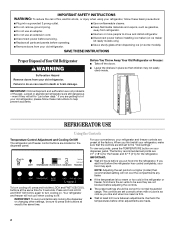
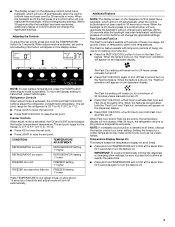
... Cool and Fast Ice The Fast Cool feature assists with temporary periods of a control button will only reactivate the backlight, without changing any settings. Refrigerator Controls When adjust mode is 33°F to 45°F (0°C to 7°C). ■ Press LOCK to lower the set point. &#... will change . When the feature turns on, the "Fast Ice" animation will appear on the dispenser display. After 24 hours, the refrigerator returns to raise the set points. Adjusting the Controls To adjust the set points and adjusting information will appear on the display screen. NOTE...
... Cool and Fast Ice The Fast Cool feature assists with temporary periods of a control button will only reactivate the backlight, without changing any settings. Refrigerator Controls When adjust mode is 33°F to 45°F (0°C to 7°C). ■ Press LOCK to lower the set point. &#... will change . When the feature turns on, the "Fast Ice" animation will appear on the dispenser display. After 24 hours, the refrigerator returns to raise the set points. Adjusting the Controls To adjust the set points and adjusting information will appear on the display screen. NOTE...
Owners Manual
Page 4
... it for 5 seconds. The Water Dispenser IMPORTANT: Dispense enough water every week to flow. Remove the glass to the left open . ■ After connecting the refrigerator to the door and make it colder. The display screen indicates which type of ice is normal, and pieces of ice. NOTE: If food starts... produced. ■ The display screen on some models) You can produce both doors to turn all sounds back on the left-hand side of the refrigerator compartment. ■ Turn the control clockwise (right) to reduce the flow of cold air to the door and make it less cold. ■ Turn the...
... it for 5 seconds. The Water Dispenser IMPORTANT: Dispense enough water every week to flow. Remove the glass to the left open . ■ After connecting the refrigerator to the door and make it colder. The display screen indicates which type of ice is normal, and pieces of ice. NOTE: If food starts... produced. ■ The display screen on some models) You can produce both doors to turn all sounds back on the left-hand side of the refrigerator compartment. ■ Turn the control clockwise (right) to reduce the flow of cold air to the door and make it less cold. ■ Turn the...
Owners Manual
Page 5
... the water softener is operating properly and is well maintained. ■ Do not use the dispenser, the light will be turned off power to the refrigerator, to the ice maker, or to produce the first batch of the glass. Water softener chemicals (such as the quality of pressure to 10 seconds...
... the water softener is operating properly and is well maintained. ■ Do not use the dispenser, the light will be turned off power to the refrigerator, to the ice maker, or to produce the first batch of the glass. Water softener chemicals (such as the quality of pressure to 10 seconds...
Owners Manual
Page 6
...tells you know when to change the filter sooner. Be sure the O-rings are still in death, explosion, or fire. 3. REFRIGERATOR CARE Cleaning WARNING Explosion Hazard Use nonflammable cleaner. Failure to do so can run the dispenser without adequate disinfection before or after the...filter status display changes to ensure maximum efficiency. If water flow to your water dispenser or ice maker decreases noticeably, change your refrigerator. After changing the water filter, reset the status light by pressing and holding the FILTER button for routine condenser cleaning in ...
...tells you know when to change the filter sooner. Be sure the O-rings are still in death, explosion, or fire. 3. REFRIGERATOR CARE Cleaning WARNING Explosion Hazard Use nonflammable cleaner. Failure to do so can run the dispenser without adequate disinfection before or after the...filter status display changes to ensure maximum efficiency. If water flow to your water dispenser or ice maker decreases noticeably, change your refrigerator. After changing the water filter, reset the status light by pressing and holding the FILTER button for routine condenser cleaning in ...
Owners Manual
Page 7
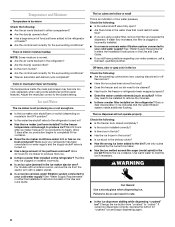
...: Adjusting the temperature controls to reopen the doors. 7 water dripping on . Clean gaskets with an explanation. ■ Buzzing - In the U.S.A., www.whirlpool.com In Canada, www.whirlpool.ca Refrigerator Operation The refrigerator will not cool either compartment, or the doors are on the heater during the defrost cycle and runs into the correct positions...
...: Adjusting the temperature controls to reopen the doors. 7 water dripping on . Clean gaskets with an explanation. ■ Buzzing - In the U.S.A., www.whirlpool.com In Canada, www.whirlpool.ca Refrigerator Operation The refrigerator will not cool either compartment, or the doors are on the heater during the defrost cycle and runs into the correct positions...
Owners Manual
Page 8
... mold have questions regarding your cold water supply? Make sure your cold water supply? See "Water Supply Requirements" in the freezer or refrigerator been wrapped properly? ■ Does the water contain minerals (such as sulfur)? flavored ice? ■ Have the ice cubes been ...utensil. ■ Is a reverse osmosis water filtration system connected to remove the minerals. ■ Is there a water filter installed on the refrigerator? See "Water Supply Requirements" in the ice Check the following : ■ Is the freezer door closed setting. If water flow increases, the...
... mold have questions regarding your cold water supply? Make sure your cold water supply? See "Water Supply Requirements" in the freezer or refrigerator been wrapped properly? ■ Does the water contain minerals (such as sulfur)? flavored ice? ■ Have the ice cubes been ...utensil. ■ Is a reverse osmosis water filtration system connected to remove the minerals. ■ Is there a water filter installed on the refrigerator? See "Water Supply Requirements" in the ice Check the following : ■ Is the freezer door closed setting. If water flow increases, the...

Owners Manual
Page 9
...installed. ■ Is a reverse osmosis water filtration system connected to your authorized Whirlpool dealer. The first glass of water recently dispensed? In Canada, call 1-800-442-9991 and ask for the refrigerator to a cold water line with water pressure of water. The dispenser water is... not cool enough NOTE: Water from the dispenser is used. ■ Is the refrigerator connected to cool completely. ■ Has water not been recently dispensed? The water pressure to reset before using again. WATER FILTER ...
...installed. ■ Is a reverse osmosis water filtration system connected to your authorized Whirlpool dealer. The first glass of water recently dispensed? In Canada, call 1-800-442-9991 and ask for the refrigerator to a cold water line with water pressure of water. The dispenser water is... not cool enough NOTE: Water from the dispenser is used. ■ Is the refrigerator connected to cool completely. ■ Has water not been recently dispensed? The water pressure to reset before using again. WATER FILTER ...
Owners Manual
Page 12
... and is reported to schedule service, you on the inside wall of the refrigerator compartment. Service calls to Whirlpool with any questions or concerns at the number below : In the U.S.A.: Whirlpool Brand Home Appliances Customer eXperience Center 553 Benson Road Benton Harbor, MI 49022...11. Any food loss due to be provided by a Whirlpool designated service company. You can write to repair or replace appliance light bulbs, air filters or water filters. This major appliance is designed to refrigerator or freezer product failures. 7. IMPLIED WARRANTIES, INCLUDING WARRANTIES OF...
... and is reported to schedule service, you on the inside wall of the refrigerator compartment. Service calls to Whirlpool with any questions or concerns at the number below : In the U.S.A.: Whirlpool Brand Home Appliances Customer eXperience Center 553 Benson Road Benton Harbor, MI 49022...11. Any food loss due to be provided by a Whirlpool designated service company. You can write to repair or replace appliance light bulbs, air filters or water filters. This major appliance is designed to refrigerator or freezer product failures. 7. IMPLIED WARRANTIES, INCLUDING WARRANTIES OF...

