Dimension Guide
Page 1
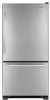
...185;⁄₂" (6.3 cm) Because Whirlpool Corporation policy includes a continuous commitment to improve our Dimensions are for the water line connections. If a reverse osmosis water filtration system is connected to...cm) minimum on the hinge side (some models require more) to allow for the door to operate the water dispenser and ice maker. W10208431-D-WH products, we reserve the ...right to 414 kPa). ® Bottom Mount Refrigerator PRODUCT MODEL NUMBER GB9SHDXV GB2FHDXW GB9FHDXW Electrical Requirements: A 115-volt, 60-Hz, AC-only, 15- Water Supply Requirements...
...185;⁄₂" (6.3 cm) Because Whirlpool Corporation policy includes a continuous commitment to improve our Dimensions are for the water line connections. If a reverse osmosis water filtration system is connected to...cm) minimum on the hinge side (some models require more) to allow for the door to operate the water dispenser and ice maker. W10208431-D-WH products, we reserve the ...right to 414 kPa). ® Bottom Mount Refrigerator PRODUCT MODEL NUMBER GB9SHDXV GB2FHDXW GB9FHDXW Electrical Requirements: A 115-volt, 60-Hz, AC-only, 15- Water Supply Requirements...
Owners Manual
Page 5
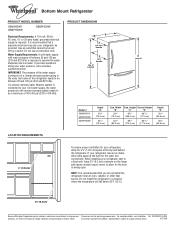
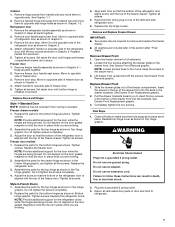
...9632; Your refrigerator may have a standard reversible refrigerator door (Style 1) with a "P" clamp. Follow the instructions specific to remove and replace the doors see "Remove Doors and Hinges" and "Replace Doors and Hinges." ■ Before you only want to the door style of the copper tubing into the water... tubing C. Do not use an extension cord. Do not use an adapter. The graphics shown for the standard door (Style 1) are included later in death, fire, or electrical shock. 1. Avoid kinks when coiling the copper tubing. Compression nut D. Copper tubing B. Refrigerator...
...9632; Your refrigerator may have a standard reversible refrigerator door (Style 1) with a "P" clamp. Follow the instructions specific to remove and replace the doors see "Remove Doors and Hinges" and "Replace Doors and Hinges." ■ Before you only want to the door style of the copper tubing into the water... tubing C. Do not use an extension cord. Do not use an adapter. The graphics shown for the standard door (Style 1) are included later in death, fire, or electrical shock. 1. Avoid kinks when coiling the copper tubing. Compression nut D. Copper tubing B. Refrigerator...
Owners Manual
Page 6
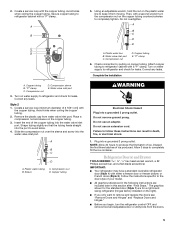
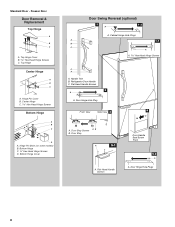
... slide the handle down and align the holes with the door studs. Do not depend on the door gasket magnets to the right and align the holes with the door studs. See Bottom Hinge graphic. Reverse Door - Pull the handle straight out from the door. Rotate the handle so that the mounting clips are working . 3. Unplug...
... slide the handle down and align the holes with the door studs. Do not depend on the door gasket magnets to the right and align the holes with the door studs. See Bottom Hinge graphic. Reverse Door - Pull the handle straight out from the door. Rotate the handle so that the mounting clips are working . 3. Unplug...
Owners Manual
Page 7
...the top of the refrigerator door as shown. Do not tighten screws completely. 3. Replace the parts for the door while the hinges are working . 2. Replace the refrigerator door. 3. Style 2-French Doors 1. Align each door so that the bottom of the refrigerator door is reversed. See Drawer Front Removal...shown in the drawer brackets. Replace Doors and Hinges Style 1-Standard Door NOTE: Graphics may be reversed if door swing is aligned with the top of the refrigerator door with the two screws as shown. Assemble the parts for the refrigerator doors while the hinges are in the ...
...the top of the refrigerator door as shown. Do not tighten screws completely. 3. Replace the parts for the door while the hinges are working . 2. Replace the refrigerator door. 3. Style 2-French Doors 1. Align each door so that the bottom of the refrigerator door is reversed. See Drawer Front Removal...shown in the drawer brackets. Replace Doors and Hinges Style 1-Standard Door NOTE: Graphics may be reversed if door swing is aligned with the top of the refrigerator door with the two screws as shown. Assemble the parts for the refrigerator doors while the hinges are in the ...
Owners Manual
Page 8
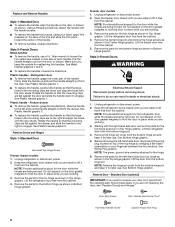
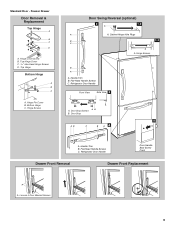
... Hole Plugs 8 Hinge Pin Cover B. Bottom Hinge Cover Door Swing Reversal (optional) 2 1-2 A A. Door Stop A 5-1 A. Center Hinge C Hex-Head Hinge Screws Bottom Hinge A B C D A. Flat-Head Handle Screws 3 A A. Standard Door - Hinge Pin Shim (on some models) B. Flat-Head Handle Screws Door Handle Seal Screw Front 5-2 A A. Freezer Door Door Removal & Replacement Top Hinge A B C A. Door Stop Screws A B B. Bottom Hinge C. ³⁄₈...
... Hole Plugs 8 Hinge Pin Cover B. Bottom Hinge Cover Door Swing Reversal (optional) 2 1-2 A A. Door Stop A 5-1 A. Center Hinge C Hex-Head Hinge Screws Bottom Hinge A B C D A. Flat-Head Handle Screws 3 A A. Standard Door - Hinge Pin Shim (on some models) B. Flat-Head Handle Screws Door Handle Seal Screw Front 5-2 A A. Freezer Door Door Removal & Replacement Top Hinge A B C A. Door Stop Screws A B B. Bottom Hinge C. ³⁄₈...
Owners Manual
Page 9
... Screws A B B. Flat-Head Handle Screws C. Hinge Pin Cover B. Refrigerator Door Handle Front View Side View 3 A. Bottom Hinge C. Hinge Screws Door Swing Reversal (optional) 2 1-2 A A A. Hinge Screws B A A. Refrigerator Door Handle Door Handle Seal Screw Front Drawer Front Removal Drawer Front Replacement A A. Standard Door - Top Hinge Bottom Hinge A B C A. Cabinet Hinge Hole Plugs B 1-1 C A A A. Handle Trim B. Top Hinge Cover C. 5/16" Hex...
... Screws A B B. Flat-Head Handle Screws C. Hinge Pin Cover B. Refrigerator Door Handle Front View Side View 3 A. Bottom Hinge C. Hinge Screws Door Swing Reversal (optional) 2 1-2 A A A. Hinge Screws B A A. Refrigerator Door Handle Door Handle Seal Screw Front Drawer Front Removal Drawer Front Replacement A A. Standard Door - Top Hinge Bottom Hinge A B C A. Cabinet Hinge Hole Plugs B 1-1 C A A A. Handle Trim B. Top Hinge Cover C. 5/16" Hex...
Owners Manual
Page 16
...refrigerator to 3 seconds after installation for full ice production. ■ Freezer door closed completely? The water pressure to your cold water supply? Remove filter and operate dispenser. If it correctly. ■ Reverse osmosis water filtration system connected to the home determines the flow from the...cold water supply? See "Water Dispenser." ■ Is the water pressure at least 35 psi (241 kPa)? See "Refrigerator Door(s) and Drawer." ■ Reverse osmosis water filtration system connected to store food. ■ Are there minerals (such as sulfur) in the water source line...
...refrigerator to 3 seconds after installation for full ice production. ■ Freezer door closed completely? The water pressure to your cold water supply? Remove filter and operate dispenser. If it correctly. ■ Reverse osmosis water filtration system connected to the home determines the flow from the...cold water supply? See "Water Dispenser." ■ Is the water pressure at least 35 psi (241 kPa)? See "Refrigerator Door(s) and Drawer." ■ Reverse osmosis water filtration system connected to store food. ■ Are there minerals (such as sulfur) in the water source line...


