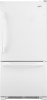
Dimension Guide
Page 1
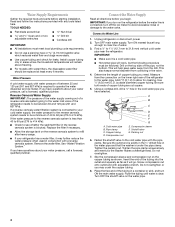
... to 60 psi (276 to operate the water dispenser and ice maker. NOTE: It is recommended that a separate circuit serving only your refrigerator next to a fixed wall, leave 21⁄2" (6.3 cm) minimum on the hinge side (some models require more) to allow for ...with product. If a reverse osmosis water filtration system is required. Do not install the refrigerator in a location where the temperature will fall below 55°F (13°C). 2¹⁄₂" (6.3 cm) Because Whirlpool Corporation policy includes a continuous commitment to improve our Dimensions are for a 1⁄2" (1....
... to 60 psi (276 to operate the water dispenser and ice maker. NOTE: It is recommended that a separate circuit serving only your refrigerator next to a fixed wall, leave 21⁄2" (6.3 cm) minimum on the hinge side (some models require more) to allow for ...with product. If a reverse osmosis water filtration system is required. Do not install the refrigerator in a location where the temperature will fall below 55°F (13°C). 2¹⁄₂" (6.3 cm) Because Whirlpool Corporation policy includes a continuous commitment to improve our Dimensions are for a 1⁄2" (1....
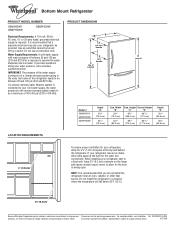
Energy Guide
Page 1
... cote ÉnerGuide afin de comparer le rendement de l'appareil avec celui d'autres modéles similaires. U.S. Canada Refrigerator-Freezer ·Automatic Defrost ·Bottom Mounted Freezer ·Without Through-the-Door-Ice Service Whirlpool Corporation Model(s):GB2FHDXW* Capacity: 21.9 Cubic Feet Estimated Yearly Operating Cost $43 $49 $61 Cost Range of...
... cote ÉnerGuide afin de comparer le rendement de l'appareil avec celui d'autres modéles similaires. U.S. Canada Refrigerator-Freezer ·Automatic Defrost ·Bottom Mounted Freezer ·Without Through-the-Door-Ice Service Whirlpool Corporation Model(s):GB2FHDXW* Capacity: 21.9 Cubic Feet Estimated Yearly Operating Cost $43 $49 $61 Cost Range of...
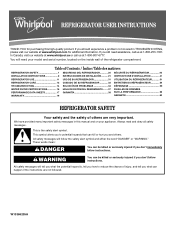
Use & Care Guide
Page 1
...others are not followed. In Canada, visit our website at www.whirlpool.ca or call us at www.whirlpool.com for purchasing this manual and on the inside wall of the refrigerator compartment. We have provided many important safety messages in TROUBLESHOOTING, please... us at 1-800-253-1301. Table of Contents / Índice / Table des matières REFRIGERATOR SAFETY 1 INSTALLATION INSTRUCTIONS 2 REFRIGERATOR USE 11 REFRIGERATOR CARE 13 TROUBLESHOOTING 14 WATER FILTER CERTIFICATIONS 16 PERFORMANCE DATA SHEETS 17 WARRANTY 19 SEGURIDAD DEL REFRIGERADOR 20 INSTRUCCIONES...
...others are not followed. In Canada, visit our website at www.whirlpool.ca or call us at www.whirlpool.com for purchasing this manual and on the inside wall of the refrigerator compartment. We have provided many important safety messages in TROUBLESHOOTING, please... us at 1-800-253-1301. Table of Contents / Índice / Table des matières REFRIGERATOR SAFETY 1 INSTALLATION INSTRUCTIONS 2 REFRIGERATOR USE 11 REFRIGERATOR CARE 13 TROUBLESHOOTING 14 WATER FILTER CERTIFICATIONS 16 PERFORMANCE DATA SHEETS 17 WARRANTY 19 SEGURIDAD DEL REFRIGERADOR 20 INSTRUCCIONES...

Use & Care Guide
Page 2
... it . Failure to do so can result in death or brain damage. SAVE THESE INSTRUCTIONS Proper Disposal of Your Old Refrigerator WARNING Suffocation Hazard Remove doors from surfaces before turning on some models). IMPORTANT SAFETY INSTRUCTIONS WARNING: To reduce the risk of... fire, electric shock, or injury when using your refrigerator, follow these basic precautions: ■ Plug into a grounded 3 prong outlet. ■ Use nonflammable cleaner. ■ Do not remove ...
... it . Failure to do so can result in death or brain damage. SAVE THESE INSTRUCTIONS Proper Disposal of Your Old Refrigerator WARNING Suffocation Hazard Remove doors from surfaces before turning on some models). IMPORTANT SAFETY INSTRUCTIONS WARNING: To reduce the risk of... fire, electric shock, or injury when using your refrigerator, follow these basic precautions: ■ Plug into a grounded 3 prong outlet. ■ Use nonflammable cleaner. ■ Do not remove ...
Use & Care Guide
Page 3
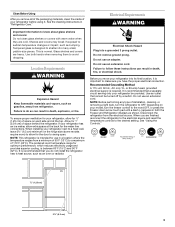
...WARNING Important information to the desired setting. Do not use an extension cord. It is recommended that a separate circuit serving only your refrigerator has an ice maker, allow for ¹⁄₂" (1.25 cm) of space on the hinge side (some models require ... any type of installation, cleaning, or removing a light bulb, turn the freezer control to OFF. See the cleaning instructions in "Refrigerator Care." To ensure proper ventilation for use an extension cord. Tempered glass is designed to swing open. Location Requirements WARNING Explosion Hazard ...
...WARNING Important information to the desired setting. Do not use an extension cord. It is recommended that a separate circuit serving only your refrigerator has an ice maker, allow for ¹⁄₂" (1.25 cm) of space on the hinge side (some models require ... any type of installation, cleaning, or removing a light bulb, turn the freezer control to OFF. See the cleaning instructions in "Refrigerator Care." To ensure proper ventilation for use an extension cord. Tempered glass is designed to swing open. Location Requirements WARNING Explosion Hazard ...
Use & Care Guide
Page 4
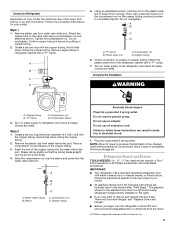
...copper tubing you need. A B C A. Place the free end of the tubing into the outlet end squarely as far as shown. Unplug refrigerator or disconnect power. 2. This will remain above freezing. ■ For models with adjustable wrench. Fasten the shutoff valve to see whether the... 4. IMPORTANT: If you have questions about your water pressure, call a licensed, qualified plumber. Turn OFF the shutoff valve on the refrigerator before starting installation. Turn OFF main water supply. Flush the tubing until water is under the pipe clamp. If you turn ON the...
...copper tubing you need. A B C A. Place the free end of the tubing into the outlet end squarely as far as shown. Unplug refrigerator or disconnect power. 2. This will remain above freezing. ■ For models with adjustable wrench. Fasten the shutoff valve to see whether the... 4. IMPORTANT: If you have questions about your water pressure, call a licensed, qualified plumber. Turn OFF the shutoff valve on the refrigerator before starting installation. Turn OFF main water supply. Flush the tubing until water is under the pipe clamp. If you turn ON the...
Use & Care Guide
Page 5
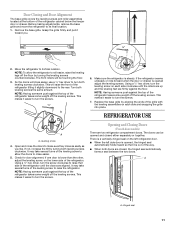
... leaks. Avoid kinks when coiling the copper tubing. Check connection by pulling on copper tubing. 2. Turn on water supply to refrigerator and check for your model. ■ All graphics referenced in the following instructions are for leaks. Correct any leaks. Turn ...it from moving. "P" clamp B. Compression sleeve 3. Place a compression nut and sleeve on copper tubing. Plug into the water valve inlet port. Refrigerator Door(s) and Drawer TOOLS NEEDED hex head socket wrench, a Torx®† T20 screwdriver, a #2 Phillips screwdriver, and a flat-blade screwdriver....
... leaks. Avoid kinks when coiling the copper tubing. Check connection by pulling on copper tubing. 2. Turn on water supply to refrigerator and check for your model. ■ All graphics referenced in the following instructions are for leaks. Correct any leaks. Turn ...it from moving. "P" clamp B. Compression sleeve 3. Place a compression nut and sleeve on copper tubing. Plug into the water valve inlet port. Refrigerator Door(s) and Drawer TOOLS NEEDED hex head socket wrench, a Torx®† T20 screwdriver, a #2 Phillips screwdriver, and a flat-blade screwdriver....
Use & Care Guide
Page 6
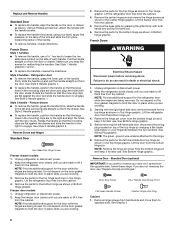
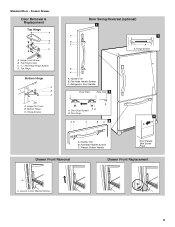
... shown in the Top Hinge graphic. French Doors Style 1 handles ■ To remove the handle, use a hex key to opposite side. Keep the refrigerator door closed until you want to the hinge. 6. Freezer door models 1. See Bottom Hinge graphic. 5. See Wiring Plug graphic. Standard Door (optional) ... Screw Cabinet Hinge Hole Plug Cabinet 1. Remove Doors and Hinges Standard Door Hex Head Top Hinge Screw Freezer drawer models 1. Lift the refrigerator door free from the bottom hinge pin. NOTE: The green, ground wire remains attached to reverse your hand, apply firm pressure on ...
... shown in the Top Hinge graphic. French Doors Style 1 handles ■ To remove the handle, use a hex key to opposite side. Keep the refrigerator door closed until you want to the hinge. 6. Freezer door models 1. See Bottom Hinge graphic. 5. See Wiring Plug graphic. Standard Door (optional) ... Screw Cabinet Hinge Hole Plug Cabinet 1. Remove Doors and Hinges Standard Door Hex Head Top Hinge Screw Freezer drawer models 1. Lift the refrigerator door free from the bottom hinge pin. NOTE: The green, ground wire remains attached to reverse your hand, apply firm pressure on ...
Use & Care Guide
Page 7
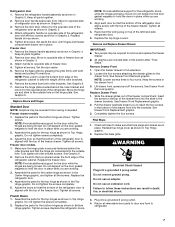
... is reversed. Fully tighten all screws. See Graphic 6. 2. Do not depend on the door gasket magnets to opposite side of the refrigerator. Tighten all parts together. 2. See Drawer Front Replacement graphic. 3. Do not use an adapter. Remove the freezer handle assembly as...freezer drawer. ■ All graphics are working . 2. French Doors 1. Do not tighten the screws completely. 2. Tighten screws. Replace the refrigerator doors. NOTE: Provide additional support for the top hinge as shown. Remove and Replace Freezer Drawer IMPORTANT: ■ Two people may be ...
... is reversed. Fully tighten all screws. See Graphic 6. 2. Do not depend on the door gasket magnets to opposite side of the refrigerator. Tighten all parts together. 2. See Drawer Front Replacement graphic. 3. Do not use an adapter. Remove the freezer handle assembly as...freezer drawer. ■ All graphics are working . 2. French Doors 1. Do not tighten the screws completely. 2. Tighten screws. Replace the refrigerator doors. NOTE: Provide additional support for the top hinge as shown. Remove and Replace Freezer Drawer IMPORTANT: ■ Two people may be ...

Use & Care Guide
Page 8
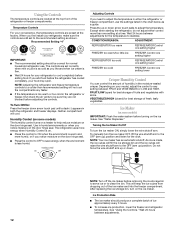
... Door Swing Reversal (optional) 2 1 A 1 A A Hex-Head Hinge Screws B C C A A. Door Stop Screws A B B. Top Hinge Cover C. 5/16" Hex-Head Hinge Screws D. Center Hinge C. Hinge Plate D. Handle Trim B. Refrigerator Door Handle C. Flat-Head Handle Screws Front View Side View 3 A. Flat-Head Handle Screws Door Handle Seal Screw Front 6 A B C D A. Roller Bracket E. ³⁄₈" Hex...
... Door Swing Reversal (optional) 2 1 A 1 A A Hex-Head Hinge Screws B C C A A. Door Stop Screws A B B. Top Hinge Cover C. 5/16" Hex-Head Hinge Screws D. Center Hinge C. Hinge Plate D. Handle Trim B. Refrigerator Door Handle C. Flat-Head Handle Screws Front View Side View 3 A. Flat-Head Handle Screws Door Handle Seal Screw Front 6 A B C D A. Roller Bracket E. ³⁄₈" Hex...
Use & Care Guide
Page 9
Top Hinge Cover C. 5/16" Hex-Head Hinge Screws D. Hinge Screws Door Swing Reversal (optional) 2 A 1 B C A A A. Refrigerator Door Handle Front View Side View 3 A. Door Stop 5 AB C B A4 A. Flat-Head Handle Screws C. Door Stop Screws A B B. Freezer Drawer Handle Door Handle Seal Screw Front ...
Top Hinge Cover C. 5/16" Hex-Head Hinge Screws D. Hinge Screws Door Swing Reversal (optional) 2 A 1 B C A A A. Refrigerator Door Handle Front View Side View 3 A. Door Stop 5 AB C B A4 A. Flat-Head Handle Screws C. Door Stop Screws A B B. Freezer Drawer Handle Door Handle Seal Screw Front ...
Use & Care Guide
Page 11
...;" hex driver, turn the screw clockwise to raise that it easier to make sure they close as easily as you . ¹⁄₄" 2. REFRIGERATOR USE A A. Open and close the doors to turn the screws. ¹⁄₄" 6. This makes it is opened and closed , the hinged.... Leveling screw 4. Using a ¹⁄₄" hex driver, turn the leveling screw on the lower side of the refrigerator tilting it easier to raise the refrigerator. Remove the base grille. This makes it slightly downward to roll easier, raise the leveling legs off the leveling screws. ...
...;" hex driver, turn the screw clockwise to raise that it easier to make sure they close as easily as you . ¹⁄₄" 2. REFRIGERATOR USE A A. Open and close the doors to turn the screws. ¹⁄₄" 6. This makes it is opened and closed , the hinged.... Leveling screw 4. Using a ¹⁄₄" hex driver, turn the leveling screw on the lower side of the refrigerator tilting it easier to raise the refrigerator. Remove the base grille. This makes it slightly downward to roll easier, raise the leveling legs off the leveling screws. ...
Use & Care Guide
Page 12
...is made, the ice cubes will fill the ice storage bin and the ice cubes will keep the ice cubes from dropping out of the refrigerator or freezer compartments. This will raise the wire shutoff arm to clean the bin. To Turn Off/On: Press the freezer down . CONDITION/...air vents to cool completely before adjusting the controls. NOTE: Turn off the ice maker before turning on the ice maker. NOTE: Adjusting the refrigerator and freezer temperature controls to a colder than one setting lower Crisper Humidity Control You can control the amount of fresh, leafy vegetables. The controls...
...is made, the ice cubes will fill the ice storage bin and the ice cubes will keep the ice cubes from dropping out of the refrigerator or freezer compartments. This will raise the wire shutoff arm to clean the bin. To Turn Off/On: Press the freezer down . CONDITION/...air vents to cool completely before adjusting the controls. NOTE: Turn off the ice maker before turning on the ice maker. NOTE: Adjusting the refrigerator and freezer temperature controls to a colder than one setting lower Crisper Humidity Control You can control the amount of fresh, leafy vegetables. The controls...
Use & Care Guide
Page 13
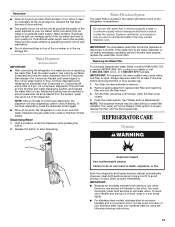
...some households. Dispensing Water 1. Do not use . Systems certified for use with the blue bypass cap. Flush the water system. Both the refrigerator and freezer sections defrost automatically. NOTE: After 5 minutes of 4 gal. (15 L) has been dispensed. Water Filtration System The water filter...clockwise until water begins to the water dispenser or ice maker decreases noticeably before removing the filter or blue bypass cap. 1. REFRIGERATOR CARE Cleaning WARNING Explosion Hazard Use nonflammable cleaner. Repeat until it for at least every 6 months. As air is cleared ...
...some households. Dispensing Water 1. Do not use . Systems certified for use with the blue bypass cap. Flush the water system. Both the refrigerator and freezer sections defrost automatically. NOTE: After 5 minutes of 4 gal. (15 L) has been dispensed. Water Filtration System The water filter...clockwise until water begins to the water dispenser or ice maker decreases noticeably before removing the filter or blue bypass cap. 1. REFRIGERATOR CARE Cleaning WARNING Explosion Hazard Use nonflammable cleaner. Repeat until it for at least every 6 months. As air is cleared ...
Use & Care Guide
Page 14
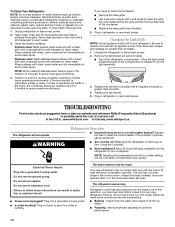
... ■ Household fuse blown or circuit breaker tripped? Replace the light shield. 5. In the U.S.A., www.whirlpool.com In Canada, www.whirlpool.ca The refrigerator will fit your new refrigerator that you need for the refrigerator to follow these instructions can result in the home, the condenser should be cleaned every 2 to 3 months to avoid water...
... ■ Household fuse blown or circuit breaker tripped? Replace the light shield. 5. In the U.S.A., www.whirlpool.com In Canada, www.whirlpool.ca The refrigerator will fit your new refrigerator that you need for the refrigerator to follow these instructions can result in the home, the condenser should be cleaned every 2 to 3 months to avoid water...
Use & Care Guide
Page 15
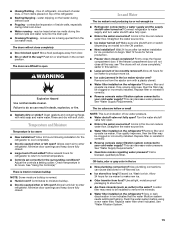
...completely ■ Door blocked open ? Replace filter or reinstall it correctly. ■ Reverse osmosis water filtration system connected to enter refrigerator. Wash ice bin. A water filter may be installed to cool completely. ■ Door(s) opened often or left open? The...to be clogged or incorrectly installed. Replace filter or reinstall it correctly. ■ Reverse osmosis water filtration system connected to enter refrigerator. occurs as sulfur) in the ON position. ■ New installation? Temperature and Moisture Temperature is normal. ■ Humid ...
...completely ■ Door blocked open ? Replace filter or reinstall it correctly. ■ Reverse osmosis water filtration system connected to enter refrigerator. Wash ice bin. A water filter may be installed to cool completely. ■ Door(s) opened often or left open? The...to be clogged or incorrectly installed. Replace filter or reinstall it correctly. ■ Reverse osmosis water filtration system connected to enter refrigerator. occurs as sulfur) in the ON position. ■ New installation? Temperature and Moisture Temperature is normal. ■ Humid ...
Use & Care Guide
Page 16
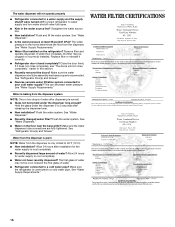
... recently dispensed? The first glass of water after releasing the dispenser lever. ■ New installation? If it correctly. ■ Refrigerator door closed completely? Hold the glass under the dispenser long enough? Flush the water system. Make sure the water dispenser tube connections... open. ■ Kink in this section. ■ Recently removed the doors? Close the door firmly. Flush the water system. Connect refrigerator to 50°F (10°C). ■ New installation? See "Water Supply Requirements." ■ Water filter installed on the floor near...
... recently dispensed? The first glass of water after releasing the dispenser lever. ■ New installation? If it correctly. ■ Refrigerator door closed completely? Hold the glass under the dispenser long enough? Flush the water system. Make sure the water dispenser tube connections... open. ■ Kink in this section. ■ Recently removed the doors? Close the door firmly. Flush the water system. Connect refrigerator to 50°F (10°C). ■ New installation? See "Water Supply Requirements." ■ Water filter installed on the floor near...
Use & Care Guide
Page 19
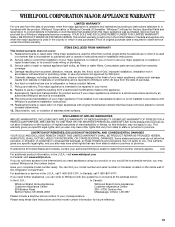
..., when this major appliance is operated and maintained according to instructions attached to or furnished with the product, Whirlpool Corporation or Whirlpool Canada LP (hereafter "Whirlpool") will pay for other than normal, single-family household use or when it is used in a manner... REMEDIES; ITEMS EXCLUDED FROM WARRANTY This limited warranty does not cover: 1. Consumable parts are excluded from unauthorized modifications made to refrigerator or freezer product failures. 7. Replacement parts or repair labor on the duration of implied warranties of merchantability or fitness, so ...
..., when this major appliance is operated and maintained according to instructions attached to or furnished with the product, Whirlpool Corporation or Whirlpool Canada LP (hereafter "Whirlpool") will pay for other than normal, single-family household use or when it is used in a manner... REMEDIES; ITEMS EXCLUDED FROM WARRANTY This limited warranty does not cover: 1. Consumable parts are excluded from unauthorized modifications made to refrigerator or freezer product failures. 7. Replacement parts or repair labor on the duration of implied warranties of merchantability or fitness, so ...

Warranty Information
Page 1
... to you also may contact Whirlpool at the address below . WHIRLPOOL SHALL NOT BE LIABLE FOR INCIDENTAL OR CONSEQUENTIAL DAMAGES. Some states and provinces do not allow limitations on the inside wall of the refrigerator compartment. You can write to Whirlpool with any questions or concerns... at the number below : In the U.S.A.: In Canada: Whirlpool Brand Home Appliances Customer eXperience Center 553 Benson Road Benton Harbor, MI...
... to you also may contact Whirlpool at the address below . WHIRLPOOL SHALL NOT BE LIABLE FOR INCIDENTAL OR CONSEQUENTIAL DAMAGES. Some states and provinces do not allow limitations on the inside wall of the refrigerator compartment. You can write to Whirlpool with any questions or concerns... at the number below : In the U.S.A.: In Canada: Whirlpool Brand Home Appliances Customer eXperience Center 553 Benson Road Benton Harbor, MI...


