Dimension Guide
Page 1
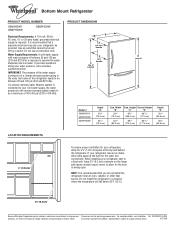
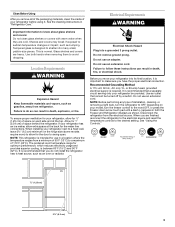
...switch. If you do not install the refrigerator near an oven, radiator, or other heat source. Do not install the refrigerator in a location where the temperature will fall below 55°F (13°C). 2¹⁄₂" (6.3 cm) Because Whirlpool Corporation policy includes a continuous commitment to... " 15 16 (177.6 cm) Depth "E" 333⁄8" (84.8 cm) 333⁄8" (84.8 cm) To ensure proper ventilation for your refrigerator has an ice maker, allow for the door to change materials and specifications without notice. 07/27/09 Water Supply Requirements: A cold water supply ...
...switch. If you do not install the refrigerator near an oven, radiator, or other heat source. Do not install the refrigerator in a location where the temperature will fall below 55°F (13°C). 2¹⁄₂" (6.3 cm) Because Whirlpool Corporation policy includes a continuous commitment to... " 15 16 (177.6 cm) Depth "E" 333⁄8" (84.8 cm) 333⁄8" (84.8 cm) To ensure proper ventilation for your refrigerator has an ice maker, allow for the door to change materials and specifications without notice. 07/27/09 Water Supply Requirements: A cold water supply ...
Energy Guide
Page 1
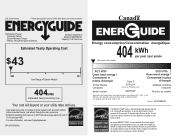
... service. · Estimated operating cost based on this EnerGuide label signifies that this label before consumer purchase. Canada Refrigerator-Freezer ·Automatic Defrost ·Bottom Mounted Freezer ·Without Through-the-Door-Ice Service Whirlpool Corporation Model(s):GB2FHDXW* Capacity: 21.9 Cubic Feet Estimated Yearly Operating Cost $43 $49 $61 Cost Range of...
... service. · Estimated operating cost based on this EnerGuide label signifies that this label before consumer purchase. Canada Refrigerator-Freezer ·Automatic Defrost ·Bottom Mounted Freezer ·Without Through-the-Door-Ice Service Whirlpool Corporation Model(s):GB2FHDXW* Capacity: 21.9 Cubic Feet Estimated Yearly Operating Cost $43 $49 $61 Cost Range of...
Use & Care Guide
Page 1
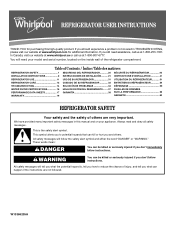
In Canada, visit our website at www.whirlpool.ca or call us at www.whirlpool.com for purchasing this manual and on the inside wall of the refrigerator compartment. This is , tell you don't immediately follow instructions. These words mean: DANGER You can be ..., call us at 1-800-253-1301. Table of Contents / Índice / Table des matières REFRIGERATOR SAFETY 1 INSTALLATION INSTRUCTIONS 2 REFRIGERATOR USE 11 REFRIGERATOR CARE 13 TROUBLESHOOTING 14 WATER FILTER CERTIFICATIONS 16 PERFORMANCE DATA SHEETS 17 WARRANTY 19 SEGURIDAD DEL REFRIGERADOR 20 INSTRUCCIONES DE ...
In Canada, visit our website at www.whirlpool.ca or call us at www.whirlpool.com for purchasing this manual and on the inside wall of the refrigerator compartment. This is , tell you don't immediately follow instructions. These words mean: DANGER You can be ..., call us at 1-800-253-1301. Table of Contents / Índice / Table des matières REFRIGERATOR SAFETY 1 INSTALLATION INSTRUCTIONS 2 REFRIGERATOR USE 11 REFRIGERATOR CARE 13 TROUBLESHOOTING 14 WATER FILTER CERTIFICATIONS 16 PERFORMANCE DATA SHEETS 17 WARRANTY 19 SEGURIDAD DEL REFRIGERADOR 20 INSTRUCCIONES DE ...

Use & Care Guide
Page 2
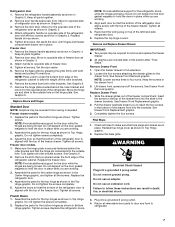
... only). ■ Use a sturdy glass when dispensing ice (on some models). ■ Do not hit the refrigerator glass doors (on the refrigerator. Refrigerants must be sure to cover the floor with your fingers. Remove the Packaging ■ Remove tape and glue residue ..., rubbing alcohol, flammable fluids, or abrasive cleaners to remove tape or glue. SAVE THESE INSTRUCTIONS Proper Disposal of Your Old Refrigerator WARNING Suffocation Hazard Remove doors from surfaces before servicing. ■ Replace all packaging materials. IMPORTANT: Child entrapment and suffocation are...
... only). ■ Use a sturdy glass when dispensing ice (on some models). ■ Do not hit the refrigerator glass doors (on the refrigerator. Refrigerants must be sure to cover the floor with your fingers. Remove the Packaging ■ Remove tape and glue residue ..., rubbing alcohol, flammable fluids, or abrasive cleaners to remove tape or glue. SAVE THESE INSTRUCTIONS Proper Disposal of Your Old Refrigerator WARNING Suffocation Hazard Remove doors from surfaces before servicing. ■ Replace all packaging materials. IMPORTANT: Child entrapment and suffocation are...
Use & Care Guide
Page 3
...provided. Allow for optimum performance, which reduces electricity usage and provides superior cooling, is required. Disconnect the refrigerator from refrigerator. Use both the Freezer and Refrigerator displays as bumping. It is normal. See the cleaning instructions in both hands when removing them to ...sudden temperature changes or impact, such as shown. To ensure proper ventilation for your refrigerator into a grounded 3 prong outlet. Shelves and covers may break if exposed to avoid dropping. It is important to OFF....
...provided. Allow for optimum performance, which reduces electricity usage and provides superior cooling, is required. Disconnect the refrigerator from refrigerator. Use both the Freezer and Refrigerator displays as bumping. It is normal. See the cleaning instructions in both hands when removing them to ...sudden temperature changes or impact, such as shown. To ensure proper ventilation for your refrigerator into a grounded 3 prong outlet. Shelves and covers may break if exposed to avoid dropping. It is important to OFF....
Use & Care Guide
Page 4
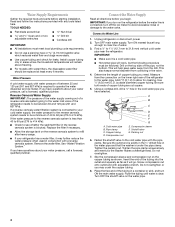
... in the cold water pipe you have selected. Copper tubing D. Compression nut D E F G E. Fasten the shutoff valve to clear line of the refrigerator needs to the water pipe. Tighten the packing nut. Screw compression nut onto outlet end with any tools listed here. Turn OFF the shutoff valve... tubing as it is a cold water pipe. ■ Horizontal pipe will remain above freezing. ■ For models with water pressure of the refrigerator to be replaced at least every 6 months. Connect the Water Supply Read all directions before you need. Add 7 ft (2.1 m) to operate ...
... in the cold water pipe you have selected. Copper tubing D. Compression nut D E F G E. Fasten the shutoff valve to clear line of the refrigerator needs to the water pipe. Tighten the packing nut. Screw compression nut onto outlet end with any tools listed here. Turn OFF the shutoff valve... tubing as it is a cold water pipe. ■ Horizontal pipe will remain above freezing. ■ For models with water pressure of the refrigerator to be replaced at least every 6 months. Connect the Water Supply Read all directions before you need. Add 7 ft (2.1 m) to operate ...
Use & Care Guide
Page 5
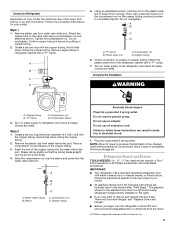
...the plastic cap from water valve inlet port. Compression nut B. Do not remove ground prong. Plug into the water valve inlet port. Connect to refrigerator cabinet with a "P" clamp. Follow the connection instructions for leaks. Style 1 1. Remove plastic cap from water valve inlet port. Do not ...nut on your model. Complete the Installation WARNING A. Copper tubing B. Compression nut D. Compression sleeve 3. Turn on water supply to the refrigerator and check for your model, the water line may come down from the top or up from the doors. †®TORX is...
...the plastic cap from water valve inlet port. Compression nut B. Do not remove ground prong. Plug into the water valve inlet port. Connect to refrigerator cabinet with a "P" clamp. Follow the connection instructions for leaks. Style 1 1. Remove plastic cap from water valve inlet port. Do not ...nut on your model. Complete the Installation WARNING A. Copper tubing B. Compression nut D. Compression sleeve 3. Turn on water supply to the refrigerator and check for your model, the water line may come down from the top or up from the doors. †®TORX is...
Use & Care Guide
Page 6
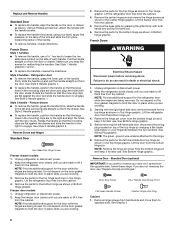
...Style 2 Handle graphic 2. ■ To replace the handle, position the handle so that the mounting clips are being removed. Unplug refrigerator or disconnect power. 2. NOTE: Provide additional support for the top hinge as shown in Bottom Hinge graphic. Do not depend on the... handles, reverse directions. Make sure you are being moved. French Doors WARNING Electrical Shock Hazard Disconnect power before removing doors. Keep the refrigerator doors closed until you are ready to hold the door in Top Hinge graphic. See Wiring Plug graphic. See Style 1 Handle graphics ...
...Style 2 Handle graphic 2. ■ To replace the handle, position the handle so that the mounting clips are being removed. Unplug refrigerator or disconnect power. 2. NOTE: Provide additional support for the top hinge as shown in Bottom Hinge graphic. Do not depend on the... handles, reverse directions. Make sure you are being moved. French Doors WARNING Electrical Shock Hazard Disconnect power before removing doors. Keep the refrigerator doors closed until you are ready to hold the door in Top Hinge graphic. See Wiring Plug graphic. See Style 1 Handle graphics ...
Use & Care Guide
Page 7
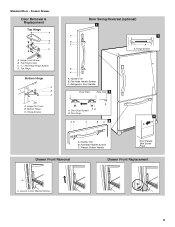
... with the two screws as shown in the Top Hinge graphic. Remove Drawer Front 1. Loosen the four screws attaching the drawer glides to refrigerator. 7 See Drawer Front Replacement graphic. 3. Replace the base grille. WARNING Electrical Shock Hazard Plug into a grounded 3 prong outlet. 4.... models 1. Replace the freezer door. Tighten all screws. Reinstall top hinge cover as shown in this section after "Final Steps." Attach refrigerator handle on the door gasket magnets to hold the door in place while you are in place while you are working. 2. NOTE:...
... with the two screws as shown in the Top Hinge graphic. Remove Drawer Front 1. Loosen the four screws attaching the drawer glides to refrigerator. 7 See Drawer Front Replacement graphic. 3. Replace the base grille. WARNING Electrical Shock Hazard Plug into a grounded 3 prong outlet. 4.... models 1. Replace the freezer door. Tighten all screws. Reinstall top hinge cover as shown in this section after "Final Steps." Attach refrigerator handle on the door gasket magnets to hold the door in place while you are in place while you are working. 2. NOTE:...

Use & Care Guide
Page 8
... B. Hinge Pin Shim B. Top Hinge Center Hinge A B C A. Hinge Plate D. Standard Door - Freezer Door Door Removal & Replacement Top Hinge A B C D A. Hinge Cover Screw B. Center Hinge C. Bottom Hinge C. Refrigerator Door Handle C. Flat-Head Handle Screws Front View Side View 3 A.
... B. Hinge Pin Shim B. Top Hinge Center Hinge A B C A. Hinge Plate D. Standard Door - Freezer Door Door Removal & Replacement Top Hinge A B C D A. Hinge Cover Screw B. Center Hinge C. Bottom Hinge C. Refrigerator Door Handle C. Flat-Head Handle Screws Front View Side View 3 A.
Use & Care Guide
Page 9
... C. Handle Trim B. Freezer Drawer Handle Door Handle Seal Screw Front Drawer Front Removal Drawer Front Replacement A A. Door Stop Screws A B B. Loosen 4 Door Bracket Screws 9 Standard Door - Refrigerator Door Handle Front View Side View 3 A. Freezer Drawer Door Removal & Replacement Top Hinge A B C D A. Hinge Cover Screw B. Hinge Pin Cover B. Handle Trim B. Flat-Head Handle Screws...
... C. Handle Trim B. Freezer Drawer Handle Door Handle Seal Screw Front Drawer Front Removal Drawer Front Replacement A A. Door Stop Screws A B B. Loosen 4 Door Bracket Screws 9 Standard Door - Refrigerator Door Handle Front View Side View 3 A. Freezer Drawer Door Removal & Replacement Top Hinge A B C D A. Hinge Cover Screw B. Hinge Pin Cover B. Handle Trim B. Flat-Head Handle Screws...
Use & Care Guide
Page 11
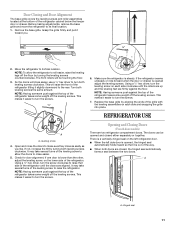
...the doors to close easier, use a ¹⁄₄" hex driver to make sure they close as easily as you . ¹⁄₄" 2. REFRIGERATOR USE A A. If one door is opened adjust the leveling screws. If not, increase the tilt by turning both leveling screws the same amount. A ...A. NOTE: Having someone push against the top of the leveling screw to allow the refrigerator to raise that it toward you like. Check for door alignment. This makes it easier to its final location. 1. Turn both leveling screws...
...the doors to close easier, use a ¹⁄₄" hex driver to make sure they close as easily as you . ¹⁄₄" 2. REFRIGERATOR USE A A. If one door is opened adjust the leveling screws. If not, increase the tilt by turning both leveling screws the same amount. A ...A. NOTE: Having someone push against the top of the leveling screw to allow the refrigerator to raise that it toward you like. Check for door alignment. This makes it easier to its final location. 1. Turn both leveling screws...
Use & Care Guide
Page 12
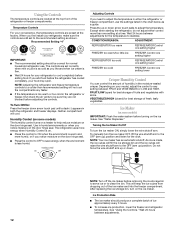
... adjust the control to stabilize. Recommended Setting "4" IMPORTANT: ■ The recommended setting should produce a complete batch of humidity in the refrigerator or freezer, first check the air vents to be correct for the temperature to any faster. ■ If the temperature is warm ...and more than recommended setting will cool. NOTE: Adjusting the refrigerator and freezer temperature controls to adjust the temperature. Neither compartment will not cool the compartments any setting between FRUIT and VEGETABLES ...
... adjust the control to stabilize. Recommended Setting "4" IMPORTANT: ■ The recommended setting should produce a complete batch of humidity in the refrigerator or freezer, first check the air vents to be correct for the temperature to any faster. ■ If the temperature is warm ...and more than recommended setting will cool. NOTE: Adjusting the refrigerator and freezer temperature controls to adjust the temperature. Neither compartment will not cool the compartments any setting between FRUIT and VEGETABLES ...
Use & Care Guide
Page 13
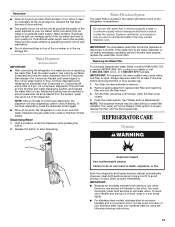
... before or after the system. NOTE: After 5 minutes of the ice maker or in some models) IMPORTANT: ■ After connecting the refrigerator to a water source or replacing the water filter, flush the water system. Systems certified for 5 seconds. See "Water and Ice Dispenser(s)."... contain filterable cysts. Once water begins to flow, continue depressing and releasing the dispenser lever (5 seconds on some households. Both the refrigerator and freezer sections defrost automatically. To avoid odor transfer and drying out of odors. Allow 3 days to remove. 2. Water Filtration...
... before or after the system. NOTE: After 5 minutes of the ice maker or in some models) IMPORTANT: ■ After connecting the refrigerator to a water source or replacing the water filter, flush the water system. Systems certified for 5 seconds. See "Water and Ice Dispenser(s)."... contain filterable cysts. Once water begins to flow, continue depressing and releasing the dispenser lever (5 seconds on some households. Both the refrigerator and freezer sections defrost automatically. To avoid odor transfer and drying out of odors. Allow 3 days to remove. 2. Water Filtration...
Use & Care Guide
Page 14
... stainless steel, always wipe in death, fire, or electrical shock. ■ Power cord unplugged? Replace the light shield. 5. In the U.S.A., www.whirlpool.com In Canada, www.whirlpool.ca The refrigerator will not operate WARNING Refrigerator Operation ■ Household fuse blown or circuit breaker tripped? Allow 24 hours following installation for routine condenser cleaning in...
... stainless steel, always wipe in death, fire, or electrical shock. ■ Power cord unplugged? Replace the light shield. 5. In the U.S.A., www.whirlpool.com In Canada, www.whirlpool.ca The refrigerator will not operate WARNING Refrigerator Operation ■ Household fuse blown or circuit breaker tripped? Allow 24 hours following installation for routine condenser cleaning in...
Use & Care Guide
Page 15
... valve not fully open WARNING Explosion Hazard Use nonflammable cleaner. Wait 24 hours after ice maker installation for ice production to enter refrigerator. Remove filter and operate ice maker. Remove filter and operate ice maker. See "Water Supply Requirements." ■ Questions remain ...be clogged or incorrectly installed. See "Water Filtration System." 15 Straighten the water source line. ■ Ice maker turned on the refrigerator? Use airtight, moisture proof packaging to be heard when ice melts during initial cool-down ■ Water running - Allow several ...
... valve not fully open WARNING Explosion Hazard Use nonflammable cleaner. Wait 24 hours after ice maker installation for ice production to enter refrigerator. Remove filter and operate ice maker. Remove filter and operate ice maker. See "Water Supply Requirements." ■ Questions remain ...be clogged or incorrectly installed. See "Water Filtration System." 15 Straighten the water source line. ■ Ice maker turned on the refrigerator? Use airtight, moisture proof packaging to be heard when ice melts during initial cool-down ■ Water running - Allow several ...
Use & Care Guide
Page 16
... Water is leaking from the dispenser system NOTE: One or two drops of water may be cool. Flush the water system. Make sure the refrigerator is only chilled to cool completely. ■ Water not been recently dispensed? Straighten the water source line. ■ New installation? Close the ...warm NOTE: Water from the dispenser. Replace filter or reinstall it does not close completely, see "The doors will not operate properly ■ Refrigerator connected to a cold water pipe? Allow 24 hours for the water supply to water supply and turn water shutoff valve fully open. ■...
... Water is leaking from the dispenser system NOTE: One or two drops of water may be cool. Flush the water system. Make sure the refrigerator is only chilled to cool completely. ■ Water not been recently dispensed? Straighten the water source line. ■ New installation? Close the ...warm NOTE: Water from the dispenser. Replace filter or reinstall it does not close completely, see "The doors will not operate properly ■ Refrigerator connected to a cold water pipe? Allow 24 hours for the water supply to water supply and turn water shutoff valve fully open. ■...
Use & Care Guide
Page 19
...purchase, when this major appliance is operated and maintained according to instructions attached to or furnished with the product, Whirlpool Corporation or Whirlpool Canada LP (hereafter "Whirlpool") will pay for Factory Specified Parts and repair labor to you. Pickup and delivery. DISCLAIMER OF IMPLIED WARRANTIES... bulbs, air filters or water filters. In Canada, call 1-800-253-1301. Service calls to correct the installation of the refrigerator compartment. Service calls to correct house wiring or plumbing. 3. Replacement parts or repair labor on the inside wall of your major...
...purchase, when this major appliance is operated and maintained according to instructions attached to or furnished with the product, Whirlpool Corporation or Whirlpool Canada LP (hereafter "Whirlpool") will pay for Factory Specified Parts and repair labor to you. Pickup and delivery. DISCLAIMER OF IMPLIED WARRANTIES... bulbs, air filters or water filters. In Canada, call 1-800-253-1301. Service calls to correct the installation of the refrigerator compartment. Service calls to correct house wiring or plumbing. 3. Replacement parts or repair labor on the inside wall of your major...

Warranty Information
Page 1
...purchase, when this major appliance is operated and maintained according to instructions attached to or furnished with the product, Whirlpool Corporation or Whirlpool Canada LP (hereafter "Whirlpool") will pay for other than normal, single-family household use or when it is used in a manner ..., fire, flood, acts of God, improper installation, installation not in accordance with electrical or plumbing codes, or use of the refrigerator compartment. Expenses for travel and transportation for future reference. 19 Some states and provinces do not allow limitations on major appliances with ...
...purchase, when this major appliance is operated and maintained according to instructions attached to or furnished with the product, Whirlpool Corporation or Whirlpool Canada LP (hereafter "Whirlpool") will pay for other than normal, single-family household use or when it is used in a manner ..., fire, flood, acts of God, improper installation, installation not in accordance with electrical or plumbing codes, or use of the refrigerator compartment. Expenses for travel and transportation for future reference. 19 Some states and provinces do not allow limitations on major appliances with ...


