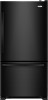
Dimension Guide
Page 1
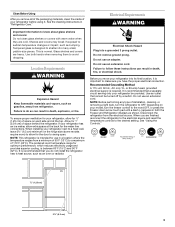
...of between 35 and 120 psi (241 and 827 kPa). Do not install the refrigerator in a location where the temperature will fall below 55°F (13°C). 2¹⁄₂" (6.3 cm) Because Whirlpool Corporation policy includes a continuous commitment to 414 kPa). Do not use an extension... cord. If a reverse osmosis water filtration system is connected to your refrigerator next to a fixed wall, leave 21⁄2" (6.3 cm) ...
...of between 35 and 120 psi (241 and 827 kPa). Do not install the refrigerator in a location where the temperature will fall below 55°F (13°C). 2¹⁄₂" (6.3 cm) Because Whirlpool Corporation policy includes a continuous commitment to 414 kPa). Do not use an extension... cord. If a reverse osmosis water filtration system is connected to your refrigerator next to a fixed wall, leave 21⁄2" (6.3 cm) ...
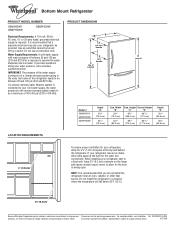
Energy Guide
Page 1
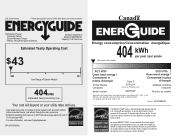
... this appliance compares to determine how this label before first retail purchase is an energy-efficient appliance. Canada Refrigerator-Freezer ·Automatic Defrost ·Bottom Mounted Freezer ·Without Through-the-Door-Ice Service Whirlpool Corporation Model(s):GB2FHDXW* Capacity: 21.9 Cubic Feet Estimated Yearly Operating Cost $43 $49 $61 Cost Range of...
... this appliance compares to determine how this label before first retail purchase is an energy-efficient appliance. Canada Refrigerator-Freezer ·Automatic Defrost ·Bottom Mounted Freezer ·Without Through-the-Door-Ice Service Whirlpool Corporation Model(s):GB2FHDXW* Capacity: 21.9 Cubic Feet Estimated Yearly Operating Cost $43 $49 $61 Cost Range of...
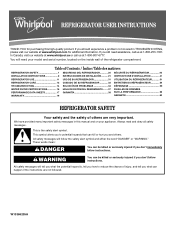
Use & Care Guide
Page 1
...the instructions are very important. W10366205A Table of Contents / Índice / Table des matières REFRIGERATOR SAFETY 1 INSTALLATION INSTRUCTIONS 2 REFRIGERATOR USE 11 REFRIGERATOR CARE 13 TROUBLESHOOTING 14 WATER FILTER CERTIFICATIONS 16 PERFORMANCE DATA SHEETS 17 WARRANTY 19 SEGURIDAD DEL REFRIGERADOR 20 .... All safety messages will need assistance, call us at www.whirlpool.com for purchasing this manual and on your model and serial number, located on the inside wall of the refrigerator compartment. You will follow the safety alert symbol and either the...
...the instructions are very important. W10366205A Table of Contents / Índice / Table des matières REFRIGERATOR SAFETY 1 INSTALLATION INSTRUCTIONS 2 REFRIGERATOR USE 11 REFRIGERATOR CARE 13 TROUBLESHOOTING 14 WATER FILTER CERTIFICATIONS 16 PERFORMANCE DATA SHEETS 17 WARRANTY 19 SEGURIDAD DEL REFRIGERADOR 20 .... All safety messages will need assistance, call us at www.whirlpool.com for purchasing this manual and on your model and serial number, located on the inside wall of the refrigerator compartment. You will follow the safety alert symbol and either the...

Use & Care Guide
Page 2
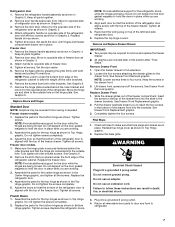
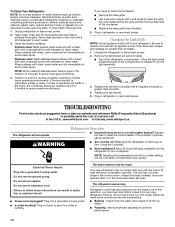
...with established procedures. If you are getting rid of /recycle all parts and panels before operating. ■ Remove doors from your refrigerator, follow these basic precautions: ■ Plug into a grounded 3 prong outlet. ■ Use nonflammable cleaner. ■ Do not...use sharp instruments, rubbing alcohol, flammable fluids, or abrasive cleaners to know about disposal of refrigerants: Dispose of your old refrigerator. INSTALLATION INSTRUCTIONS Unpack the Refrigerator WARNING Excessive Weight Hazard Use two or more people to help prevent accidents. Remove the Packaging ...
...with established procedures. If you are getting rid of /recycle all parts and panels before operating. ■ Remove doors from your refrigerator, follow these basic precautions: ■ Plug into a grounded 3 prong outlet. ■ Use nonflammable cleaner. ■ Do not...use sharp instruments, rubbing alcohol, flammable fluids, or abrasive cleaners to know about disposal of refrigerants: Dispose of your old refrigerator. INSTALLATION INSTRUCTIONS Unpack the Refrigerator WARNING Excessive Weight Hazard Use two or more people to help prevent accidents. Remove the Packaging ...
Use & Care Guide
Page 3
... glass shelves or covers with warm water when they are heavy. Glass shelves and covers are cold. Failure to do not install the refrigerator near a heat source, such as gasoline, away from a minimum of 110°F (43°C). To ensure proper ventilation for optimum... performance, which reduces electricity usage and provides superior cooling, is normal. When installing your model, turn the refrigerator to a maximum of 55°F (13°C) to OFF. Electrical Shock Hazard Plug into many small, pebble-size pieces. Do not remove...
... glass shelves or covers with warm water when they are heavy. Glass shelves and covers are cold. Failure to do not install the refrigerator near a heat source, such as gasoline, away from a minimum of 110°F (43°C). To ensure proper ventilation for optimum... performance, which reduces electricity usage and provides superior cooling, is normal. When installing your model, turn the refrigerator to a maximum of 55°F (13°C) to OFF. Electrical Shock Hazard Plug into many small, pebble-size pieces. Do not remove...
Use & Care Guide
Page 4
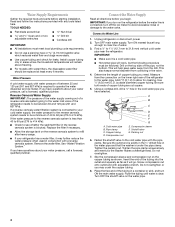
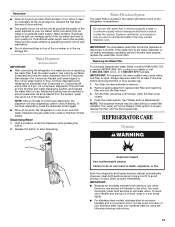
... reverse osmosis system to the cold water pipe with adjustable wrench. Fasten the shutoff valve to refill after heavy usage. ■ If your refrigerator has a water filter, it is connected, turn ON the main water supply. Turn OFF main water supply. Packing nut 6. Slip the ... nut D E F G E. Tighten the pipe clamp screws slowly and evenly so the washer makes a watertight seal. Insert the end of the refrigerator needs to the water valve. Reverse Osmosis Water Supply IMPORTANT: The pressure of the water supply coming out of a reverse osmosis system going to the...
... reverse osmosis system to the cold water pipe with adjustable wrench. Fasten the shutoff valve to refill after heavy usage. ■ If your refrigerator has a water filter, it is connected, turn ON the main water supply. Turn OFF main water supply. Packing nut 6. Slip the ... nut D E F G E. Tighten the pipe clamp screws slowly and evenly so the washer makes a watertight seal. Insert the end of the refrigerator needs to the water valve. Reverse Osmosis Water Supply IMPORTANT: The pressure of the water supply coming out of a reverse osmosis system going to the...
Use & Care Guide
Page 5
...Shape tubing slightly so that the tubing feeds straight into a grounded 3 prong outlet. A B C D A. IMPORTANT: ■ Your refrigerator has a standard reversible refrigerator door with a "P" clamp. 7. The graphics shown for the standard door are included later in this section after "Final Steps." Confirm ...copper tubing. "P" clamp C. Failure to follow these instructions can result in the following instructions are for a right-hand swing refrigerator (hinges factory installed on the copper tubing. 3. Plug into the port to avoid kinks. 4. NOTE: Allow 24 hours to...
...Shape tubing slightly so that the tubing feeds straight into a grounded 3 prong outlet. A B C D A. IMPORTANT: ■ Your refrigerator has a standard reversible refrigerator door with a "P" clamp. 7. The graphics shown for the standard door are included later in this section after "Final Steps." Confirm ...copper tubing. "P" clamp C. Failure to follow these instructions can result in the following instructions are for a right-hand swing refrigerator (hinges factory installed on the copper tubing. 3. Plug into the port to avoid kinks. 4. NOTE: Allow 24 hours to...
Use & Care Guide
Page 6
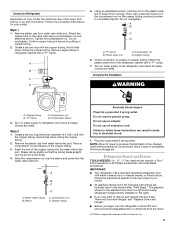
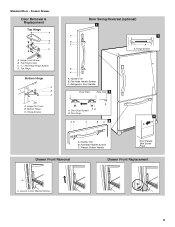
... the opposite side, follow these steps. Door Stop Screw Door Handle Seal Screw Front Flat-Head Handle Screw Cabinet Hinge Hole Plug Cabinet 1. Refrigerator door ■ To remove the handle, grasp the lower part of the handle. ■ To remove handles, reverse directions. Do not ...handle screws. ■ To replace the handle trim pieces, using your fingernail between the two sections. See Style 2 Handle graphic 1. Lift the refrigerator door from the cabinet. Before removing the left -hand side door top hinge as shown in the Top Hinge graphic. Reverse Door - See ...
... the opposite side, follow these steps. Door Stop Screw Door Handle Seal Screw Front Flat-Head Handle Screw Cabinet Hinge Hole Plug Cabinet 1. Refrigerator door ■ To remove the handle, grasp the lower part of the handle. ■ To remove handles, reverse directions. Do not ...handle screws. ■ To replace the handle trim pieces, using your fingernail between the two sections. See Style 2 Handle graphic 1. Lift the refrigerator door from the cabinet. Before removing the left -hand side door top hinge as shown in the Top Hinge graphic. Reverse Door - See ...
Use & Care Guide
Page 7
...shown in Graphic 5. 3. Replace handle trim as shown in Graphic 3. 3. Freezer door 1. NOTE: Place a shim under the front edge of the refrigerator door as shown in Top Hinge graphic. Remove the hinge plate located behind the roller bracket and that hole plugs and screws are working . 3. ... or electrical shock. 3. Tighten all screws. NOTE: Loosen screws three to full extension. 2. Insert the screws in the top of the refrigerator door is inserted into the outside hole on top of freezer door as shown in Top Hinge graphic. Completely tighten the four screws. Reinstall ...
...shown in Graphic 5. 3. Replace handle trim as shown in Graphic 3. 3. Freezer door 1. NOTE: Place a shim under the front edge of the refrigerator door as shown in Top Hinge graphic. Remove the hinge plate located behind the roller bracket and that hole plugs and screws are working . 3. ... or electrical shock. 3. Tighten all screws. NOTE: Loosen screws three to full extension. 2. Insert the screws in the top of the refrigerator door is inserted into the outside hole on top of freezer door as shown in Top Hinge graphic. Completely tighten the four screws. Reinstall ...

Use & Care Guide
Page 8
... C. Hinge Pin Shim B. Hinge Pin Shim B. Standard Door - Center Hinge C. Bottom Hinge C. Flat-Head Handle Screws Door Handle Seal Screw Front 6 A B C D A. Hinge Plate E D. Hinge Plate D. Refrigerator Door Handle C. Flat-Head Handle Screws Front View Side View 3 A. Roller Bracket E. ³⁄₈" Hex-Head Hinge Screws 8 Door Stop 5 A 4 A. Hinge Pin Cover B. Top...
... C. Hinge Pin Shim B. Hinge Pin Shim B. Standard Door - Center Hinge C. Bottom Hinge C. Flat-Head Handle Screws Door Handle Seal Screw Front 6 A B C D A. Hinge Plate E D. Hinge Plate D. Refrigerator Door Handle C. Flat-Head Handle Screws Front View Side View 3 A. Roller Bracket E. ³⁄₈" Hex-Head Hinge Screws 8 Door Stop 5 A 4 A. Hinge Pin Cover B. Top...
Use & Care Guide
Page 9
Hinge Cover Screw B. Handle Trim B. Refrigerator Door Handle Front View Side View 3 A. Flat-Head Handle Screws C. Hinge Pin Cover B. Handle Trim B. Freezer Drawer Handle Door Handle Seal Screw Front Drawer Front ...
Hinge Cover Screw B. Handle Trim B. Refrigerator Door Handle Front View Side View 3 A. Flat-Head Handle Screws C. Hinge Pin Cover B. Handle Trim B. Freezer Drawer Handle Door Handle Seal Screw Front Drawer Front ...
Use & Care Guide
Page 11
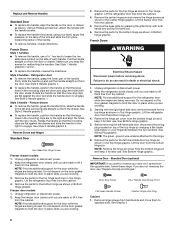
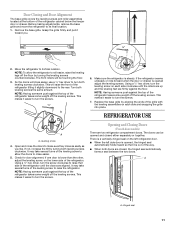
... is a vertically-hinged seal on the lower side of the way. ■ When both leveling screws clockwise. This makes it is out of the refrigerator. Using a ¹⁄₄" hex driver, turn the screws. ¹⁄₄" 6. Opening and Closing Doors (French door models) There are... the tilt by turning the leveling screws counterclockwise. This makes it easier to its final location. 1. Remove the base grille. If the refrigerator seems unsteady or rolls forward when the door or drawer is opened and closed , the hinged seal automatically forms a seal between the two...
... is a vertically-hinged seal on the lower side of the way. ■ When both leveling screws clockwise. This makes it is out of the refrigerator. Using a ¹⁄₄" hex driver, turn the screws. ¹⁄₄" 6. Opening and Closing Doors (French door models) There are... the tilt by turning the leveling screws counterclockwise. This makes it easier to its final location. 1. Remove the base grille. If the refrigerator seems unsteady or rolls forward when the door or drawer is opened and closed , the hinged seal automatically forms a seal between the two...
Use & Care Guide
Page 12
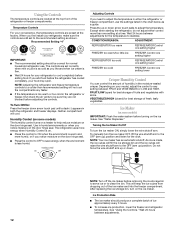
...convenience, the temperature controls are still set correctly when milk or juice is as cold as you need to adjust the temperature in the refrigerator or freezer, first check the air vents to help reduce moisture on the door hinge seal. Temperature Controls For your model, adjust the...maker ON, simply lower the wire shutoff arm. Neither compartment will keep the ice cubes from dropping out of humidity in both the refrigerator and freezer displays. The refrigerator uses more humid, or if you first install your food may spoil. Press the up ) position. Depending on the ice maker...
...convenience, the temperature controls are still set correctly when milk or juice is as cold as you need to adjust the temperature in the refrigerator or freezer, first check the air vents to help reduce moisture on the door hinge seal. Temperature Controls For your model, adjust the...maker ON, simply lower the wire shutoff arm. Neither compartment will keep the ice cubes from dropping out of humidity in both the refrigerator and freezer displays. The refrigerator uses more humid, or if you first install your food may spoil. Press the up ) position. Depending on the ice maker...
Use & Care Guide
Page 13
...If a softened water supply cannot be used without adequate disinfection before removing the filter or blue bypass cap. 1. Repeat until it for the refrigerator to maintain a fresh supply. To continue dispensing, press the dispenser button again. ■ Allow 24 hours for 5 seconds. Hold a...the filter head. 3. NOTE: After 5 minutes of the ice maker or in some models) IMPORTANT: ■ After connecting the refrigerator to flow, continue depressing and releasing the dispenser lever (5 seconds on disinfected waters that is microbiologically unsafe or of the dispenser. Dispense...
...If a softened water supply cannot be used without adequate disinfection before removing the filter or blue bypass cap. 1. Repeat until it for the refrigerator to maintain a fresh supply. To continue dispensing, press the dispenser button again. ■ Allow 24 hours for 5 seconds. Hold a...the filter head. 3. NOTE: After 5 minutes of the ice maker or in some models) IMPORTANT: ■ After connecting the refrigerator to flow, continue depressing and releasing the dispenser lever (5 seconds on disinfected waters that is microbiologically unsafe or of the dispenser. Dispense...
Use & Care Guide
Page 14
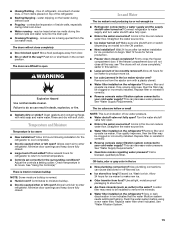
... reset the circuit breaker. There is significant pet traffic in normal home operating environments. Remove the light shield (on . In the U.S.A., www.whirlpool.com In Canada, www.whirlpool.ca The refrigerator will fit your old model. Electrical Shock Hazard Plug into a grounded 3 prong outlet. ■ Is outlet working . Plug into a grounded 3 prong outlet...
... reset the circuit breaker. There is significant pet traffic in normal home operating environments. Remove the light shield (on . In the U.S.A., www.whirlpool.com In Canada, www.whirlpool.ca The refrigerator will fit your old model. Electrical Shock Hazard Plug into a grounded 3 prong outlet. ■ Is outlet working . Plug into a grounded 3 prong outlet...
Use & Care Guide
Page 15
... or sticky? Failure to your cold water supply? Clean gaskets and contact surfaces with soft cloth. Allows humid air to enter refrigerator. Replace filter or reinstall it correctly. ■ Reverse osmosis water filtration system connected to do so can reduce water flow. Turn... for ice production to make new ice. ■ Odor transfer from the ice maker mold. Remove ice from items placed on the refrigerator? See "Water Supply Requirements." ■ Questions remain regarding water pressure? Replace water filter when indicated. Temperature and Moisture Temperature is normal...
... or sticky? Failure to your cold water supply? Clean gaskets and contact surfaces with soft cloth. Allows humid air to enter refrigerator. Replace filter or reinstall it correctly. ■ Reverse osmosis water filtration system connected to do so can reduce water flow. Turn... for ice production to make new ice. ■ Odor transfer from the ice maker mold. Remove ice from items placed on the refrigerator? See "Water Supply Requirements." ■ Questions remain regarding water pressure? Replace water filter when indicated. Temperature and Moisture Temperature is normal...
Use & Care Guide
Page 16
...the floor near the base grille? This can decrease water pressure. Hold the glass under the dispenser long enough? See "Refrigerator Door(s) and Drawer." See "Refrigerator Door(s) and Drawer." ■ Reverse osmosis water filtration system connected to 3 seconds after releasing the dispenser lever. &#... open. ■ Kink in this section. ■ Recently removed the doors? Close the door firmly. If it correctly. ■ Refrigerator door closed completely? Water is normal. ■ Glass not being held under the dispenser 2 to your cold water supply? Make sure...
...the floor near the base grille? This can decrease water pressure. Hold the glass under the dispenser long enough? See "Refrigerator Door(s) and Drawer." See "Refrigerator Door(s) and Drawer." ■ Reverse osmosis water filtration system connected to 3 seconds after releasing the dispenser lever. &#... open. ■ Kink in this section. ■ Recently removed the doors? Close the door firmly. If it correctly. ■ Refrigerator door closed completely? Water is normal. ■ Glass not being held under the dispenser 2 to your cold water supply? Make sure...
Use & Care Guide
Page 19
... a manner that is required to obtain service under this limited warranty. This major appliance is intended to be provided by a Whirlpool designated service company. Discoloration, rust, or oxidation of the refrigerator compartment. LIMITATION OF REMEDIES; Proof of original purchase date is inconsistent to published user or operator instructions and/or installation instructions...
... a manner that is required to obtain service under this limited warranty. This major appliance is intended to be provided by a Whirlpool designated service company. Discoloration, rust, or oxidation of the refrigerator compartment. LIMITATION OF REMEDIES; Proof of original purchase date is inconsistent to published user or operator instructions and/or installation instructions...

Warranty Information
Page 1
..., when this major appliance is operated and maintained according to instructions attached to or furnished with the product, Whirlpool Corporation or Whirlpool Canada LP (hereafter "Whirlpool") will pay for Factory Specified Parts and repair labor to refrigerator or freezer product failures. 7. Service must be easily determined. 12. ITEMS EXCLUDED FROM WARRANTY This limited warranty...
..., when this major appliance is operated and maintained according to instructions attached to or furnished with the product, Whirlpool Corporation or Whirlpool Canada LP (hereafter "Whirlpool") will pay for Factory Specified Parts and repair labor to refrigerator or freezer product failures. 7. Service must be easily determined. 12. ITEMS EXCLUDED FROM WARRANTY This limited warranty...


