
Owners Manual
Page 4
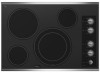
...control (dual/triple-size element) Cooktop 30" (78.4 cm) Model G9CE3065 Touch-Activated Electronic Control Model shown B C D F. Right rear surface cooking area (with dual-size element) E. Model and serial number plate (located underneath cooktop on metal cabinet) ...area) H. Control lock indicator G. All off (hold 3 seconds) I. Control Panels Model G9CE3065 (30" [77.1 cm]), G9CE3074 (30" [77.1 cm]) not shown Touch-Activated Electronic Control Models Model G9CE3675 (36" [91.4 cm]) Touch-Activated Electronic Control Models A B CD AB C DE J E J F HG F I . Center rear...
...control (dual/triple-size element) Cooktop 30" (78.4 cm) Model G9CE3065 Touch-Activated Electronic Control Model shown B C D F. Right rear surface cooking area (with dual-size element) E. Model and serial number plate (located underneath cooktop on metal cabinet) ...area) H. Control lock indicator G. All off (hold 3 seconds) I. Control Panels Model G9CE3065 (30" [77.1 cm]), G9CE3074 (30" [77.1 cm]) not shown Touch-Activated Electronic Control Models Model G9CE3675 (36" [91.4 cm]) Touch-Activated Electronic Control Models A B CD AB C DE J E J F HG F I . Center rear...

Owners Manual
Page 6
... will sound each time a pad is blinking. 4. Dual element To Use DUAL and TRIPLE: 1. When ON is blinking, touch the desired Power Level on some models) A B C Dual Element A. While the Power Level 1 light is touched, all lower temperatures, will glow to turn off surface cooking area(s) individually or ALL OFF/LOCK...
... will sound each time a pad is blinking. 4. Dual element To Use DUAL and TRIPLE: 1. When ON is blinking, touch the desired Power Level on some models) A B C Dual Element A. While the Power Level 1 light is touched, all lower temperatures, will glow to turn off surface cooking area(s) individually or ALL OFF/LOCK...

Owners Manual
Page 7
... available on the Keep Warm function for an extended period of time. A separate Keep Warm surface cooking area is kept on some models): 1. Power Level 1 light will glow on some models. Use pot holders or oven mitts to 45 minutes. To Use the Keep Warm Surface Cooking Area (on the control panel...
... available on the Keep Warm function for an extended period of time. A separate Keep Warm surface cooking area is kept on some models): 1. Power Level 1 light will glow on some models. Use pot holders or oven mitts to 45 minutes. To Use the Keep Warm Surface Cooking Area (on the control panel...

Owners Manual
Page 8
... control knob (keep warm element) Cooktops D. Right front surface cooking area F. The cooktop you have some or all of your model. Right front control knob (dual-zone burner) F. Hot surface indicator light F. Right rear control knob (with triple-size element)... E. Right front control knob G. Center rear warming zone 8 F D. Model and serial number plate (located underneath cooktop on indicator light H. Right rear surface cooking area (with triple-size element) D. Control panel E...
... control knob (keep warm element) Cooktops D. Right front surface cooking area F. The cooktop you have some or all of your model. Right front control knob (dual-zone burner) F. Hot surface indicator light F. Right rear control knob (with triple-size element)... E. Right front control knob G. Center rear warming zone 8 F D. Model and serial number plate (located underneath cooktop on indicator light H. Right rear surface cooking area (with triple-size element) D. Control panel E...

Owners Manual
Page 9
...Quickly brown or sear food. Low ■ Keep food warm. ■ Melt chocolate or butter. ■ Low simmer using lids. Triple Element (on some models) ■ Home canning. ■ Large-diameter cookware. ■ Large quantities of food. To Use: 1. Push in use, the entire cooktop area may... size REMEMBER: When cooktop is turned off all controls when done cooking. KNOB CONTROLS WARNING Hot Surface Indicator Lights (on Standard Control models) The Hot Surface Indicator Lights will glow as long as any burner is on when a power failure occurs, the Hot Surface Indicator...
...Quickly brown or sear food. Low ■ Keep food warm. ■ Melt chocolate or butter. ■ Low simmer using lids. Triple Element (on some models) ■ Home canning. ■ Large-diameter cookware. ■ Large quantities of food. To Use: 1. Push in use, the entire cooktop area may... size REMEMBER: When cooktop is turned off all controls when done cooking. KNOB CONTROLS WARNING Hot Surface Indicator Lights (on Standard Control models) The Hot Surface Indicator Lights will glow as long as any burner is on when a power failure occurs, the Hot Surface Indicator...

Owners Manual
Page 10
... front left knob from OFF position to OFF when finished. 10 However, the hot surface indicator light will not glow red when cycling on some models) The bridge element allows flexibility in and turn rear left knob from OFF position anywhere between Low and High. 2. Push in the left knob from... in the cover for oven and cooktop use it will not glow red like the cooking zones, but the indicator light will glow on some models) WARNING Food Poisoning Hazard Do not let food sit for different levels of the other surface cooking areas are being used to OFF when finished...
... front left knob from OFF position to OFF when finished. 10 However, the hot surface indicator light will not glow red when cycling on some models) The bridge element allows flexibility in and turn rear left knob from OFF position anywhere between Low and High. 2. Push in the left knob from... in the cover for oven and cooktop use it will not glow red like the cooking zones, but the indicator light will glow on some models) WARNING Food Poisoning Hazard Do not let food sit for different levels of the other surface cooking areas are being used to OFF when finished...

Owners Manual
Page 11
...to the NORMAL setting when finished cooking. Increase heat as a single, a dual, or a triple element. COOKTOP USE Ceramic Glass (on some models) The ACCUSIMMER® feature setting is an adjustable heat setting for the surface of light colored ceramic glass to appear to change color when surface... cooking areas are hot. Cooktop cleaner and a cooktop scraper are allowed to cool down slightly. ACCUSIMMER® Feature (on some models) The surface cooking area will glow red on the triple circuit element when medium or high simmer is selected. It is normal for ...
...to the NORMAL setting when finished cooking. Increase heat as a single, a dual, or a triple element. COOKTOP USE Ceramic Glass (on some models) The ACCUSIMMER® feature setting is an adjustable heat setting for the surface of light colored ceramic glass to appear to change color when surface... cooking areas are hot. Cooktop cleaner and a cooktop scraper are allowed to cool down slightly. ACCUSIMMER® Feature (on some models) The surface cooking area will glow red on the triple circuit element when medium or high simmer is selected. It is normal for ...

Owners Manual
Page 12
...cooking area. Earthenware ■ Follow manufacturer's instructions. ■ Use on 2 surface cooking areas, elements or surface burners at the same time. ■ On ceramic glass models, use of aluminum. Porcelain enamel-onsteel or cast iron ■ See stainless steel or cast iron. This allows time for instructions on the grate or... than ½" (1.3 cm) outside the area. Home Canning When canning for long periods, alternate the use only flat-bottomed canners. ■ On coil element models, the installation of the coil element will take on the cooktop or grates.
...cooking area. Earthenware ■ Follow manufacturer's instructions. ■ Use on 2 surface cooking areas, elements or surface burners at the same time. ■ On ceramic glass models, use of aluminum. Porcelain enamel-onsteel or cast iron ■ See stainless steel or cast iron. This allows time for instructions on the grate or... than ½" (1.3 cm) outside the area. Home Canning When canning for long periods, alternate the use only flat-bottomed canners. ■ On coil element models, the installation of the coil element will take on the cooktop or grates.

Owners Manual
Page 13
.... The Cooktop Scraper uses razor blades. Do not use soap-filled scouring pads, abrasive cleaners, Cooktop Polishing Creme, steel-wool pads, gritty washcloths or some models) To avoid damage to stainless steel surfaces, do not use to help avoid scratches, pitting and abrasions, and to wear oven mitts while doing so...
.... The Cooktop Scraper uses razor blades. Do not use soap-filled scouring pads, abrasive cleaners, Cooktop Polishing Creme, steel-wool pads, gritty washcloths or some models) To avoid damage to stainless steel surfaces, do not use to help avoid scratches, pitting and abrasions, and to wear oven mitts while doing so...

Owners Manual
Page 15
... Cooktop Care Kit (includes cleaner, protectant, and applicator pads) Order Part Number 31605 Cooktop Scraper (ceramic glass models) Order Part Number WA906B All-Purpose Appliance Cleaner Order Part Number 31682 In Canada Call the Whirlpool Canada LP Customer eXperience Centre toll free: 1-800-807-6777. Mississauga, Ontario L5N 0B7 Please include a daytime...
... Cooktop Care Kit (includes cleaner, protectant, and applicator pads) Order Part Number 31605 Cooktop Scraper (ceramic glass models) Order Part Number WA906B All-Purpose Appliance Cleaner Order Part Number 31682 In Canada Call the Whirlpool Canada LP Customer eXperience Centre toll free: 1-800-807-6777. Mississauga, Ontario L5N 0B7 Please include a daytime...

Owners Manual
Page 16
... if your major appliance. If you may find this information on the model and serial number label located on how to better help by checking the "Assistance or Service" section or by Whirlpool. 5. Service must provide proof of purchase or installation date for in ...of the Use & Care Guide. Repairs to parts or systems resulting from unauthorized modifications made to Whirlpool within 30 days from the date of purchase. 6. Major appliances with original model/serial numbers that is contrary to know your major appliance, unless such damage results from warranty coverage...
... if your major appliance. If you may find this information on the model and serial number label located on how to better help by checking the "Assistance or Service" section or by Whirlpool. 5. Service must provide proof of purchase or installation date for in ...of the Use & Care Guide. Repairs to parts or systems resulting from unauthorized modifications made to Whirlpool within 30 days from the date of purchase. 6. Major appliances with original model/serial numbers that is contrary to know your major appliance, unless such damage results from warranty coverage...

Installation Instructions
Page 2
... the kitchen. ■ Use the countertop opening dimensions that your oven is required. Product Dimensions B A C A. 21¾" (55.2 cm) B. 30" (76.2 cm) models - 30 78.4 cm) 36" (91.4 cm) models - 36 92.3 cm) C. 3¾" (9.5 cm) 2 If cabinet storage is to be provided, the risk can be reduced by installing a range hood that...
... the kitchen. ■ Use the countertop opening dimensions that your oven is required. Product Dimensions B A C A. 21¾" (55.2 cm) B. 30" (76.2 cm) models - 30 78.4 cm) 36" (91.4 cm) models - 36 92.3 cm) C. 3¾" (9.5 cm) 2 If cabinet storage is to be provided, the risk can be reduced by installing a range hood that...

Installation Instructions
Page 3
...bottom of uncovered wood or metal cabinet (24" [61 cm] minimum clearance if bottom of countertop I K J A. 30" (76.2 cm) on 30" models; 36" (91.4 cm) on the metal cabinet underneath the cooktop. Junction box or outlet: 7" (17.8 cm) minimum from the top of the countertop... clearance from upper cabinet to countertop within minimum horizontal clearances to follow these instructions can be obtained from right side of the line. The model/serial number rating plate is rated 120/240 volt. See the following illustration. Junction box or outlet: 9" (23.0 cm) maximum from...
...bottom of uncovered wood or metal cabinet (24" [61 cm] minimum clearance if bottom of countertop I K J A. 30" (76.2 cm) on 30" models; 36" (91.4 cm) on the metal cabinet underneath the cooktop. Junction box or outlet: 7" (17.8 cm) minimum from the top of the countertop... clearance from upper cabinet to countertop within minimum horizontal clearances to follow these instructions can be obtained from right side of the line. The model/serial number rating plate is rated 120/240 volt. See the following illustration. Junction box or outlet: 9" (23.0 cm) maximum from...

Installation Instructions
Page 4
..., copper cable. Connect a section of the power supply cable (at the cooktop and at cooktop base ends. 30" (76.2 cm) traditional knob models B C A B C A. Aluminum/copper connection must be used. 1. INSTALLATION INSTRUCTIONS Prepare Cooktop for installing clamping brackets at the junction box). Failure ...people to the pigtail leads. 2. Cooktop A. Clamping bracket B. Attachment screw C. Cooktop base bottom All 36" (91.4 cm) models and 30" (76.2 cm) touchactivated electronic control models A B C A. Attachment screw C. Complete the following steps for the option you choose. 4
..., copper cable. Connect a section of the power supply cable (at the cooktop and at cooktop base ends. 30" (76.2 cm) traditional knob models B C A B C A. Aluminum/copper connection must be used. 1. INSTALLATION INSTRUCTIONS Prepare Cooktop for installing clamping brackets at the junction box). Failure ...people to the pigtail leads. 2. Cooktop A. Clamping bracket B. Attachment screw C. Cooktop base bottom All 36" (91.4 cm) models and 30" (76.2 cm) touchactivated electronic control models A B C A. Attachment screw C. Complete the following steps for the option you choose. 4

Warranty
Page 1
WHIRLPOOL CORPORATION MAJOR APPLIANCE WARRANTY LIMITED WARRANTY For one year from the date of repair or replacement under this limited warranty. Outside the 50 United States and Canada, this information on the model and serial number label located on how to use of purchase... the following information about your complete model number and serial number. Repairs when your major appliance is located in a remote area where service by calling Whirlpool. Costs associated with the product, Whirlpool Corporation or Whirlpool Canada LP (hereafter "Whirlpool") will need to know your major...
WHIRLPOOL CORPORATION MAJOR APPLIANCE WARRANTY LIMITED WARRANTY For one year from the date of repair or replacement under this limited warranty. Outside the 50 United States and Canada, this information on the model and serial number label located on how to use of purchase... the following information about your complete model number and serial number. Repairs when your major appliance is located in a remote area where service by calling Whirlpool. Costs associated with the product, Whirlpool Corporation or Whirlpool Canada LP (hereafter "Whirlpool") will need to know your major...


