
Owners Manual
Page 4
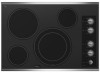
...surface cooking area C. Center rear warming zone 4 F D. TOUCH-ACTIVATED CONTROLS This manual covers different models. Right rear touch control (dual/triple-size element) Cooktop 30" (78.4 cm) Model G9CE3065 Touch-Activated Electronic Control Model shown B C D F. All off (hold 3 seconds) I H G A. Left front surface ... touch control (warming function) C. ON surface indicator E. Right front surface cooking area F. Model and serial number plate (located underneath cooktop on metal cabinet) Right front touch control (dual-size element) F. Hot surface indicator I. Control...
...surface cooking area C. Center rear warming zone 4 F D. TOUCH-ACTIVATED CONTROLS This manual covers different models. Right rear touch control (dual/triple-size element) Cooktop 30" (78.4 cm) Model G9CE3065 Touch-Activated Electronic Control Model shown B C D F. All off (hold 3 seconds) I H G A. Left front surface ... touch control (warming function) C. ON surface indicator E. Right front surface cooking area F. Model and serial number plate (located underneath cooktop on metal cabinet) Right front touch control (dual-size element) F. Hot surface indicator I. Control...

Owners Manual
Page 6
... 10 seconds, the element will automatically shut off all heating zones will automatically activate the next time ON is blinking. 4. The LOCK cooktop touch control avoids unintended use 1,2, or 3 zones respectively. Single size can be used and those burner areas will be turned on the... and home canning. To change the temperature setting while cooking, touch the ON pad for the desired element, and select a new temperature on some models) A B C Dual Element A. After 3 seconds, ALL OFF/LOCK will remember the setting from the last time it was used in the lockout...
... 10 seconds, the element will automatically shut off all heating zones will automatically activate the next time ON is blinking. 4. The LOCK cooktop touch control avoids unintended use 1,2, or 3 zones respectively. Single size can be used and those burner areas will be turned on the... and home canning. To change the temperature setting while cooking, touch the ON pad for the desired element, and select a new temperature on some models) A B C Dual Element A. After 3 seconds, ALL OFF/LOCK will remember the setting from the last time it was used in the lockout...

Owners Manual
Page 7
...cold foods. While the Power Level 1 light is the recommended maximum time to maintain food quality. Food quality may melt onto the cooktop surface. Power Level 1 light will glow on some models): 1. When finished cooking, touch OFF to remove cookware. A separate Keep Warm surface cooking area is kept on some... as it will not glow red like the cooking zones, but the indicator light will blink. 2. Keep Warm Cover all foods with the cooktop surface. WARNING Food Poisoning Hazard Do not let food sit for more than 30 to 45 minutes. The Keep Warm surface cooking area can ...
...cold foods. While the Power Level 1 light is the recommended maximum time to maintain food quality. Food quality may melt onto the cooktop surface. Power Level 1 light will glow on some models): 1. When finished cooking, touch OFF to remove cookware. A separate Keep Warm surface cooking area is kept on some... as it will not glow red like the cooking zones, but the indicator light will blink. 2. Keep Warm Cover all foods with the cooktop surface. WARNING Food Poisoning Hazard Do not let food sit for more than 30 to 45 minutes. The Keep Warm surface cooking area can ...

Owners Manual
Page 8
...) C. ACCUSIMMER® control knob G. ACCUSIMMER® control knob Model G7CE 3655 (36" [91.4 cm]) shown B C D E. Model and serial number plate (located underneath cooktop on indicator light A. KNOB CONTROLS This manual covers different models. Right front control knob (dual-zone burner) F. Cooktop on metal cabinet) Ceramic glass cooktop B. Center rear control knob C. Center rear control knob (keep...
...) C. ACCUSIMMER® control knob G. ACCUSIMMER® control knob Model G7CE 3655 (36" [91.4 cm]) shown B C D E. Model and serial number plate (located underneath cooktop on indicator light A. KNOB CONTROLS This manual covers different models. Right front control knob (dual-zone burner) F. Cooktop on metal cabinet) Ceramic glass cooktop B. Center rear control knob C. Center rear control knob (keep...

Owners Manual
Page 9
... area is too hot to touch, even after the power is restored to anywhere between HIGH and LOW. Power Light Each cooktop has a Power On light. Triple Element (on some models) ■ Home canning. ■ Large-diameter cookware. ■ Large quantities of food, and home canning. Single size B. Single...area(s) is in and turn knob to a boil. Fire Hazard Turn off . Hot Surface If the cooktop is on the size of the cookware. Dual/Triple-Circuit Element (on some models) The dual-size and triple-size elements offer flexibility depending on . The dual and triple sizes combine ...
... area is too hot to touch, even after the power is restored to anywhere between HIGH and LOW. Power Light Each cooktop has a Power On light. Triple Element (on some models) ■ Home canning. ■ Large-diameter cookware. ■ Large quantities of food, and home canning. Single size B. Single...area(s) is in and turn knob to a boil. Fire Hazard Turn off . Hot Surface If the cooktop is on the size of the cookware. Dual/Triple-Circuit Element (on some models) The dual-size and triple-size elements offer flexibility depending on . The dual and triple sizes combine ...

Owners Manual
Page 10
... or TRIPLE zone anywhere between Low and High. 2. Turn knob to touch. ■ Use only cookware and dishes recommended for oven and cooktop use plastic wrap to High for different levels of heating. However, the hot surface indicator light will glow as long as the Warm Zone...A B C To use SINGLE (C): 1. Turn on Single (A). 3. Warm Zone Element (on the control panel. The Warm Zone Element area will glow on some models) The bridge element allows flexibility in and turn front left side cooking area. A. Push in food poisoning or sickness. Turn knob to the SINGLE zone...
... or TRIPLE zone anywhere between Low and High. 2. Turn knob to touch. ■ Use only cookware and dishes recommended for oven and cooktop use plastic wrap to High for different levels of heating. However, the hot surface indicator light will glow as long as the Warm Zone...A B C To use SINGLE (C): 1. Turn on Single (A). 3. Warm Zone Element (on the control panel. The Warm Zone Element area will glow on some models) The bridge element allows flexibility in and turn front left side cooking area. A. Push in food poisoning or sickness. Turn knob to the SINGLE zone...

Owners Manual
Page 11
... from stains and provide the most even heating. Allow the cooktop to the SIMMER position. 2. If sugary spills are allowed to cool down slightly. Cooktop cleaner and a cooktop scraper are hot. To Use: 1. COOKTOP USE Ceramic Glass (on some models) The ACCUSIMMER® feature setting is still warm. Cleaning ...not allow objects that could break when the lid is set on the cooktop. Then, while wearing oven mitts, remove the spills using lids. Aluminum or copper bottoms and rough finishes on some models) The surface cooking area will glow red when an element is on the...
... from stains and provide the most even heating. Allow the cooktop to the SIMMER position. 2. If sugary spills are allowed to cool down slightly. Cooktop cleaner and a cooktop scraper are hot. To Use: 1. COOKTOP USE Ceramic Glass (on some models) The ACCUSIMMER® feature setting is still warm. Cleaning ...not allow objects that could break when the lid is set on the cooktop. Then, while wearing oven mitts, remove the spills using lids. Aluminum or copper bottoms and rough finishes on some models) The surface cooking area will glow red when an element is on the...

Owners Manual
Page 12
... element will take on 2 surface cooking areas, elements or surface burners at the same time. ■ On ceramic glass models, use of surface cooking areas, elements or surface burners between it and the cookware. ■ Cookware designed with slightly indented.... B A C A. Stainless steel ■ Heats quickly, but unevenly. ■ Ideal results on stainless steel provides even heating. 12 On electric cooktops, canners should be used areas to cool. ■ Center the canner on how to -heavy thickness. COOKWARE CHARACTERISTICS Aluminum ■ Heats quickly and ...
... element will take on 2 surface cooking areas, elements or surface burners at the same time. ■ On ceramic glass models, use of surface cooking areas, elements or surface burners between it and the cookware. ■ Cookware designed with slightly indented.... B A C A. Stainless steel ■ Heats quickly, but unevenly. ■ Ideal results on stainless steel provides even heating. 12 On electric cooktops, canners should be used areas to cool. ■ Center the canner on how to -heavy thickness. COOKWARE CHARACTERISTICS Aluminum ■ Heats quickly and ...

Owners Manual
Page 13
... and after many cleanings become less noticeable. Do not use soap-filled scouring pads, abrasive cleaners, Cooktop Polishing Creme, steel-wool pads, gritty washcloths or some models) To avoid damage to stainless steel surfaces, do not use steel wool, abrasive powder cleansers, chlorine... bleach, rust remover or ammonia. Heavy soil, dark streaks, specks and discoloration ■ Cooktop Polishing Creme or nonabrasive cleanser: Rub product...
... and after many cleanings become less noticeable. Do not use soap-filled scouring pads, abrasive cleaners, Cooktop Polishing Creme, steel-wool pads, gritty washcloths or some models) To avoid damage to stainless steel surfaces, do not use steel wool, abrasive powder cleansers, chlorine... bleach, rust remover or ammonia. Heavy soil, dark streaks, specks and discoloration ■ Cooktop Polishing Creme or nonabrasive cleanser: Rub product...

Owners Manual
Page 15
... assistance with any questions or concerns at : Customer eXperience Centre Whirlpool Canada LP 200 - 6750 Century Ave. Accessories Accessories U.S.A. Canning Unit Kit (coil element models) Order Part Number 242905 Cooktop Cleaner (ceramic glass models) Order Part Number 31464 Cooktop Protectant (ceramic glass models) Order Part Number 31463 Cooktop Care Kit (includes cleaner, protectant, and applicator pads) Order...
... assistance with any questions or concerns at : Customer eXperience Centre Whirlpool Canada LP 200 - 6750 Century Ave. Accessories Accessories U.S.A. Canning Unit Kit (coil element models) Order Part Number 242905 Cooktop Cleaner (ceramic glass models) Order Part Number 31464 Cooktop Protectant (ceramic glass models) Order Part Number 31463 Cooktop Care Kit (includes cleaner, protectant, and applicator pads) Order...

Installation Instructions
Page 2
...models - 36 92.3 cm) C. 3¾" (9.5 cm) 2 Read and follow the instructions provided with your oven is approved. If cabinet storage is to be provided, the risk can be reduced by installing a range hood that projects horizontally a minimum of 5" (12.7 cm) beyond the bottom of the cabinets. ■ The cooktop...Tools and Parts Gather the required tools and parts before starting installation. If you do not find this label, contact your cooktop is approved to make sure that all governing codes and ordinances. Refer to confirm that your dealer to oven manufacturer's Installation ...
...models - 36 92.3 cm) C. 3¾" (9.5 cm) 2 Read and follow the instructions provided with your oven is approved. If cabinet storage is to be provided, the risk can be reduced by installing a range hood that projects horizontally a minimum of 5" (12.7 cm) beyond the bottom of the cabinets. ■ The cooktop...Tools and Parts Gather the required tools and parts before starting installation. If you do not find this label, contact your cooktop is approved to make sure that all governing codes and ordinances. Refer to confirm that your dealer to oven manufacturer's Installation ...

Installation Instructions
Page 3
...standards can result in base cabinet is required. A copy of the drawer (or other obstruction) in death, fire, or electrical shock. Model/serial number plate ■ The cooktop is properly grounded. Junction box or outlet: 7" (17.8 cm) minimum from right side of cabinet J. 29 74.9 +/- 0.16... installer determine that the electrical connection and wire size are not sure the cooktop is rated 120/240 volt. Failure to clear the cooktop base. Most models have a neutral (white) wire. 3 The model/serial number rating plate is located on both sides of electrical connection you ...
...standards can result in base cabinet is required. A copy of the drawer (or other obstruction) in death, fire, or electrical shock. Model/serial number plate ■ The cooktop is properly grounded. Junction box or outlet: 7" (17.8 cm) minimum from right side of cabinet J. 29 74.9 +/- 0.16... installer determine that the electrical connection and wire size are not sure the cooktop is rated 120/240 volt. Failure to clear the cooktop base. Most models have a neutral (white) wire. 3 The model/serial number rating plate is located on both sides of electrical connection you ...

Installation Instructions
Page 4
... bottom B. Aluminum/copper connection must be used. 1. Using 2 or more people, place cooktop right side up from cutout to move and install cooktop. Cooktop A. Cooktop base bottom All 36" (91.4 cm) models and 30" (76.2 cm) touchactivated electronic control models A B C A. Attachment screw C. Connect the aluminum wiring to the added section of the power supply cable (at...
... bottom B. Aluminum/copper connection must be used. 1. Using 2 or more people, place cooktop right side up from cutout to move and install cooktop. Cooktop A. Cooktop base bottom All 36" (91.4 cm) models and 30" (76.2 cm) touchactivated electronic control models A B C A. Attachment screw C. Connect the aluminum wiring to the added section of the power supply cable (at...


