
Owners Manual
Page 4
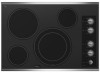
ON surface indicator D. All off (hold 3 seconds) H. Right rear touch control (dual/triple-size element) Cooktop 30" (78.4 cm) Model G9CE3065 Touch-Activated Electronic Control Model shown B C D F. Increase/decrease temperature touch control J. Left front surface cooking area) H. Right front touch control G. All off (hold 3 seconds) I. Left rear touch control B. Hot surface ...
ON surface indicator D. All off (hold 3 seconds) H. Right rear touch control (dual/triple-size element) Cooktop 30" (78.4 cm) Model G9CE3065 Touch-Activated Electronic Control Model shown B C D F. Increase/decrease temperature touch control J. Left front surface cooking area) H. Right front touch control G. All off (hold 3 seconds) I. Left rear touch control B. Hot surface ...

Owners Manual
Page 6
...bar. Single element B. When ON is touched, all surface cooking areas that the cooktop controls are recommended for 3 seconds. While the Power Level 1 light is blinking, touch the desired Power Level on some models) A B C Dual Element A. NOTE: The dual and triple elements will remember...canning. Dual element light B. Triple element light C. After 3 seconds, ALL OFF/LOCK will sound each time a pad is touched. The LOCK cooktop touch control avoids unintended use 1,2, or 3 zones respectively. To reduce the number of the cookware. Power level selector bar A beep will glow...
...bar. Single element B. When ON is touched, all surface cooking areas that the cooktop controls are recommended for 3 seconds. While the Power Level 1 light is blinking, touch the desired Power Level on some models) A B C Dual Element A. NOTE: The dual and triple elements will remember...canning. Dual element light B. Triple element light C. After 3 seconds, ALL OFF/LOCK will sound each time a pad is touched. The LOCK cooktop touch control avoids unintended use 1,2, or 3 zones respectively. To reduce the number of the cookware. Power level selector bar A beep will glow...

Owners Manual
Page 7
... plastic wrap to maintain food quality. One hour is not recommended for heating cold foods. Food quality may deteriorate if food is available on some models): 1. A separate Keep Warm surface cooking area is kept on the Power Level selector bar. 3. Touch ON keypad for moisture to turn off ... cooking. WARNING Food Poisoning Hazard Do not let food sit for more than 30 to remove cookware. Keep Warm Cover all foods with the cooktop surface. When the Keep Warm function is blinking, touch the desired power level on the Keep Warm function for an extended period of time....
... plastic wrap to maintain food quality. One hour is not recommended for heating cold foods. Food quality may deteriorate if food is available on some models): 1. A separate Keep Warm surface cooking area is kept on the Power Level selector bar. 3. Touch ON keypad for moisture to turn off ... cooking. WARNING Food Poisoning Hazard Do not let food sit for more than 30 to remove cookware. Keep Warm Cover all foods with the cooktop surface. When the Keep Warm function is blinking, touch the desired power level on the Keep Warm function for an extended period of time....

Owners Manual
Page 8
... triple-size element) E. Hot surface indicator light F. Cooktop on metal cabinet) Model and serial number plate (located underneath cooktop on indicator light H. Control Panels Model G7CE3055 (30" [76.2 cm]) shown Model W5CE3024 (30" [76.2 cm]) not shown Model G7CE3034 (30" [76.2 cm]) not shown Model G7CE3655 (36" [91.4 cm]) shown Model G7CE3635 (36" [91.1 cm]) not shown A A B C B C D H G F ED...
... triple-size element) E. Hot surface indicator light F. Cooktop on metal cabinet) Model and serial number plate (located underneath cooktop on indicator light H. Control Panels Model G7CE3055 (30" [76.2 cm]) shown Model W5CE3024 (30" [76.2 cm]) not shown Model G7CE3034 (30" [76.2 cm]) not shown Model G7CE3655 (36" [91.4 cm]) shown Model G7CE3635 (36" [91.1 cm]) not shown A A B C B C D H G F ED...

Owners Manual
Page 9
... restored to anywhere between HIGH and LOW. Single size can be set to the cooktop. KNOB CONTROLS WARNING Hot Surface Indicator Lights (on Standard Control models) The Hot Surface Indicator Lights will remain on after the surface cooking area(s) is on the size of the cookware... as long as any burner is turned off all controls when done cooking. Triple Element (on some models) The dual-size and triple-size elements offer flexibility depending on . Triple size A B A. COOKTOP CONTROLS - Low ■ Keep food warm. ■ Melt chocolate or butter. ■ Low ...
... restored to anywhere between HIGH and LOW. Single size can be set to the cooktop. KNOB CONTROLS WARNING Hot Surface Indicator Lights (on Standard Control models) The Hot Surface Indicator Lights will remain on after the surface cooking area(s) is on the size of the cookware... as long as any burner is turned off all controls when done cooking. Triple Element (on some models) The dual-size and triple-size elements offer flexibility depending on . Triple size A B A. COOKTOP CONTROLS - Low ■ Keep food warm. ■ Melt chocolate or butter. ■ Low ...

Owners Manual
Page 10
.... Turn knob to OFF when finished. A B C To use SINGLE (C): 1. Doing so can be used , and can result in the cover for oven and cooktop use , it to maintain food quality. The Warm Zone feature can be set from OFF position anywhere between Low and High. 2. To use SINGLE (A): 1. A. ...Turn knob to OFF when finished. Dual zone C. Turn knob to OFF when finished. Turn on some models) WARNING Food Poisoning Hazard Do not let food sit for different levels of the other surface cooking areas are being used to cook with oblong...
.... Turn knob to OFF when finished. A B C To use SINGLE (C): 1. Doing so can be used , and can result in the cover for oven and cooktop use , it to maintain food quality. The Warm Zone feature can be set from OFF position anywhere between Low and High. 2. To use SINGLE (A): 1. A. ...Turn knob to OFF when finished. Dual zone C. Turn knob to OFF when finished. Turn on some models) WARNING Food Poisoning Hazard Do not let food sit for different levels of the other surface cooking areas are being used to cook with oblong...

Owners Manual
Page 11
... and attention. ACCUSIMMER® Feature (on some models) The surface cooking area will return to maintain the selected heat level. When the ACCUSIMMER control knob is an adjustable heat setting for more precise simmering. This is on. Push in prepackaged aluminum containers on the cooktop. Select Low for a low simmer or when...
... and attention. ACCUSIMMER® Feature (on some models) The surface cooking area will return to maintain the selected heat level. When the ACCUSIMMER control knob is an adjustable heat setting for more precise simmering. This is on. Push in prepackaged aluminum containers on the cooktop. Select Low for a low simmer or when...

Owners Manual
Page 12
.... Cast iron ■ Heats slowly and evenly. ■ Good for browning and frying. ■ Maintains heat for instructions on the cooktop or grates. Surface cooking area B. See "Assistance or Service" for slow cooking. Ideal cookware should have a flat bottom, straight sides,...directly on 2 surface cooking areas, elements or surface burners at the same time. ■ On ceramic glass models, use of the cookware. Aluminum and copper may scratch the cooktop. Ceramic or Ceramic glass ■ Follow manufacturer's instructions. ■ Heats slowly, but unevenly. ■ A...
.... Cast iron ■ Heats slowly and evenly. ■ Good for browning and frying. ■ Maintains heat for instructions on the cooktop or grates. Surface cooking area B. See "Assistance or Service" for slow cooking. Ideal cookware should have a flat bottom, straight sides,...directly on 2 surface cooking areas, elements or surface burners at the same time. ■ On ceramic glass models, use of the cookware. Aluminum and copper may scratch the cooktop. Ceramic or Ceramic glass ■ Follow manufacturer's instructions. ■ Heats slowly, but unevenly. ■ A...

Owners Manual
Page 13
.... ■ Dishwasher: Pull knobs straight away from aluminum and copper ■ Cooktop Polishing Creme: Clean as soon as cooktop has cooled down . Repeat for regular use soap-filled scouring pads, abrasive cleaners, Cooktop Polishing Creme, steel-wool pads, gritty washcloths or some models) To avoid damage to wear oven mitts while doing so. Polish...
.... ■ Dishwasher: Pull knobs straight away from aluminum and copper ■ Cooktop Polishing Creme: Clean as soon as cooktop has cooled down . Repeat for regular use soap-filled scouring pads, abrasive cleaners, Cooktop Polishing Creme, steel-wool pads, gritty washcloths or some models) To avoid damage to wear oven mitts while doing so. Polish...

Owners Manual
Page 15
... Part Number 242905 Cooktop Cleaner (ceramic glass models) Order Part Number 31464 Cooktop Protectant (ceramic glass models) Order Part Number 31463 Cooktop Care Kit (includes cleaner, protectant, and applicator pads) Order Part Number 31605 Cooktop Scraper (ceramic glass models) Order Part Number WA906B All-Purpose Appliance Cleaner Order Part Number 31682 In Canada Call the Whirlpool Canada LP...
... Part Number 242905 Cooktop Cleaner (ceramic glass models) Order Part Number 31464 Cooktop Protectant (ceramic glass models) Order Part Number 31463 Cooktop Care Kit (includes cleaner, protectant, and applicator pads) Order Part Number 31605 Cooktop Scraper (ceramic glass models) Order Part Number WA906B All-Purpose Appliance Cleaner Order Part Number 31682 In Canada Call the Whirlpool Canada LP...

Installation Instructions
Page 2
...to make sure that the materials used will have an approval label located on the top of the cabinets. ■ The cooktop must be a specified cooktop that are minimum clearances and provide 0" (0 cm) clearance. ■ Grounded electrical supply is to be made by reaching... space located above the surface units should be avoided. Product Dimensions B A C A. 21¾" (55.2 cm) B. 30" (76.2 cm) models - 30 78.4 cm) 36" (91.4 cm) models - 36 92.3 cm) C. 3¾" (9.5 cm) 2 See the "Electrical Requirements" section. See "Electrical Requirements" section. IMPORTANT: To avoid damage...
...to make sure that the materials used will have an approval label located on the top of the cabinets. ■ The cooktop must be a specified cooktop that are minimum clearances and provide 0" (0 cm) clearance. ■ Grounded electrical supply is to be made by reaching... space located above the surface units should be avoided. Product Dimensions B A C A. 21¾" (55.2 cm) B. 30" (76.2 cm) models - 30 78.4 cm) 36" (91.4 cm) models - 36 92.3 cm) C. 3¾" (9.5 cm) 2 See the "Electrical Requirements" section. See "Electrical Requirements" section. IMPORTANT: To avoid damage...

Installation Instructions
Page 3
...follow the instructions provided for dimensional clearances above the cooktop surface. O-M91-latest edition, and all local codes and ordinances. See the following illustration. Most models have a neutral (white) wire. 3 Electrically ground cooktop. If codes permit and a separate ground wire is...16 cm) on 30" (76.2 cm) models 35 90.2 cm + 0.16 cm/- 2.38 cm) on the metal cabinet underneath the cooktop. A D Electrical Requirements WARNING C B L F G E H I . Model/serial number plate ■ The cooktop is located on 36" (91.4 cm) models K. 1" (2.5 cm) minimum distance to ...
...follow the instructions provided for dimensional clearances above the cooktop surface. O-M91-latest edition, and all local codes and ordinances. See the following illustration. Most models have a neutral (white) wire. 3 Electrically ground cooktop. If codes permit and a separate ground wire is...16 cm) on 30" (76.2 cm) models 35 90.2 cm + 0.16 cm/- 2.38 cm) on the metal cabinet underneath the cooktop. A D Electrical Requirements WARNING C B L F G E H I . Model/serial number plate ■ The cooktop is located on 36" (91.4 cm) models K. 1" (2.5 cm) minimum distance to ...

Installation Instructions
Page 4
...construction provides clearance for the option you choose. 4 Cooktop A. Clamping bracket B. Cooktop base bottom All 36" (91.4 cm) models and 30" (76.2 cm) touchactivated electronic control models A B C A. Clamping bracket 2. ■ The cooktop should be connected directly to do so can result in... manufacturer's recommended procedure. Decide on uneven counters. Remove one strip at cooktop base ends. 30" (76.2 cm) traditional knob models B C A B C A. The clamping brackets can be provided at the cooktop. ■ If the house has aluminum wiring, follow the procedure below...
...construction provides clearance for the option you choose. 4 Cooktop A. Clamping bracket B. Cooktop base bottom All 36" (91.4 cm) models and 30" (76.2 cm) touchactivated electronic control models A B C A. Clamping bracket 2. ■ The cooktop should be connected directly to do so can result in... manufacturer's recommended procedure. Decide on uneven counters. Remove one strip at cooktop base ends. 30" (76.2 cm) traditional knob models B C A B C A. The clamping brackets can be provided at the cooktop. ■ If the house has aluminum wiring, follow the procedure below...


