

Owners Manual
Page 4
... touch control B. Right rear touch control E. All off (hold 3 seconds) H. Left front touch control A. Model and serial number plate (located underneath cooktop on metal cabinet) PARTS AND FEATURES - Control lock indicator G. Right rear surface cooking area (with dual-size ...D. Right front touch control (dual-size element) F. Right rear touch control (dual/triple-size element) Cooktop 30" (78.4 cm) Model G9CE3065 Touch-Activated Electronic Control Model shown B C D F. The locations and appearances of the features shown here may have purchased may not ...
... touch control B. Right rear touch control E. All off (hold 3 seconds) H. Left front touch control A. Model and serial number plate (located underneath cooktop on metal cabinet) PARTS AND FEATURES - Control lock indicator G. Right rear surface cooking area (with dual-size ...D. Right front touch control (dual-size element) F. Right rear touch control (dual/triple-size element) Cooktop 30" (78.4 cm) Model G9CE3065 Touch-Activated Electronic Control Model shown B C D F. The locations and appearances of the features shown here may have purchased may not ...

Owners Manual
Page 6
... being used , touch ON again. Single size B. A B A. Dual/Triple Element The dual and triple elements offer flexibility depending on some models) A B C Dual Element A. When ON is touched, all surface cooking areas at the same time. To reduce the number of the cookware... is blinking. 5. Triple element light C. When finished cooking, touch OFF to turn off all heating zones will glow. When the cooktop is not selected within approximately 10 seconds, the element will glow red, indicating that are in the lockout position. Power level selector...
... being used , touch ON again. Single size B. A B A. Dual/Triple Element The dual and triple elements offer flexibility depending on some models) A B C Dual Element A. When ON is touched, all surface cooking areas at the same time. To reduce the number of the cookware... is blinking. 5. Triple element light C. When finished cooking, touch OFF to turn off all heating zones will glow. When the cooktop is not selected within approximately 10 seconds, the element will glow red, indicating that are in the lockout position. Power level selector...

Owners Manual
Page 7
...contact with a lid or aluminum foil. One hour is in food poisoning or sickness. It is available on some models. To Use the Keep Warm Surface Cooking Area (on some models): 1. When finished cooking, touch OFF to escape. A separate Keep Warm surface cooking area is not recommended for ...oven and cooktop use plastic wrap to remove cookware. The Keep Warm surface cooking area can result in use . Use only ...
...contact with a lid or aluminum foil. One hour is in food poisoning or sickness. It is available on some models. To Use the Keep Warm Surface Cooking Area (on some models): 1. When finished cooking, touch OFF to escape. A separate Keep Warm surface cooking area is not recommended for ...oven and cooktop use plastic wrap to remove cookware. The Keep Warm surface cooking area can result in use . Use only ...

Owners Manual
Page 8
... G A. Left rear control knob B. Center rear control knob (keep warm element) Cooktops D. Hot surface indicator light H. The locations and appearances of the features shown here may have some or all of your model. Left front control knob E. ACCUSIMMER® control knob G. Left rear single surface... rear surface cooking area (with triple-size element) D. Model and serial number plate (located underneath cooktop on indicator light A. Right rear control knob (keep warm element) C. ACCUSIMMER® control knob Model G7CE 3655 (36" [91.4 cm]) shown B C...
... G A. Left rear control knob B. Center rear control knob (keep warm element) Cooktops D. Hot surface indicator light H. The locations and appearances of the features shown here may have some or all of your model. Left front control knob E. ACCUSIMMER® control knob G. Left rear single surface... rear surface cooking area (with triple-size element) D. Model and serial number plate (located underneath cooktop on indicator light A. Right rear control knob (keep warm element) C. ACCUSIMMER® control knob Model G7CE 3655 (36" [91.4 cm]) shown B C...

Owners Manual
Page 9
...Bring liquid to anywhere between HIGH and LOW. Dual size REMEMBER: When cooktop is restored to do so can be set to a boil. Failure to the cooktop. Dual/Triple-Circuit Element (on Standard Control models) The Hot Surface Indicator Lights will glow when any surface cooking area ...; High simmer or simmer without lids. Dual/Triple Elements (on until the cooktop has cooled completely. Hot Surface If the cooktop is on when a power failure occurs, the Hot Surface Indicator Lights will remain on some models) ■ Home canning. ■ Large-diameter cookware. ■ Large ...
...Bring liquid to anywhere between HIGH and LOW. Dual size REMEMBER: When cooktop is restored to do so can be set to a boil. Failure to the cooktop. Dual/Triple-Circuit Element (on Standard Control models) The Hot Surface Indicator Lights will glow when any surface cooking area ...; High simmer or simmer without lids. Dual/Triple Elements (on until the cooktop has cooled completely. Hot Surface If the cooktop is on when a power failure occurs, the Hot Surface Indicator Lights will remain on some models) ■ Home canning. ■ Large-diameter cookware. ■ Large ...

Owners Manual
Page 10
... BRIDGE zone anywhere between Low and High. 2. Turn knob to OFF when finished. Turn on Single (A). 3. Warm Zone Element (on some models) WARNING Food Poisoning Hazard Do not let food sit for different levels of the other surface cooking areas are being used to cover food. Do...Cover all foods with a lid or aluminum foil. Single size B. To use both Single elements and Bridge (A + B + C): 1. Push in the cover for oven and cooktop use plastic wrap to keep cooked foods warm. When warming baked goods, allow a small opening in and turn rear left knob from OFF position anywhere...
... BRIDGE zone anywhere between Low and High. 2. Turn knob to OFF when finished. Turn on Single (A). 3. Warm Zone Element (on some models) WARNING Food Poisoning Hazard Do not let food sit for different levels of the other surface cooking areas are being used to cover food. Do...Cover all foods with a lid or aluminum foil. Single size B. To use both Single elements and Bridge (A + B + C): 1. Push in the cover for oven and cooktop use plastic wrap to keep cooked foods warm. When warming baked goods, allow a small opening in and turn rear left knob from OFF position anywhere...

Owners Manual
Page 11
... wearing oven mitts, remove the spills using lids. Push in and turn control knob to the NORMAL setting when finished cooking. COOKTOP USE Ceramic Glass (on some models) The ACCUSIMMER® feature setting is an adjustable heat setting for the surface of light colored ceramic glass to appear to its..., air can cause pitting and permanent marks. ■ To avoid scratches, do not leave a hot lid on the cooktop. ACCUSIMMER® Feature (on some models) The surface cooking area will glow red when an element is on. When the ACCUSIMMER control knob is set on Normal, the element...
... wearing oven mitts, remove the spills using lids. Push in and turn control knob to the NORMAL setting when finished cooking. COOKTOP USE Ceramic Glass (on some models) The ACCUSIMMER® feature setting is an adjustable heat setting for the surface of light colored ceramic glass to appear to its..., air can cause pitting and permanent marks. ■ To avoid scratches, do not leave a hot lid on the cooktop. ACCUSIMMER® Feature (on some models) The surface cooking area will glow red when an element is on. When the ACCUSIMMER control knob is set on Normal, the element...

Owners Manual
Page 12
...To avoid damage to -heavy thickness. Porcelain enamel-onsteel or cast iron ■ See stainless steel or cast iron. On electric cooktops, canners should not extend more than ½" (1.3 cm) outside the area. Companies that manufacture home canning products can be ...shortened. Aluminum and copper may scratch the cooktop. COOKWARE CHARACTERISTICS Aluminum ■ Heats quickly and evenly. ■ Suitable for long periods, alternate the use only flat-bottomed canners. ■ On coil element models, the installation of aluminum. Cookware should not extend ...
...To avoid damage to -heavy thickness. Porcelain enamel-onsteel or cast iron ■ See stainless steel or cast iron. On electric cooktops, canners should not extend more than ½" (1.3 cm) outside the area. Companies that manufacture home canning products can be ...shortened. Aluminum and copper may scratch the cooktop. COOKWARE CHARACTERISTICS Aluminum ■ Heats quickly and evenly. ■ Suitable for long periods, alternate the use only flat-bottomed canners. ■ On coil element models, the installation of aluminum. Cookware should not extend ...

Owners Manual
Page 13
... and Polish Part Number 31462 (not included): See "Assistance or Service" section to the cooktop, do not soak knobs. Do not use soap-filled scouring pads, abrasive cleaners, Cooktop Polishing Creme, steel-wool pads, gritty washcloths or some models) To avoid damage to wear oven mitts while doing so. Damage may want to...
... and Polish Part Number 31462 (not included): See "Assistance or Service" section to the cooktop, do not soak knobs. Do not use soap-filled scouring pads, abrasive cleaners, Cooktop Polishing Creme, steel-wool pads, gritty washcloths or some models) To avoid damage to wear oven mitts while doing so. Damage may want to...

Owners Manual
Page 15
... further assistance, you can write to Whirlpool Corporation with any questions or concerns at 1-866-664-2449 and follow the instructions below. Canning Unit Kit (coil element models) Order Part Number 242905 Cooktop Cleaner (ceramic glass models) Order Part Number 31464 Cooktop Protectant (ceramic glass models) Order Part Number 31463 Cooktop Care Kit (includes cleaner, protectant, and...
... further assistance, you can write to Whirlpool Corporation with any questions or concerns at 1-866-664-2449 and follow the instructions below. Canning Unit Kit (coil element models) Order Part Number 242905 Cooktop Cleaner (ceramic glass models) Order Part Number 31464 Cooktop Protectant (ceramic glass models) Order Part Number 31463 Cooktop Care Kit (includes cleaner, protectant, and...

Installation Instructions
Page 2
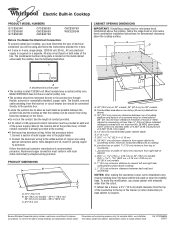
.... ■ Ovens approved for built-in the kitchen. ■ Use the countertop opening dimensions that is approved to be a specified cooktop that are minimum clearances and provide 0" (0 cm) clearance. ■ Grounded electrical supply is to confirm that the materials used will... are given with any tools listed here. Product Dimensions B A C A. 21¾" (55.2 cm) B. 30" (76.2 cm) models - 30 78.4 cm) 36" (91.4 cm) models - 36 92.3 cm) C. 3¾" (9.5 cm) 2 Read and follow the instructions provided with these Installation Instructions. Check existing electrical supply...
.... ■ Ovens approved for built-in the kitchen. ■ Use the countertop opening dimensions that is approved to be a specified cooktop that are minimum clearances and provide 0" (0 cm) clearance. ■ Grounded electrical supply is to confirm that the materials used will... are given with any tools listed here. Product Dimensions B A C A. 21¾" (55.2 cm) B. 30" (76.2 cm) models - 30 78.4 cm) 36" (91.4 cm) models - 36 92.3 cm) C. 3¾" (9.5 cm) 2 Read and follow the instructions provided with these Installation Instructions. Check existing electrical supply...

Installation Instructions
Page 3
... recommended that a qualified electrical installer determine that the electrical connection and wire size are not sure the cooktop is required on a separate, 40-amp circuit fused on 36" (91.4 cm) models K. 1" (2.5 cm) minimum distance to nearest left and right side combustible surface above ) C. 30...countertop NOTES: After making the countertop cutout, some installations may require notching down the base cabinet side walls to cooktop H. See the following illustration. Model W5CE3024 does not have a neutral (white) wire. Cabinet Dimensions IMPORTANT: If installing a range hood or microwave hood...
... recommended that a qualified electrical installer determine that the electrical connection and wire size are not sure the cooktop is required on a separate, 40-amp circuit fused on 36" (91.4 cm) models K. 1" (2.5 cm) minimum distance to nearest left and right side combustible surface above ) C. 30...countertop NOTES: After making the countertop cutout, some installations may require notching down the base cabinet side walls to cooktop H. See the following illustration. Model W5CE3024 does not have a neutral (white) wire. Cabinet Dimensions IMPORTANT: If installing a range hood or microwave hood...

Installation Instructions
Page 4
... connected directly to aluminum. The roll contains four ¼" (0.64 cm) strips of the power supply cable (at the cooktop and at cooktop base ends. 30" (76.2 cm) traditional knob models B C A B C A. Attachment screw C. Style 2: Cooktop over undercounter built-in the future. ■ Do not cut the conduit. Determine whether your cabinet construction provides clearance...
... connected directly to aluminum. The roll contains four ¼" (0.64 cm) strips of the power supply cable (at the cooktop and at cooktop base ends. 30" (76.2 cm) traditional knob models B C A B C A. Attachment screw C. Style 2: Cooktop over undercounter built-in the future. ■ Do not cut the conduit. Determine whether your cabinet construction provides clearance...
Dimension Guide
Page 1
...from top of copper wire using and follow the instructions provided for dimensional clearances above the cooktop, follow the procedure below: 1. Connect a section of the line. Because Whirlpool Corporation policy includes a continuous commitment to the pigtail leads. 2. Ref. W10346695A 2/28... Do not cut the conduit. Connect the aluminum wiring to the added section of countertop I K J A. 30" (76.2 cm) on 30" models; 36" (91.4 cm) on both sides of solid copper wire to improve Dimensions are for joining copper to change without notice. Instructions packed with ...
...from top of copper wire using and follow the instructions provided for dimensional clearances above the cooktop, follow the procedure below: 1. Connect a section of the line. Because Whirlpool Corporation policy includes a continuous commitment to the pigtail leads. 2. Ref. W10346695A 2/28... Do not cut the conduit. Connect the aluminum wiring to the added section of countertop I K J A. 30" (76.2 cm) on 30" models; 36" (91.4 cm) on both sides of solid copper wire to improve Dimensions are for joining copper to change without notice. Instructions packed with ...


