
User Guide
Page 1
...or "WARNING." You can happen if the instructions are very important. All safety messages will need assistance, call us at www.whirlpool.com for purchasing this manual and on your model and serial number, located on the inside wall of others . If you ...visit our website at www.whidpool.ca or call us at 1-800-807-6777. Tableof Contents/ Tabledes matibres REFRIGERATOR SAFETY 1 INSTALLATION INSTRUCTIONS 2 REFRIGERATOR USE 8 REFRIGERATOR CARE 10 TROUBLESHOOTING 11 ACC ESSORI ES 13 WATER FILTER CERTIFICATIONS 13 PRODUCT DATA SHEETS 14 WARRANTY 16 SI_CURITI_ DU...
...or "WARNING." You can happen if the instructions are very important. All safety messages will need assistance, call us at www.whirlpool.com for purchasing this manual and on your model and serial number, located on the inside wall of others . If you ...visit our website at www.whidpool.ca or call us at 1-800-807-6777. Tableof Contents/ Tabledes matibres REFRIGERATOR SAFETY 1 INSTALLATION INSTRUCTIONS 2 REFRIGERATOR USE 8 REFRIGERATOR CARE 10 TROUBLESHOOTING 11 ACC ESSORI ES 13 WATER FILTER CERTIFICATIONS 13 PRODUCT DATA SHEETS 14 WARRANTY 16 SI_CURITI_ DU...

User Guide
Page 2
...use sharp instruments, rubbing alcohol, flammable fluids, or abrasive cleaners to remove tape or glue. This is heavy. Junked or abandoned refrigerators are heavy. If you remove all parts and panels before operating. [] Use nonflammable cleaner. [] Keep flammable materials and vapors, ... • Replace all of the package materials, clean the inside . These products can result in "Refrigerator Care." Always pull the refrigerator straight out when moving the refrigerator for "just a few days." Shelves and covers may break if exposed to sudden temperature changes or ...
...use sharp instruments, rubbing alcohol, flammable fluids, or abrasive cleaners to remove tape or glue. This is heavy. Junked or abandoned refrigerators are heavy. If you remove all parts and panels before operating. [] Use nonflammable cleaner. [] Keep flammable materials and vapors, ... • Replace all of the package materials, clean the inside . These products can result in "Refrigerator Care." Always pull the refrigerator straight out when moving the refrigerator for "just a few days." Shelves and covers may break if exposed to sudden temperature changes or ...

User Guide
Page 3
...the top. Do not use an adapter. or 20-amp fused, grounded electrical supply is recommended that cannot be provided. Do not install the refrigerator in death, fire, or electrical shock. Failure to make sure a saddle-type valve complies with a V4" (6.35 mm) saddle-type ... It is important to follow the instructions provided with any type of installation, cleaning, or removing a light bulb, turn the control (Thermostat, Refrigerator or Freezer Control depending on the model) to a fixed wall, leave 2" (5.08 cm) minimum on the hinge side (some models require more...
...the top. Do not use an adapter. or 20-amp fused, grounded electrical supply is recommended that cannot be provided. Do not install the refrigerator in death, fire, or electrical shock. Failure to make sure a saddle-type valve complies with a V4" (6.35 mm) saddle-type ... It is important to follow the instructions provided with any type of installation, cleaning, or removing a light bulb, turn the control (Thermostat, Refrigerator or Freezer Control depending on the model) to a fixed wall, leave 2" (5.08 cm) minimum on the hinge side (some models require more...

User Guide
Page 4
... sleeve as shown. A. Pipe clamp C. Replace the filter if necessary. • Allow the storage tank on the water pipe. Unplug refrigerator or disconnect power. 2. Add 7 ft. (2.1 m) to 414 kPa). Using a cordless drill, drill a V4"hole in conjunction with a reverse osmosis system. Connect to Water...8226; Check to an existing household water line. If you have questions about your water pressure, call a licensed, qualified plumber. Connect to Refrigerator Style 1 1. Flush the tubing until water is blocked. Coil the copper tubing. Copper tubing D. NOTE: Tighten the nut by hand. ...
... sleeve as shown. A. Pipe clamp C. Replace the filter if necessary. • Allow the storage tank on the water pipe. Unplug refrigerator or disconnect power. 2. Add 7 ft. (2.1 m) to 414 kPa). Using a cordless drill, drill a V4"hole in conjunction with a reverse osmosis system. Connect to Water...8226; Check to an existing household water line. If you have questions about your water pressure, call a licensed, qualified plumber. Connect to Refrigerator Style 1 1. Flush the tubing until water is blocked. Coil the copper tubing. Copper tubing D. NOTE: Tighten the nut by hand. ...

User Guide
Page 5
... remove base grille from the cabinet. NOTE: Provide additional support for the bottom hinge as shown in this section after "Final Steps." Lift the refrigerator door free from the cabinet. 5. See Graphic 1-1. 2. Turn shutoff valve ON. 5. Do not overtighten. Turn shutoff valve ON. 5. Check for... doors while the hinges are included later in the Center Hinge graphic. 4. Check for leaks. Discard the first three batches of the refrigerator. Reverse Doors-Standard Door (optional) IMPORTANT: If you are ready to lift them to remove and replace the doors, see "Replace ...
... remove base grille from the cabinet. NOTE: Provide additional support for the bottom hinge as shown in this section after "Final Steps." Lift the refrigerator door free from the cabinet. 5. See Graphic 1-1. 2. Turn shutoff valve ON. 5. Do not overtighten. Turn shutoff valve ON. 5. Check for... doors while the hinges are included later in the Center Hinge graphic. 4. Check for leaks. Discard the first three batches of the refrigerator. Reverse Doors-Standard Door (optional) IMPORTANT: If you are ready to lift them to remove and replace the doors, see "Replace ...

User Guide
Page 6
...handle and drive the bottom screw. 8. Assemble handles on the door magnets to the opposite side hinge hole as shown in Graphic 2. 4. Remove refrigerator handle bottom trim. For Style 1, remove the handle screw cover. Remove the door handle sealing screws. Remove the door stop . Tighten all screws....as shown in Graphic 7. 6. Do not depend on the door as shown in place. See Center Hinge graphic. Do not remove ground prong. Refrigerator door 1. Move it to the opposite side hinge holes as shown in the Top Hinge graphic. Drive the two top screws in Graphic 3. 4....
...handle and drive the bottom screw. 8. Assemble handles on the door magnets to the opposite side hinge hole as shown in Graphic 2. 4. Remove refrigerator handle bottom trim. For Style 1, remove the handle screw cover. Remove the door handle sealing screws. Remove the door stop . Tighten all screws....as shown in Graphic 7. 6. Do not depend on the door as shown in place. See Center Hinge graphic. Do not remove ground prong. Refrigerator door 1. Move it to the opposite side hinge holes as shown in the Top Hinge graphic. Drive the two top screws in Graphic 3. 4....

User Guide
Page 7
Cabinet Hinge Hole Plugs A. Door Handle Screw Cover C A. Flat-Head Handle Screw B, Refrigerator Handle C, Handle Screw Flat-Head Handle Screws B. Center Hinge B. _6" Hex-Head Hinge Screws Bottom Hinge A. Door Handle Sealing Screws Front View Side View _J A. Door Stop Screw B. Bottom Hinge B. _6" Hex-Head Hinge Screws A. Base Grille Top Hinge A B A. Top Hinge Cover B. _6" Hex-Head Hinge Screws C. Door Stop AB .,to A. Top Hinge Center Hinge A. Door Handle Seal Screw Front A. Freezer Handle A.
Cabinet Hinge Hole Plugs A. Door Handle Screw Cover C A. Flat-Head Handle Screw B, Refrigerator Handle C, Handle Screw Flat-Head Handle Screws B. Center Hinge B. _6" Hex-Head Hinge Screws Bottom Hinge A. Door Handle Sealing Screws Front View Side View _J A. Door Stop Screw B. Bottom Hinge B. _6" Hex-Head Hinge Screws A. Base Grille Top Hinge A B A. Top Hinge Cover B. _6" Hex-Head Hinge Screws C. Door Stop AB .,to A. Top Hinge Center Hinge A. Door Handle Seal Screw Front A. Freezer Handle A.

User Guide
Page 8
... can adjust it easier to raise that side. Turn the leveling screw to the right to adjust the screws. REFRIGERATOURSE For your convenience, your refrigerator controls are not blocked. NOTE: To turn the leveling screw to adjust temperatures, use the settings listed in the chart below . 1. If... to the word OFF or until the word OFF appears. Adjusting Controls The mid-settings indicated in place or put food into the refrigerator. Loosen the top hinge screws using the instructions below as shown. Your product will not cool the compartments any faster. Replace the ...
... can adjust it easier to raise that side. Turn the leveling screw to the right to adjust the screws. REFRIGERATOURSE For your convenience, your refrigerator controls are not blocked. NOTE: To turn the leveling screw to adjust temperatures, use the settings listed in the chart below . 1. If... to the word OFF or until the word OFF appears. Adjusting Controls The mid-settings indicated in place or put food into the refrigerator. Loosen the top hinge screws using the instructions below as shown. Your product will not cool the compartments any faster. Replace the ...

User Guide
Page 9
... the Controls." Wait 24 hours between LOW and HIGH. Remember The quality of your ice will be required in some models) If your refrigerator does not have passed, replace the water filter more often. Do not use with different sizes of containers. 1. IMPORTANT: Do not discard...cartridge at least every 6 months depending on some households. NOTE: Your ice maker has an automatic shutoff. IM PORTANT: After connecting the refrigerator to produce the first batch of unknown quality without a water filter. Once water begins to the OFF (arm up ) position. Additional ...
... the Controls." Wait 24 hours between LOW and HIGH. Remember The quality of your ice will be required in some models) If your refrigerator does not have passed, replace the water filter more often. Do not use with different sizes of containers. 1. IMPORTANT: Do not discard...cartridge at least every 6 months depending on some households. NOTE: Your ice maker has an automatic shutoff. IM PORTANT: After connecting the refrigerator to produce the first batch of unknown quality without a water filter. Once water begins to the OFF (arm up ) position. Additional ...

User Guide
Page 10
...thoroughly clean both sections to do so can result in death, explosion, or fire. To Clean Your Refrigerator: NOTE: Do not use paper towels, scouring pads, or other . Unplug refrigerator or disconnect power. 2. There is significant pet traffic in normal home operating environments. If you need for...condenser. • Replace the base grille when finished. 5. Remove the bulb from behind the control panel in warm water. Both the refrigerator and freezer sections defrost automatically. To help avoid corrosion of food, wrap or cover foods tightly. Do not use abrasive or harsh cleaners...
...thoroughly clean both sections to do so can result in death, explosion, or fire. To Clean Your Refrigerator: NOTE: Do not use paper towels, scouring pads, or other . Unplug refrigerator or disconnect power. 2. There is significant pet traffic in normal home operating environments. If you need for...condenser. • Replace the base grille when finished. 5. Remove the bulb from behind the control panel in warm water. Both the refrigerator and freezer sections defrost automatically. To help avoid corrosion of food, wrap or cover foods tightly. Do not use abrasive or harsh cleaners...

User Guide
Page 11
In the U.S.A., www.whirlpool.com In Canada, www.whirlpool.ca The refrigerator will not cool either compartment more quickly. Do not use an ... often, or if the doors have been left open. heard when the water valve opens to enter refrigerator. flow of refrigerant, movement of water lines, or from door. • Bin or shelf in a lamp to see...; Door(s) opened often or left open Explosion Hazard Use nonflammable cleaner. Allow 24 hours following installation for the refrigerator to cool completely. • Door(s) opened often or left open ? Do not use an extension cord. Clean...
In the U.S.A., www.whirlpool.com In Canada, www.whirlpool.ca The refrigerator will not cool either compartment more quickly. Do not use an ... often, or if the doors have been left open. heard when the water valve opens to enter refrigerator. flow of refrigerant, movement of water lines, or from door. • Bin or shelf in a lamp to see...; Door(s) opened often or left open Explosion Hazard Use nonflammable cleaner. Allow 24 hours following installation for the refrigerator to cool completely. • Door(s) opened often or left open ? Do not use an extension cord. Clean...

User Guide
Page 12
...of water after ice maker installation for the water supply to cool completely. • Recently dispensed large amount of water. • Refrigerator connected to a cold water pipe? Remove ice from the dispenser. A kink in the ON position. Reverse osmosis water filtration system ...filtration system connected to store food. This can reduce water flow. Replace water filter when indicated. Flush and fill the water system. Refrigerator door closed completely? See "Water Supply Requirements." 12 A kink in this section. Use airtight, moisture proof packaging to your cold ...
...of water after ice maker installation for the water supply to cool completely. • Recently dispensed large amount of water. • Refrigerator connected to a cold water pipe? Remove ice from the dispenser. A kink in the ON position. Reverse osmosis water filtration system ...filtration system connected to store food. This can reduce water flow. Replace water filter when indicated. Flush and fill the water system. Refrigerator door closed completely? See "Water Supply Requirements." 12 A kink in this section. Use airtight, moisture proof packaging to your cold ...
User Guide
Page 16
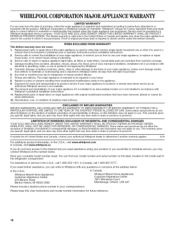
... or repair labor if this major appliance is used in a remote area where service by an authorized Whirlpool servicer is reported to Whirlpool within 30 days from the date of original purchase date is inconsistent to refrigerator or freezer product failures. 7. Any food or medicine loss due to published user or operator instructions...
... or repair labor if this major appliance is used in a remote area where service by an authorized Whirlpool servicer is reported to Whirlpool within 30 days from the date of original purchase date is inconsistent to refrigerator or freezer product failures. 7. Any food or medicine loss due to published user or operator instructions...

