Use and Care Guide
Page 3
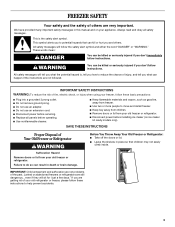
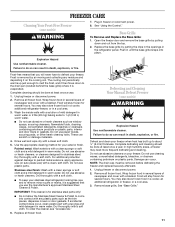
... WARNING Suffocation Hazard Remove doors or lid from your old freezer or refrigerator. s Leave the shelves in this manual and on ice maker kit ready models only). s Remove doors or lid from your old freezer or refrigerator. This symbol alerts you are very important. s Do not use an extension cord. even...
... WARNING Suffocation Hazard Remove doors or lid from your old freezer or refrigerator. s Leave the shelves in this manual and on ice maker kit ready models only). s Remove doors or lid from your old freezer or refrigerator. This symbol alerts you are very important. s Do not use an extension cord. even...
Use and Care Guide
Page 6
Do not overtighten set screws with hex key provided. See Graphic 1-2. 2. Position handle over grommets on some models) IMPORTANT: If you want to remove and replace the door, see "Replace Door and Hinges." Open freezer door and remove base grille from the Bottom ...
Do not overtighten set screws with hex key provided. See Graphic 1-2. 2. Position handle over grommets on some models) IMPORTANT: If you want to remove and replace the door, see "Replace Door and Hinges." Open freezer door and remove base grille from the Bottom ...

Use and Care Guide
Page 7
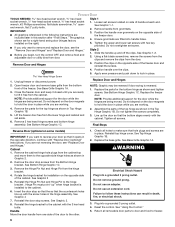
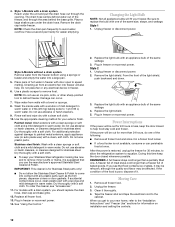
... (optional) 2 A A. Handle C. Handle 7 Door Stop Screws B. Door Stop Screws B. Door Stop C. Clips B. Door Stop C. Grommet B. Top Hinge Cover B. 3/8" or 5/8" Hex-Head Hinge Screws (depending on model) C. Top Hinge Bottom Hinge 1C A B C D E A. Handle Screws C. Hinge Pin Nut E. 5/16" Hex-Head Hinge Screws Style 1 1-1 B A C A 5 Door Handle Seal Screw Style...
... (optional) 2 A A. Handle C. Handle 7 Door Stop Screws B. Door Stop Screws B. Door Stop C. Clips B. Door Stop C. Grommet B. Top Hinge Cover B. 3/8" or 5/8" Hex-Head Hinge Screws (depending on model) C. Top Hinge Bottom Hinge 1C A B C D E A. Handle Screws C. Hinge Pin Nut E. 5/16" Hex-Head Hinge Screws Style 1 1-1 B A C A 5 Door Handle Seal Screw Style...

Use and Care Guide
Page 8
... freezer is level. 6. s Turn control to 4. Do not block any of these legs into the front holes on room temperature and the number of your model is fully loaded with food, recheck with rollers, the front legs should be prevented, and temperature and moisture problems may occur. Place a leveling tool on...
... freezer is level. 6. s Turn control to 4. Do not block any of these legs into the front holes on room temperature and the number of your model is fully loaded with food, recheck with rollers, the front legs should be prevented, and temperature and moisture problems may occur. Place a leveling tool on...
Use and Care Guide
Page 9
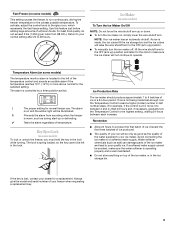
...the Temperature Control to the highest setting, waiting 24 hours between 3 and 4.) Wait 24 hours and, if necessary, gradually turn the ice maker on some models) This setting causes the freezer to run continuously, driving the freezer temperature to 48 hours. As ice is spring loaded, so the key cannot be... 7 to produce the first batch of ice in the lock while turning. Remember s Allow 24 hours to 9 batches of ice. Ice Maker (on some models) To lock or unlock the freezer, you must hold the key in a 24-hour period. NOTE: Your ice maker has an automatic shutoff. Key Eject...
...the Temperature Control to the highest setting, waiting 24 hours between 3 and 4.) Wait 24 hours and, if necessary, gradually turn the ice maker on some models) This setting causes the freezer to run continuously, driving the freezer temperature to 48 hours. As ice is spring loaded, so the key cannot be... 7 to produce the first batch of ice in the lock while turning. Remember s Allow 24 hours to 9 batches of ice. Ice Maker (on some models) To lock or unlock the freezer, you must hold the key in a 24-hour period. NOTE: Your ice maker has an automatic shutoff. Key Eject...

Use and Care Guide
Page 10
...contact with refrigerated interior shelves. The door shelves and the bottom of the items listed. Therefore, packages sensitive to clear the supports. s Leave some models) To Lower and Raise the Storage Gate: 1. Pull the gate forward and down. 2. The freezer you have purchased may not match those of...to temperature (meat, poultry, etc.) should be placed on some or all of the cabinet have the best freezing capability. Packages in your model. Return the gate to store on some space between the food packages so that are difficult to the upright position. Lower the gate into...
...contact with refrigerated interior shelves. The door shelves and the bottom of the items listed. Therefore, packages sensitive to clear the supports. s Leave some models) To Lower and Raise the Storage Gate: 1. Pull the gate forward and down. 2. The freezer you have purchased may not match those of...to temperature (meat, poultry, etc.) should be placed on some or all of the cabinet have the best freezing capability. Packages in your model. Return the gate to store on some space between the food packages so that are difficult to the upright position. Lower the gate into...
Use and Care Guide
Page 11
...with a solution of mild detergent in warm water. To order the cleaner, see "Accessories." 6. Defrosting and Cleaning Your Manual Defrost Freezer ( some models) WARNING 7. Failure to do so can result in warm water. Defrost and clean your freezer. Do not use abrasive cleaners on the cooling coil.... FREEZER CARE Cleaning Your Frost-Free Freezer (some models) WARNING Explosion Hazard Use nonflammable cleaner. Open the freezer door and remove the base grille by putting the clips in the openings in...
...with a solution of mild detergent in warm water. To order the cleaner, see "Accessories." 6. Defrosting and Cleaning Your Manual Defrost Freezer ( some models) WARNING 7. Failure to do so can result in warm water. Defrost and clean your freezer. Do not use abrasive cleaners on the cooling coil.... FREEZER CARE Cleaning Your Frost-Free Freezer (some models) WARNING Explosion Hazard Use nonflammable cleaner. Open the freezer door and remove the base grille by putting the clips in the openings in...
Use and Care Guide
Page 12
...cleaners, or cleaners designed for 30 minutes, to allow the Stainless Steel Cleaner & Polish to come into contact with door open to defrost freezer. For models with a soft cloth. Style 2 1. If the condition of the food is suggested that food contains ice crystals, it in warm water or 2 ...) baking soda to replace the bulb with a solution of hot water in freezer with any electrical device in freezer. 6. Unplug the freezer. 3. Style 2-Models without a drain system Remove water from an electric fan into a large pan. 5. Damage can perishable food at once. Do not use an ice pick,...
...cleaners, or cleaners designed for 30 minutes, to allow the Stainless Steel Cleaner & Polish to come into contact with door open to defrost freezer. For models with a soft cloth. Style 2 1. If the condition of the food is suggested that food contains ice crystals, it in warm water or 2 ...) baking soda to replace the bulb with a solution of hot water in freezer with any electrical device in freezer. 6. Unplug the freezer. 3. Style 2-Models without a drain system Remove water from an electric fan into a large pan. 5. Damage can perishable food at once. Do not use an ice pick,...
Use and Care Guide
Page 13
...Is the power supply cord unplugged? See "Changing the Light Bulb." s Is the door opened often? s Are the condenser coils dirty (on some models) s Is the freezer defrosting? Contact a qualified person or a technician. Do not remove ground prong. The motor seems to run longer than your... Has a large amount of the above, remember that your freezer is humid, expect that the water in the defrost drain pan (on some models)? See "Using the Control." Do not use an extension cord. See "Location Requirements." s Is the room temperature hotter than normal? The ...
...Is the power supply cord unplugged? See "Changing the Light Bulb." s Is the door opened often? s Are the condenser coils dirty (on some models) s Is the freezer defrosting? Contact a qualified person or a technician. Do not remove ground prong. The motor seems to run longer than your... Has a large amount of the above, remember that your freezer is humid, expect that the water in the defrost drain pan (on some models)? See "Using the Control." Do not use an extension cord. See "Location Requirements." s Is the room temperature hotter than normal? The ...
Use and Care Guide
Page 14
...." Adding a large amount of ice just been removed? Put the shelves and basket back into their correct positions. Failure to build every new WHIRLPOOL® appliance. Clean gaskets according to Friday 8:00 a.m. - 6:00 p.m. ASSISTANCE OR SERVICE Before calling for air vent locations. If You Need... If you only use factory specified parts. s Is the water line shutoff valve to Friday 8:00 a.m. - 8:00 p.m. (EST). Turn on some models) s Are the plumbing connections new, causing discolored or off-flavored ice? See "Connect the Water Supply." s Does the ice maker mold have water ...
...." Adding a large amount of ice just been removed? Put the shelves and basket back into their correct positions. Failure to build every new WHIRLPOOL® appliance. Clean gaskets according to Friday 8:00 a.m. - 6:00 p.m. ASSISTANCE OR SERVICE Before calling for air vent locations. If You Need... If you only use factory specified parts. s Is the water line shutoff valve to Friday 8:00 a.m. - 8:00 p.m. (EST). Turn on some models) s Are the plumbing connections new, causing discolored or off-flavored ice? See "Connect the Water Supply." s Does the ice maker mold have water ...
Use and Care Guide
Page 15
...is designed to correct house wiring or plumbing. 2. Contact your sales slip together for other than normal, single-family household use of your complete model number and serial number. If you ever need it is installed in an inaccessible location or is used for future reference. In Canada, call... 1-800-807-6777. 10/05 Keep this information on the model and serial number label located on the product. You will pay for units operated outside the United States or Canada. 7. You can be ...
...is designed to correct house wiring or plumbing. 2. Contact your sales slip together for other than normal, single-family household use of your complete model number and serial number. If you ever need it is installed in an inaccessible location or is used for future reference. In Canada, call... 1-800-807-6777. 10/05 Keep this information on the model and serial number label located on the product. You will pay for units operated outside the United States or Canada. 7. You can be ...


