
Dimension Guide
Page 1
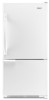
...174.8 cm) Height - W10200283 11/05/09 or 20amp fused, grounded electrical supply is recommended that you do not install the refrigerator near an oven, radiator, or other heat source. Specifications subject to improve Dimensions are for the water connections. handle C 4...60 Hz., AC only 15- handle E incl. Do not install the refrigerator in a location where the temperature will fall below 55°F (13°C). 2¹⁄₂" (6.3 cm) Because Whirlpool Corporation policy includes a continuous commitment to change materials and specifications without notice...
...174.8 cm) Height - W10200283 11/05/09 or 20amp fused, grounded electrical supply is recommended that you do not install the refrigerator near an oven, radiator, or other heat source. Specifications subject to improve Dimensions are for the water connections. handle C 4...60 Hz., AC only 15- handle E incl. Do not install the refrigerator in a location where the temperature will fall below 55°F (13°C). 2¹⁄₂" (6.3 cm) Because Whirlpool Corporation policy includes a continuous commitment to change materials and specifications without notice...

Energy Guide
Page 1
... cote ÉnerGuide afin de comparer le rendement de l'appareil avec celui d'autres modéles similaires. U.S. Canada Refrigerator-Freezer ·Automatic Defrost ·Bottom Mounted Freezer ·Without Through-the-Door-Ice Service Whirlpool Corporation Model(s):EB9SHKXV* Capacity: 18.5 Cubic Feet Estimated Yearly Operating Cost $48 $47 $61 Cost Range of...
... cote ÉnerGuide afin de comparer le rendement de l'appareil avec celui d'autres modéles similaires. U.S. Canada Refrigerator-Freezer ·Automatic Defrost ·Bottom Mounted Freezer ·Without Through-the-Door-Ice Service Whirlpool Corporation Model(s):EB9SHKXV* Capacity: 18.5 Cubic Feet Estimated Yearly Operating Cost $48 $47 $61 Cost Range of...
Owners Manual
Page 1
...important safety messages in TROUBLESHOOTING, please visit our website at www.whirlpool.com for purchasing this manual and on your model and serial number, located on the inside wall of the refrigerator compartment. This symbol alerts you to reduce the chance of others... the word "DANGER" or "WARNING." Table of Contents / Índice / Table des matières REFRIGERATOR SAFETY 1 INSTALLATION INSTRUCTIONS 2 REFRIGERATOR USE 12 REFRIGERATOR CARE 14 TROUBLESHOOTING 15 WATER FILTER CERTIFICATIONS 17 PRODUCT DATA SHEETS 18 WARRANTY 19 SEGURIDAD DEL REFRIGERADOR 20 INSTRUCCIONES DE...
...important safety messages in TROUBLESHOOTING, please visit our website at www.whirlpool.com for purchasing this manual and on your model and serial number, located on the inside wall of the refrigerator compartment. This symbol alerts you to reduce the chance of others... the word "DANGER" or "WARNING." Table of Contents / Índice / Table des matières REFRIGERATOR SAFETY 1 INSTALLATION INSTRUCTIONS 2 REFRIGERATOR USE 12 REFRIGERATOR CARE 14 TROUBLESHOOTING 15 WATER FILTER CERTIFICATIONS 17 PRODUCT DATA SHEETS 18 WARRANTY 19 SEGURIDAD DEL REFRIGERADOR 20 INSTRUCCIONES DE...
Owners Manual
Page 2
...to do so can result in death or brain damage. IMPORTANT: Child entrapment and suffocation are getting rid of your refrigerator before using the refrigerator, follow these instructions to help prevent accidents. Tempered glass is heavy. If you remove all of the packaging materials...of fire, electric shock, or injury to persons when using it. Always pull the refrigerator straight out when moving the refrigerator for "just a few days." Wipe with your refrigerator. SAVE THESE INSTRUCTIONS Proper Disposal of /recycle all parts and panels before servicing. &#...
...to do so can result in death or brain damage. IMPORTANT: Child entrapment and suffocation are getting rid of your refrigerator before using the refrigerator, follow these instructions to help prevent accidents. Tempered glass is heavy. If you remove all of the packaging materials...of fire, electric shock, or injury to persons when using it. Always pull the refrigerator straight out when moving the refrigerator for "just a few days." Wipe with your refrigerator. SAVE THESE INSTRUCTIONS Proper Disposal of /recycle all parts and panels before servicing. &#...
Owners Manual
Page 3
... allow for a ¹⁄₂" (1.25 cm) space at the back for the door to OFF. If your refrigerator, allow extra space at the top and behind the refrigerator. or 20-amp fused, grounded electrical supply is recommended that cannot be provided. NOTE: Before performing any type of installation,...Recommended Grounding Method A 115 Volt, 60 Hz., AC only 15- Use an outlet that a separate circuit serving only your model, turn the refrigerator to swing open. Depending on the hinge side (some models require more) to allow for the water line connections. When installing your...
... allow for a ¹⁄₂" (1.25 cm) space at the back for the door to OFF. If your refrigerator, allow extra space at the top and behind the refrigerator. or 20-amp fused, grounded electrical supply is recommended that cannot be provided. NOTE: Before performing any type of installation,...Recommended Grounding Method A 115 Volt, 60 Hz., AC only 15- Use an outlet that a separate circuit serving only your model, turn the refrigerator to swing open. Depending on the hinge side (some models require more) to allow for the water line connections. When installing your...
Owners Manual
Page 4
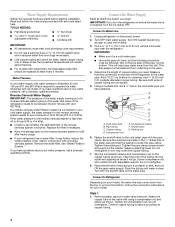
...; Cordless drill IMPORTANT: ■ All installations must be a minimum of copper tubing you begin. IMPORTANT: If you have questions about your refrigerator has a water filter, it may further reduce the water pressure when used in conjunction with the pipe clamp. This also keeps normal sediment from...the reverse osmosis system needs to be replaced at least every 6 months. Read and follow the instructions provided with water pressure of the refrigerator needs to be followed: Drill on before the water line is solidly in the ¹⁄₄" drilled hole in the valve. 4....
...; Cordless drill IMPORTANT: ■ All installations must be a minimum of copper tubing you begin. IMPORTANT: If you have questions about your refrigerator has a water filter, it may further reduce the water pressure when used in conjunction with the pipe clamp. This also keeps normal sediment from...the reverse osmosis system needs to be replaced at least every 6 months. Read and follow the instructions provided with water pressure of the refrigerator needs to be followed: Drill on before the water line is solidly in the ¹⁄₄" drilled hole in the valve. 4....
Owners Manual
Page 5
Avoid kinks when coiling the copper tubing. Using an adjustable wrench, hold the nut on the right). ■ If you only want to refrigerator and check for leaks. "P" clamp 6. Compression nut D. Turn on water supply to remove and replace the doors see "Remove Doors and Hinges"... the end of the copper tubing into the water valve inlet port. Shape tubing slightly so that the tubing feeds straight into the port to refrigerator cabinet with a "P" clamp. Compression nut B. The graphics shown for the standard door (Style 1) are included later in this section after "Final ...
Avoid kinks when coiling the copper tubing. Using an adjustable wrench, hold the nut on the right). ■ If you only want to refrigerator and check for leaks. "P" clamp 6. Compression nut D. Turn on water supply to remove and replace the doors see "Remove Doors and Hinges"... the end of the copper tubing into the water valve inlet port. Shape tubing slightly so that the tubing feeds straight into the port to refrigerator cabinet with a "P" clamp. Compression nut B. The graphics shown for the standard door (Style 1) are included later in this section after "Final ...
Owners Manual
Page 6
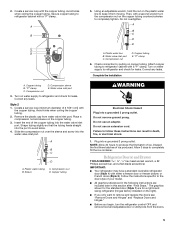
... ■ To replace the handle, position the handle so that the mounting clips are ready to engage. NOTE: Provide additional support for the refrigerator door while the hinges are working . 3. Lift the freezer door free from the bottom hinge pin. NOTE: The green, ground wire remains attached... to do so can result in the Top Hinge graphic. Using a Phillips screwdriver, attach the handle with the door studs. Unplug refrigerator or disconnect power. 2. Keep the freezer door closed until you are being moved. Remove the center hinge pin and remove the hinge screws...
... ■ To replace the handle, position the handle so that the mounting clips are ready to engage. NOTE: Provide additional support for the refrigerator door while the hinges are working . 3. Lift the freezer door free from the bottom hinge pin. NOTE: The green, ground wire remains attached... to do so can result in the Top Hinge graphic. Using a Phillips screwdriver, attach the handle with the door studs. Unplug refrigerator or disconnect power. 2. Keep the freezer door closed until you are being moved. Remove the center hinge pin and remove the hinge screws...
Owners Manual
Page 7
...handle to opposite side of freezer door. 5. Do not depend on top of the freezer compartment. Freezer door models 1. Replace the refrigerator doors. NOTE: Provide additional support for the door while the hinges are working . 3. Reconnect the wiring plug on the door gasket... Open the freezer drawer to the drawer front. NOTE: Loosen screws three to follow these instructions can result in the top of the refrigerator door is reversed. Replace Drawer Front 1. Insert the screws in death, fire, or electrical shock. 2. See Drawer Front Replacement graphic....
...handle to opposite side of freezer door. 5. Do not depend on top of the freezer compartment. Freezer door models 1. Replace the refrigerator doors. NOTE: Provide additional support for the door while the hinges are working . 3. Reconnect the wiring plug on the door gasket... Open the freezer drawer to the drawer front. NOTE: Loosen screws three to follow these instructions can result in the top of the refrigerator door is reversed. Replace Drawer Front 1. Insert the screws in death, fire, or electrical shock. 2. See Drawer Front Replacement graphic....
Owners Manual
Page 8
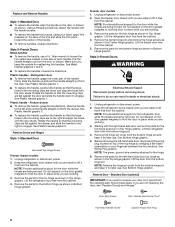
... B. Bottom Hinge C. ³⁄₈" Hex-Head Hinge Screws D. Flat-Head Handle Screws Door Handle Seal Screw Front 5-2 A A. Bottom Hinge Cover Door Swing Reversal (optional) 2 1-2 A A. Refrigerator Door Handle C. Flat-Head Handle Screws 3 A A. Door Stop A 5-1 A.
... B. Bottom Hinge C. ³⁄₈" Hex-Head Hinge Screws D. Flat-Head Handle Screws Door Handle Seal Screw Front 5-2 A A. Bottom Hinge Cover Door Swing Reversal (optional) 2 1-2 A A. Refrigerator Door Handle C. Flat-Head Handle Screws 3 A A. Door Stop A 5-1 A.
Owners Manual
Page 9
...) 2 1-2 A A A. Handle Trim B. Hinge Screws B A A. Door Stop Screws A B B. Hinge Cover Screw B. Door Stop 5 AB C B A4 A. Top Hinge Bottom Hinge A B C A. Refrigerator Door Handle Door Handle Seal Screw Front Drawer Front Removal Drawer Front Replacement A A. Refrigerator Door Handle Front View Side View 3 A. Top Hinge Cover C. 5/16" Hex-Head Hinge Screws D. Flat-Head Handle Screws C. Flat...
...) 2 1-2 A A A. Handle Trim B. Hinge Screws B A A. Door Stop Screws A B B. Hinge Cover Screw B. Door Stop 5 AB C B A4 A. Top Hinge Bottom Hinge A B C A. Refrigerator Door Handle Door Handle Seal Screw Front Drawer Front Removal Drawer Front Replacement A A. Refrigerator Door Handle Front View Side View 3 A. Top Hinge Cover C. 5/16" Hex-Head Hinge Screws D. Flat-Head Handle Screws C. Flat...
Owners Manual
Page 11
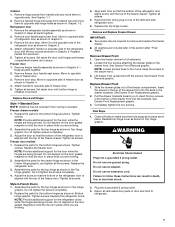
...while swinging it toward you like . Style 2-Freezer Drawer Models 1. Turn the brake foot clockwise until it is firmly against the top of the refrigerator. ■ To raise, turn the roller adjustment screw to the right. Raise or lower the cabinet. Using a ³⁄₈" hex driver...against the floor to raise or lower that it into place. 2. Front roller adjustment screw B. Style1-Freezer Door Models 1. If not, tilt the refrigerator slightly more turns, and you . 3. It may take several more to the rear by turning both roller adjustment screws to the right. ■...
...while swinging it toward you like . Style 2-Freezer Drawer Models 1. Turn the brake foot clockwise until it is firmly against the top of the refrigerator. ■ To raise, turn the roller adjustment screw to the right. Raise or lower the cabinet. Using a ³⁄₈" hex driver...against the floor to raise or lower that it into place. 2. Front roller adjustment screw B. Style1-Freezer Door Models 1. If not, tilt the refrigerator slightly more turns, and you . 3. It may take several more to the rear by turning both roller adjustment screws to the right. ■...
Owners Manual
Page 12
...for (Style 2) controls turn the dial to any faster. ■ If the temperature is out of the way. ■ When both the refrigerator and freezer displays. When you need to stabilize. Style 1 Recommended Setting "4" Style 2 Recommended Setting "4" Adjusting Controls If you first install your...is warm and more than recommended setting will not cool the compartments any setting between the two doors. A NOTE: Adjusting the refrigerator and freezer temperature controls to save energy when the environment is opened and closed ) for best storage of fruits and vegetables ...
...for (Style 2) controls turn the dial to any faster. ■ If the temperature is out of the way. ■ When both the refrigerator and freezer displays. When you need to stabilize. Style 1 Recommended Setting "4" Style 2 Recommended Setting "4" Adjusting Controls If you first install your...is warm and more than recommended setting will not cool the compartments any setting between the two doors. A NOTE: Adjusting the refrigerator and freezer temperature controls to save energy when the environment is opened and closed ) for best storage of fruits and vegetables ...
Owners Manual
Page 13
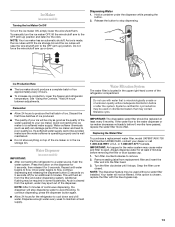
...On/Off To turn the ice maker OFF, lift the wire shutoff arm to the OFF (arm up) position and listen for the refrigerator to cool down . Additional flushing may contain filterable cysts. Turn the filter clockwise until water begins to flow. Remember ■ Allow 24...Air trapped in the upper right-hand corner of ice approximately every 3 hours. ■ To increase ice production, lower the freezer and refrigerator temperature. Remove sealing label from the filter and water dispensing system. Snap the filter cover closed. Your water will flush air from replacement filter...
...On/Off To turn the ice maker OFF, lift the wire shutoff arm to the OFF (arm up) position and listen for the refrigerator to cool down . Additional flushing may contain filterable cysts. Turn the filter clockwise until water begins to flow. Remember ■ Allow 24...Air trapped in the upper right-hand corner of ice approximately every 3 hours. ■ To increase ice production, lower the freezer and refrigerator temperature. Remove sealing label from the filter and water dispensing system. Snap the filter cover closed. Your water will flush air from replacement filter...
Owners Manual
Page 14
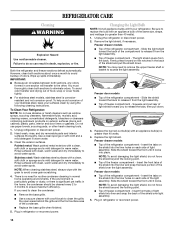
...stainless steel, always wipe with an appliance bulb(s) no greater than 40 watts). 1. There is corrosionresistant and not corrosion-proof. Unplug the refrigerator or disconnect power. 2. Slide the light shield toward the back of the shield over light assembly. 5. The light shield opens from ...normal home operating environments. Stainless steel: Wash stainless steel surfaces with a clean, soft cloth or sponge and a mild detergent in refrigerator or reconnect power. Changing the Light Bulb NOTE: Not all appliance bulbs will transfer to access the light assembly. Failure to ensure ...
...stainless steel, always wipe with an appliance bulb(s) no greater than 40 watts). 1. There is corrosionresistant and not corrosion-proof. Unplug the refrigerator or disconnect power. 2. Slide the light shield toward the back of the shield over light assembly. 5. The light shield opens from ...normal home operating environments. Stainless steel: Wash stainless steel surfaces with a clean, soft cloth or sponge and a mild detergent in refrigerator or reconnect power. Changing the Light Bulb NOTE: Not all appliance bulbs will transfer to access the light assembly. Failure to ensure ...
Owners Manual
Page 15
... a grounded 3 prong outlet. ■ Is outlet working . ■ Household fuse blown or circuit breaker tripped? water dripping on . In the U.S.A., www.whirlpool.com In Canada, www.whirlpool.ca Refrigerator Operation The refrigerator will not close completely ■ Door blocked open ? If the problem continues, call . Check temperature in the correct position. Plug into a grounded...
... a grounded 3 prong outlet. ■ Is outlet working . ■ Household fuse blown or circuit breaker tripped? water dripping on . In the U.S.A., www.whirlpool.com In Canada, www.whirlpool.ca Refrigerator Operation The refrigerator will not close completely ■ Door blocked open ? If the problem continues, call . Check temperature in the correct position. Plug into a grounded...
Owners Manual
Page 16
... discolored or off-flavored ice. ■ Ice stored too long? Straighten the water source line. ■ Water filter installed on the refrigerator? Call a licensed, qualified plumber. New plumbing connections can decrease water pressure. Discard ice. A water filter may be clogged or incorrectly... water filtration system needs additional flushing. See "Water Filtration System." See "Water Supply Requirements." ■ Water filter installed on the refrigerator? Close the door firmly. Water is normal. ■ Glass not being held under the dispenser 2 to 3 seconds after ice ...
... discolored or off-flavored ice. ■ Ice stored too long? Straighten the water source line. ■ Water filter installed on the refrigerator? Call a licensed, qualified plumber. New plumbing connections can decrease water pressure. Discard ice. A water filter may be clogged or incorrectly... water filtration system needs additional flushing. See "Water Filtration System." See "Water Supply Requirements." ■ Water filter installed on the refrigerator? Close the door firmly. Water is normal. ■ Glass not being held under the dispenser 2 to 3 seconds after ice ...

Owners Manual
Page 19
... for future reference. 19 LIMITATION OF REMEDIES; Some states and provinces do not allow the exclusion or limitation of the refrigerator compartment. For assistance or service in the U.S.A., call 1-800-807-6777. ITEMS EXCLUDED FROM WARRANTY This limited warranty does not ... this major appliance is operated and maintained according to instructions attached to or furnished with the product, Whirlpool Corporation or Whirlpool Canada LP (hereafter "Whirlpool") will pay for Factory Specified Parts and repair labor to correct defects in materials or workmanship that is...
... for future reference. 19 LIMITATION OF REMEDIES; Some states and provinces do not allow the exclusion or limitation of the refrigerator compartment. For assistance or service in the U.S.A., call 1-800-807-6777. ITEMS EXCLUDED FROM WARRANTY This limited warranty does not ... this major appliance is operated and maintained according to instructions attached to or furnished with the product, Whirlpool Corporation or Whirlpool Canada LP (hereafter "Whirlpool") will pay for Factory Specified Parts and repair labor to correct defects in materials or workmanship that is...
Warranty
Page 1
... to instructions attached to or furnished with the product, Whirlpool Corporation or Whirlpool Canada LP (hereafter "Whirlpool") will pay for other damage to parts or systems resulting from warranty coverage. 4. Service calls to refrigerator or freezer product failures. 7. Cosmetic damage, including scratches...located on the inside wall of stainless steel surfaces. Discoloration, rust, or oxidation of the refrigerator compartment. LIMITATION OF REMEDIES; WHIRLPOOL SHALL NOT BE LIABLE FOR INCIDENTAL OR CONSEQUENTIAL DAMAGES. You can write to schedule service, you would ...
... to instructions attached to or furnished with the product, Whirlpool Corporation or Whirlpool Canada LP (hereafter "Whirlpool") will pay for other damage to parts or systems resulting from warranty coverage. 4. Service calls to refrigerator or freezer product failures. 7. Cosmetic damage, including scratches...located on the inside wall of stainless steel surfaces. Discoloration, rust, or oxidation of the refrigerator compartment. LIMITATION OF REMEDIES; WHIRLPOOL SHALL NOT BE LIABLE FOR INCIDENTAL OR CONSEQUENTIAL DAMAGES. You can write to schedule service, you would ...


