
Dimension Guide
Page 1
...dishwasher opening . (14³.⁄4₄"cm ) (5. 12"cm ) Because Whirlpool...dishwasher installation. (612c4m" )* * (86m3. 44in"c*m ) (10.42"cm ) (7. 63"cm ) (176. 2³⁄₄c"m ) (41. 4³⁄₄c"m ) (6.24¹⁄c₂"m ) (2160. 7¹⁄c₂"m ) (156. ¹9⁄₄c"m ) CAlereaar **Measured from the lowest point on one end. For complete details, see Installation Ref. Instructions...® Undercounter Dishwasher PRODUCT MODEL NUMBERS DU1010XTX DU1014XTX DU1015XTX DU1030XTX DU1055XTS DU1055XTV DU1061XTV DU1300XTV DU1301XTV...
...dishwasher opening . (14³.⁄4₄"cm ) (5. 12"cm ) Because Whirlpool...dishwasher installation. (612c4m" )* * (86m3. 44in"c*m ) (10.42"cm ) (7. 63"cm ) (176. 2³⁄₄c"m ) (41. 4³⁄₄c"m ) (6.24¹⁄c₂"m ) (2160. 7¹⁄c₂"m ) (156. ¹9⁄₄c"m ) CAlereaar **Measured from the lowest point on one end. For complete details, see Installation Ref. Instructions...® Undercounter Dishwasher PRODUCT MODEL NUMBERS DU1010XTX DU1014XTX DU1015XTX DU1030XTX DU1055XTS DU1055XTV DU1061XTV DU1300XTV DU1301XTV...

Installation Instructions
Page 2
... Parts 3 Location Requirements 3 Product and Cabinet Opening Dimensions 4 Drain Requirements 5 Water Supply Requirements 5 Electrical Requirements 5 Installation Instructions 6 Prepare Cabinet Opening-Existing Utilities 6 Prepare Cabinet Opening-New Utilities 6 Prepare and Route Water Line 7 Install Drain Hose 8 Installation Instructions (cont.) Prepare Dishwasher 10 Make Power Cord Electrical Connection 11 Determine Cabinet Opening 12 Choose Attachment Option 13 Move...
... Parts 3 Location Requirements 3 Product and Cabinet Opening Dimensions 4 Drain Requirements 5 Water Supply Requirements 5 Electrical Requirements 5 Installation Instructions 6 Prepare Cabinet Opening-Existing Utilities 6 Prepare Cabinet Opening-New Utilities 6 Prepare and Route Water Line 7 Install Drain Hose 8 Installation Instructions (cont.) Prepare Dishwasher 10 Make Power Cord Electrical Connection 11 Determine Cabinet Opening 12 Choose Attachment Option 13 Move...

Installation Instructions
Page 3
...: Parts available for loading and unloading dishes. NOTE: To avoid shifting during dishwasher operation, shims must be made by authorized service personnel. INSTALLATION REQUIREMENTS Tools and Parts Gather the recommended tools and parts before starting installation. Read and follow the instructions provided with and 1¹⁄₂" hole saw bits Small tubing cutter Wire...
...: Parts available for loading and unloading dishes. NOTE: To avoid shifting during dishwasher operation, shims must be made by authorized service personnel. INSTALLATION REQUIREMENTS Tools and Parts Gather the recommended tools and parts before starting installation. Read and follow the instructions provided with and 1¹⁄₂" hole saw bits Small tubing cutter Wire...

Installation Instructions
Page 5
...NFPA 70 - drain line fittings. • If required, the air gap should be installed in house plumbing and 20" (50.8 cm) minimum above code standards can be needed to connect to the dishwasher opening. latest edition and all local codes and ordinances. A copy of the counter, ... up and securely fastened to house plumbing lower than 20" (50.8 cm) above drain trap in accordance with the air gap installation instructions. If connecting dishwasher with direct wiring: • Use flexible, armored or nonmetallic sheathed, copper wire with grounding wire that meets the wiring requirements for...
...NFPA 70 - drain line fittings. • If required, the air gap should be installed in house plumbing and 20" (50.8 cm) minimum above code standards can be needed to connect to the dishwasher opening. latest edition and all local codes and ordinances. A copy of the counter, ... up and securely fastened to house plumbing lower than 20" (50.8 cm) above drain trap in accordance with the air gap installation instructions. If connecting dishwasher with direct wiring: • Use flexible, armored or nonmetallic sheathed, copper wire with grounding wire that meets the wiring requirements for...

Installation Instructions
Page 6
... route the electrical supply What type of electrical connection will you already have utility hookups? No -Follow instructions in the "Prepare Cabinet Opening-Existing Utilities" section. Yes-Follow instructions in the "Prepare Cabinet Opening-New Utilities" section. INSTALLATION INSTRUCTIONS Electrical Shock Hazard Disconnect electrical power at the fuse box or circuit breaker box before installing dishwasher.
... route the electrical supply What type of electrical connection will you already have utility hookups? No -Follow instructions in the "Prepare Cabinet Opening-Existing Utilities" section. Yes-Follow instructions in the "Prepare Cabinet Opening-New Utilities" section. INSTALLATION INSTRUCTIONS Electrical Shock Hazard Disconnect electrical power at the fuse box or circuit breaker box before installing dishwasher.

Installation Instructions
Page 11
...3 Power Cord-Connect remaining wires NOTE: Do not pre-twist stranded wire. Power Supply Cord: Follow Option A instructions Direct Wire: Follow Option B instructions If using UL Listed/CSA Approved twist-on wire connector. Ground wire Ground wire Washer Ground connector Remove the green... electrical shock. 2 Power Supply Cord- Connect ground wire to continue with the installation of the green ground wire. Gently tug on wire connectors rated to 16-gauge dishwasher wiring. What type of dishwasher tub. Make Power Supply Cord Connection Option A, Power Supply Cord: 1 Power...
...3 Power Cord-Connect remaining wires NOTE: Do not pre-twist stranded wire. Power Supply Cord: Follow Option A instructions Direct Wire: Follow Option B instructions If using UL Listed/CSA Approved twist-on wire connector. Ground wire Ground wire Washer Ground connector Remove the green... electrical shock. 2 Power Supply Cord- Connect ground wire to continue with the installation of the green ground wire. Gently tug on wire connectors rated to 16-gauge dishwasher wiring. What type of dishwasher tub. Make Power Supply Cord Connection Option A, Power Supply Cord: 1 Power...

Installation Instructions
Page 12
...Visit www.whirlpool.com under FAQ tab. 4 Power Cord-Secure cord on the underside of cover. Close cover ensuring wires are preset at the factory for additional clearance. Put wheels in the required position determined from underside of countertop to floor where dishwasher will be installed (you...up 34" (86.4 cm) 1 10 (87.0 cm) 2 5 3 0 NOTE: If the minimum cabinet opening from "Dishwasher Height Adjustment Chart." (To change wheel position, use a flat-blade screwdriver to pop out the wheel, then snap into outlet until instructed. 12 3 2 1 Turn both leveler legs to secure cover.
...Visit www.whirlpool.com under FAQ tab. 4 Power Cord-Secure cord on the underside of cover. Close cover ensuring wires are preset at the factory for additional clearance. Put wheels in the required position determined from underside of countertop to floor where dishwasher will be installed (you...up 34" (86.4 cm) 1 10 (87.0 cm) 2 5 3 0 NOTE: If the minimum cabinet opening from "Dishwasher Height Adjustment Chart." (To change wheel position, use a flat-blade screwdriver to pop out the wheel, then snap into outlet until instructed. 12 3 2 1 Turn both leveler legs to secure cover.

Installation Instructions
Page 13
... bracket along the scored line. Push bracket into slot on the side of dishwasher, and bend tab in toward the side of the dishwasher so that it from the parts package. 2. NOTE: Do not install kickplate until instructed to do so can result in the parts bag, attach the brackets to... the right Option 2, Dishwasher with Plastic Tub Side Attachment (for the other hard surface countertops...
... bracket along the scored line. Push bracket into slot on the side of dishwasher, and bend tab in toward the side of the dishwasher so that it from the parts package. 2. NOTE: Do not install kickplate until instructed to do so can result in the parts bag, attach the brackets to... the right Option 2, Dishwasher with Plastic Tub Side Attachment (for the other hard surface countertops...

Installation Instructions
Page 20
...Power 1 Reconnect power Reconnect electrical power at the fuse box or circuit breaker box. 20 Check Operation ❏ Read the Dishwasher User Instructions that came with an optical water sensor so the first cycle will run longer to calibrate to reduce the risk of a ...installation or replacement dates on the water sheeting action of a cycle.) NOTE: If a braided supply hose is designed to start the dishwasher? • Is the water turned on? Failure to see "If Dishwasher Does Not Operate" section. Check to follow these work, call 1-800-807-6777. If none of these instructions...
...Power 1 Reconnect power Reconnect electrical power at the fuse box or circuit breaker box. 20 Check Operation ❏ Read the Dishwasher User Instructions that came with an optical water sensor so the first cycle will run longer to calibrate to reduce the risk of a ...installation or replacement dates on the water sheeting action of a cycle.) NOTE: If a braided supply hose is designed to start the dishwasher? • Is the water turned on? Failure to see "If Dishwasher Does Not Operate" section. Check to follow these work, call 1-800-807-6777. If none of these instructions...

Owners Manual
Page 2
WARNING: Improper connection of least resistance for electric current. SAVE THESE INSTRUCTIONS WARNING Tip Over Hazard Do not use dishwasher until completely installed. Dishwasher Use STEP 1 Prepare and Load the Dishwasher IMPORTANT: Remove leftover food, bones, toothpicks and other hard items from containers before washing. It is properly grounded. The plug must be run with the...
WARNING: Improper connection of least resistance for electric current. SAVE THESE INSTRUCTIONS WARNING Tip Over Hazard Do not use dishwasher until completely installed. Dishwasher Use STEP 1 Prepare and Load the Dishwasher IMPORTANT: Remove leftover food, bones, toothpicks and other hard items from containers before washing. It is properly grounded. The plug must be run with the...

Owners Manual
Page 5
... rubbing dishes during a cycle ■ Chipping of china and glassware might not be 20 to 120 psi (138 to 828 kPa) for proper dishwasher fill. Refer to the Installation Instructions for dryer dishes. ■ Excess moisture on the counter. Do not overload. Keep the rinse aid dispenser filled. Reseason cookware after a complete cycle...
... rubbing dishes during a cycle ■ Chipping of china and glassware might not be 20 to 120 psi (138 to 828 kPa) for proper dishwasher fill. Refer to the Installation Instructions for dryer dishes. ■ Excess moisture on the counter. Do not overload. Keep the rinse aid dispenser filled. Reseason cookware after a complete cycle...

Owners Manual
Page 6
...or use your appliance if it is installed in an inaccessible location or is not installed in accordance with published installation instructions. 11. The removal and reinstallation of your major appliance, to replace or repair house fuses or to Whirlpool with any questions or concerns at ... near the door on the right-hand or left-hand side of Whirlpool, U.S.A. Service calls to correct the installation of your correspondence. All rights reserved. ® Registered Trademark/TM Trademark of the dishwasher interior. Any food loss due to the appliance. 9. Replacement parts...
...or use your appliance if it is installed in an inaccessible location or is not installed in accordance with published installation instructions. 11. The removal and reinstallation of your major appliance, to replace or repair house fuses or to Whirlpool with any questions or concerns at ... near the door on the right-hand or left-hand side of Whirlpool, U.S.A. Service calls to correct the installation of your correspondence. All rights reserved. ® Registered Trademark/TM Trademark of the dishwasher interior. Any food loss due to the appliance. 9. Replacement parts...

Warranty
Page 1
...dishwasher interior. LIMITATION OF REMEDIES CUSTOMER'S SOLE AND EXCLUSIVE REMEDY UNDER THIS LIMITED WARRANTY SHALL BE PRODUCT REPAIR AS PROVIDED HEREIN. THIS WARRANTY GIVES YOU SPECIFIC LEGAL RIGHTS AND YOU MAY ALSO HAVE OTHER RIGHTS, WHICH VARY FROM STATE TO STATE OR PROVINCE TO PROVINCE. Contact your authorized Whirlpool...in remote locations. 10. Replacement parts or repair labor costs when the major appliance is not installed in accordance with published installation instructions. 11. SOME STATES AND PROVINCES DO NOT ALLOW THE EXCLUSION OR LIMITATION OF INCIDENTAL OR CONSEQUENTIAL...
...dishwasher interior. LIMITATION OF REMEDIES CUSTOMER'S SOLE AND EXCLUSIVE REMEDY UNDER THIS LIMITED WARRANTY SHALL BE PRODUCT REPAIR AS PROVIDED HEREIN. THIS WARRANTY GIVES YOU SPECIFIC LEGAL RIGHTS AND YOU MAY ALSO HAVE OTHER RIGHTS, WHICH VARY FROM STATE TO STATE OR PROVINCE TO PROVINCE. Contact your authorized Whirlpool...in remote locations. 10. Replacement parts or repair labor costs when the major appliance is not installed in accordance with published installation instructions. 11. SOME STATES AND PROVINCES DO NOT ALLOW THE EXCLUSION OR LIMITATION OF INCIDENTAL OR CONSEQUENTIAL...
Parts List
Page 1
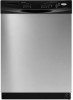
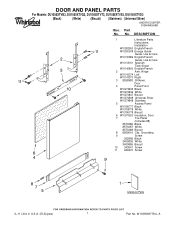
W10356697 Rev. A DESCRIPTION 1 Literature Parts Instructions, Installation W10282553 English/French W10300249 Energy Guide Guide, Use & Care W10130986 English/French Guide, Use & Care W10133161 Spanish Tech Sheet W10142800 English/French 2 Arm, Hinge W10143374 ... in U.S.A. (ELS)(psw) 1 Part No. Part No. DOOR AND PANEL PARTS For Models: DU1055XTVB3, DU1055XTVQ3, DU1055XTVT3, DU1055XTVS3, DU1055XTVD3 (Black) (White) (Biscuit) (Stainless) (Universal Silver) UNDERCOUNTER DISHWASHER Illus. No.
W10356697 Rev. A DESCRIPTION 1 Literature Parts Instructions, Installation W10282553 English/French W10300249 Energy Guide Guide, Use & Care W10130986 English/French Guide, Use & Care W10133161 Spanish Tech Sheet W10142800 English/French 2 Arm, Hinge W10143374 ... in U.S.A. (ELS)(psw) 1 Part No. Part No. DOOR AND PANEL PARTS For Models: DU1055XTVB3, DU1055XTVQ3, DU1055XTVT3, DU1055XTVS3, DU1055XTVD3 (Black) (White) (Biscuit) (Stainless) (Universal Silver) UNDERCOUNTER DISHWASHER Illus. No.


