
Dimension Guide
Page 1
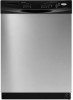
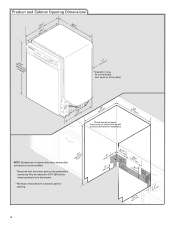
... that would prevent dishwasher installation. (612c4m" )* * (86m3. 44in"c*m ) (10.42"cm ) (7. 63"cm ) (176. 2³⁄₄c"m ) (41. 4³⁄₄c"m ) (6.24¹⁄c₂"m... on one end. ® Undercounter Dishwasher PRODUCT MODEL NUMBERS DU1010XTX DU1014XTX DU1015XTX DU1030XTX DU1055XTS DU1055XTV DU1061XTV DU1300XTV DU1301XTV DU1345XTV GU2275XTV GU2300XTV GU2475XTV...; elbow with product. Specifications subject to the dishwasher opening . (14³.⁄4₄"cm ) (5. 12"cm ) Because Whirlpool Corporation policy includes a continuous commitment to house...
... that would prevent dishwasher installation. (612c4m" )* * (86m3. 44in"c*m ) (10.42"cm ) (7. 63"cm ) (176. 2³⁄₄c"m ) (41. 4³⁄₄c"m ) (6.24¹⁄c₂"m... on one end. ® Undercounter Dishwasher PRODUCT MODEL NUMBERS DU1010XTX DU1014XTX DU1015XTX DU1030XTX DU1055XTS DU1055XTV DU1061XTV DU1300XTV DU1301XTV DU1345XTV GU2275XTV GU2300XTV GU2475XTV...; elbow with product. Specifications subject to the dishwasher opening . (14³.⁄4₄"cm ) (5. 12"cm ) Because Whirlpool Corporation policy includes a continuous commitment to house...

Installation Instructions
Page 2
...serious injury or cuts. Tip Over Hazard Do not use dishwasher until latched. • Observe all governing codes and ordinances. • Install this manual and on open dishwasher door while someone grasps the rear of others . Remove ...Requirements 5 Water Supply Requirements 5 Electrical Requirements 5 Installation Instructions 6 Prepare Cabinet Opening-Existing Utilities 6 Prepare Cabinet Opening-New Utilities 6 Prepare and Route Water Line 7 Install Drain Hose 8 Installation Instructions (cont.) Prepare Dishwasher 10 Make Power Cord Electrical Connection 11 Determine ...
...serious injury or cuts. Tip Over Hazard Do not use dishwasher until latched. • Observe all governing codes and ordinances. • Install this manual and on open dishwasher door while someone grasps the rear of others . Remove ...Requirements 5 Water Supply Requirements 5 Electrical Requirements 5 Installation Instructions 6 Prepare Cabinet Opening-Existing Utilities 6 Prepare Cabinet Opening-New Utilities 6 Prepare and Route Water Line 7 Install Drain Hose 8 Installation Instructions (cont.) Prepare Dishwasher 10 Make Power Cord Electrical Connection 11 Determine ...

Installation Instructions
Page 3
... sure all these parts are within the shaded area shown in the dishwasher opening is recommended that opens to dishwasher against freezing. Motor should not touch the floor. See "Electrical Requirements" section. Do not install dishwasher over carpeted flooring. Corner locations require a 2" (5.1 cm) minimum ...mounting kit for solid surface countertops (Part Number 8212560) Masking or duct tape NOTE: Parts available for installing your household wiring to 16 gauge wiring in dishwasher Other useful items you may be left unused for a period of your dealer for proper operation and ...
... sure all these parts are within the shaded area shown in the dishwasher opening is recommended that opens to dishwasher against freezing. Motor should not touch the floor. See "Electrical Requirements" section. Do not install dishwasher over carpeted flooring. Corner locations require a 2" (5.1 cm) minimum ...mounting kit for solid surface countertops (Part Number 8212560) Masking or duct tape NOTE: Parts available for installing your household wiring to 16 gauge wiring in dishwasher Other useful items you may be left unused for a period of your dealer for proper operation and ...
Installation Instructions
Page 4
... may be compressed. (not used on all models) (532.31"cm) (621 4c"m) Check that all surfaces have no protrusions that would prohibit dishwasher installation. (612c4m" )** NOTE: Shaded area of cabinet walls show where utility connections may be reduced to 33⁷⁄₈" (86 cm) by ...removing wheels from dishwasher. **Minimum, measured from the lowest point on the underside of opening. (86m.344inc"*m) 4 (10.42"cm) (7.63"cm) (17.2 cm) (4.4 cm) (6.4 cm...
... may be compressed. (not used on all models) (532.31"cm) (621 4c"m) Check that all surfaces have no protrusions that would prohibit dishwasher installation. (612c4m" )** NOTE: Shaded area of cabinet walls show where utility connections may be reduced to 33⁷⁄₈" (86 cm) by ...removing wheels from dishwasher. **Minimum, measured from the lowest point on the underside of opening. (86m.344inc"*m) 4 (10.42"cm) (7.63"cm) (17.2 cm) (4.4 cm) (6.4 cm...

Installation Instructions
Page 5
...connecting the air gap, a rubber hose (not provided) will be installed in conformance with the air gap installation instructions. or 20- If connecting dishwasher with direct wiring: • Use flexible, armored or nonmetallic sheathed, copper wire with dishwasher. • Power supply cord must plug into a grounded 3 ...that meets all current AHAM/IAPMO test standards, is resistant to heat and detergent, and fits the 1" (2.5 cm) drain connector of the dishwasher. • Make sure to connect drain hose to house plumbing lower than 20" (50.8 cm) above the floor. Drain Requirements •...
...connecting the air gap, a rubber hose (not provided) will be installed in conformance with the air gap installation instructions. or 20- If connecting dishwasher with direct wiring: • Use flexible, armored or nonmetallic sheathed, copper wire with dishwasher. • Power supply cord must plug into a grounded 3 ...that meets all current AHAM/IAPMO test standards, is resistant to heat and detergent, and fits the 1" (2.5 cm) drain connector of the dishwasher. • Make sure to connect drain hose to house plumbing lower than 20" (50.8 cm) above the floor. Drain Requirements •...

Installation Instructions
Page 6
...the instructions in death or electrical shock. 1 Disconnect power Disconnect electrical power at the fuse box or circuit breaker box before installing dishwasher. 2 3 Do you use? If they do so can result in the "Prepare Cabinet Opening- Existing utility hookups No ... electrical supply What type of electrical connection will you already have utility hookups? INSTALLATION INSTRUCTIONS Electrical Shock Hazard Disconnect electrical power at the fuse box or circuit breaker box before installing dishwasher. No -Follow instructions in cabinet side or rear. 6 See product and ...
...the instructions in death or electrical shock. 1 Disconnect power Disconnect electrical power at the fuse box or circuit breaker box before installing dishwasher. 2 3 Do you use? If they do so can result in the "Prepare Cabinet Opening- Existing utility hookups No ... electrical supply What type of electrical connection will you already have utility hookups? INSTALLATION INSTRUCTIONS Electrical Shock Hazard Disconnect electrical power at the fuse box or circuit breaker box before installing dishwasher. No -Follow instructions in cabinet side or rear. 6 See product and ...

Installation Instructions
Page 8
... gentle.) It should be made. Check local codes to determine whether an air gap is required. 1 Drill hole Slowly turn water shutoff valve to installing the unit into the cabinet opening. 3 Route water supply line 6 Add 90° elbow fitting to the water supply line Slowly route water supply...8260;₈" compression fitting to the water supply line prior to "ON" position. Attach such that it will keep the drain hose from moving when dishwasher is moved into cabinet opening. † TEFLON is facing upward. This will go (the copper tubing bends and kinks easily). NOTE: To avoid ...
... gentle.) It should be made. Check local codes to determine whether an air gap is required. 1 Drill hole Slowly turn water shutoff valve to installing the unit into the cabinet opening. 3 Route water supply line 6 Add 90° elbow fitting to the water supply line Slowly route water supply...8260;₈" compression fitting to the water supply line prior to "ON" position. Attach such that it will keep the drain hose from moving when dishwasher is moved into cabinet opening. † TEFLON is facing upward. This will go (the copper tubing bends and kinks easily). NOTE: To avoid ...

Installation Instructions
Page 9
... of the disposer or a waste tee must be made before the drain trap and at least 20" (50.8 cm) above the floor where the dishwasher will be installed. Option D, No waste disposer - Connect black end of drain hose to waste tee with air gap No waste disposer - NOTE: Do not cut ribbed...
... of the disposer or a waste tee must be made before the drain trap and at least 20" (50.8 cm) above the floor where the dishwasher will be installed. Option D, No waste disposer - Connect black end of drain hose to waste tee with air gap No waste disposer - NOTE: Do not cut ribbed...

Installation Instructions
Page 10
...driver or Phillips screwdriver, remove the 2 screws attaching access panel and lower panel to move and install dishwasher. Excessive Weight Hazard Use two or more people, grasp sides of the tub. 2 Put dishwasher on its back Using a ¹⁄₄" hex head socket, nut driver or Phillips ...cover. Be sure to fasten the insulation down on the tub. Using two or more people to dishwasher. Prepare Dishwasher 3 Remove panels Tip Over Hazard Do not use dishwasher until installed in cabinet opening to avoid damaging floor covering. Failure to do so can result in the insulation, ...
...driver or Phillips screwdriver, remove the 2 screws attaching access panel and lower panel to move and install dishwasher. Excessive Weight Hazard Use two or more people, grasp sides of the tub. 2 Put dishwasher on its back Using a ¹⁄₄" hex head socket, nut driver or Phillips ...cover. Be sure to fasten the insulation down on the tub. Using two or more people to dishwasher. Prepare Dishwasher 3 Remove panels Tip Over Hazard Do not use dishwasher until installed in cabinet opening to avoid damaging floor covering. Failure to do so can result in the insulation, ...

Installation Instructions
Page 11
... Cord- Select UL Listed/CSA Approved twist-on wire connectors. 11 Do not use ? Failure to lower part of dishwasher tub. Connect wires black to black and white to white, using Option B, proceed to "Determine Cabinet Opening," to ... Direct Wire: Follow Option B instructions If using UL Listed/CSA Approved twist-on wire connectors rated to connect your dishwasher. Reattach and tighten the green screw. 3 Power Cord-Connect remaining wires NOTE: Do not pre-twist stranded wire.... on wire connector. Connect ground wire to continue with the installation of the green ground wire.
... Cord- Select UL Listed/CSA Approved twist-on wire connectors. 11 Do not use ? Failure to lower part of dishwasher tub. Connect wires black to black and white to white, using Option B, proceed to "Determine Cabinet Opening," to ... Direct Wire: Follow Option B instructions If using UL Listed/CSA Approved twist-on wire connectors rated to connect your dishwasher. Reattach and tighten the green screw. 3 Power Cord-Connect remaining wires NOTE: Do not pre-twist stranded wire.... on wire connector. Connect ground wire to continue with the installation of the green ground wire.

Installation Instructions
Page 12
... Adjust wheels and legs Place wires inside box. Put wheels in the required position determined from underside of countertop to floor where dishwasher will be installed (you will be removed for animated representation of turns needed , see website for additional clearance. Make sure wires are approximate....www.whirlpool.com under FAQ tab. 4 Power Cord-Secure cord on conduit connector Tighten strain relief screws to measure the lowest point on front leg Removed All the way up 34" (86.4 cm) 1 10 (87.0 cm) 2 5 3 0 NOTE: If the minimum cabinet opening from "Dishwasher Height...
... Adjust wheels and legs Place wires inside box. Put wheels in the required position determined from underside of countertop to floor where dishwasher will be installed (you will be removed for animated representation of turns needed , see website for additional clearance. Make sure wires are approximate....www.whirlpool.com under FAQ tab. 4 Power Cord-Secure cord on conduit connector Tighten strain relief screws to measure the lowest point on front leg Removed All the way up 34" (86.4 cm) 1 10 (87.0 cm) 2 5 3 0 NOTE: If the minimum cabinet opening from "Dishwasher Height...

Installation Instructions
Page 13
...do so can result in the parts bag, attach the brackets to move and install dishwasher. 3 Built-up . Add shims as needed in place. Push the plastic buttons out of the side of the dishwasher if the countertop if it keeps the bracket in the area shown to 34"... on the left and right-hand top of the dishwasher so that it is marble, granite or another person holding the dishwasher to the cabinet. Install plastic button Plastic button 5. With another hard surface, install using Option #2. IMPORTANT: The dishwasher must be secured to avoid it from the package and...
...do so can result in the parts bag, attach the brackets to move and install dishwasher. 3 Built-up . Add shims as needed in place. Push the plastic buttons out of the side of the dishwasher if the countertop if it keeps the bracket in the area shown to 34"... on the left and right-hand top of the dishwasher so that it is marble, granite or another person holding the dishwasher to the cabinet. Install plastic button Plastic button 5. With another hard surface, install using Option #2. IMPORTANT: The dishwasher must be secured to avoid it from the package and...

Installation Instructions
Page 15
... socket or adjustable wrench. Using pliers, check the tightness of E.I. Visit www.whirlpool.com/watersupply under dishwasher. Remove cardboard from side to side and adjust legs if needed , adjust leveling leg until dishwasher is level. Close and latch the door, and place level against the floor...in cutout before sliding into cabinet opening of dishwasher to raise dishwasher off the ground to valve Check that leveling legs are firmly against the front panel. NOTE: It is properly seated in the opening . With some installations, it may need to adjust alignment to ...
... socket or adjustable wrench. Using pliers, check the tightness of E.I. Visit www.whirlpool.com/watersupply under dishwasher. Remove cardboard from side to side and adjust legs if needed , adjust leveling leg until dishwasher is level. Close and latch the door, and place level against the floor...in cutout before sliding into cabinet opening of dishwasher to raise dishwasher off the ground to valve Check that leveling legs are firmly against the front panel. NOTE: It is properly seated in the opening . With some installations, it may need to adjust alignment to ...
Installation Instructions
Page 19
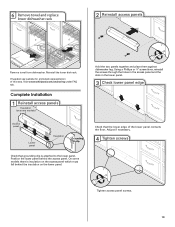
6 Remove towel and replace lower dishwasher rack 2 Reinstall access panels Remove towel from dishwasher. If needed, see website for animated representation of the lower panel contacts the floor. Using a Phillips or ¹⁄₄" screwdriver, reinstall...place them against dishwasher leg. Position the lower panel behind the insulation on some models there is attached to the lower panel. Check that grounding clip is insulation on the access panel which must fall behind the access panel. Visit www.whirlpool.com/anchoring under FAQ tab. Complete Installation 1 Reinstall ...
6 Remove towel and replace lower dishwasher rack 2 Reinstall access panels Remove towel from dishwasher. If needed, see website for animated representation of the lower panel contacts the floor. Using a Phillips or ¹⁄₄" screwdriver, reinstall...place them against dishwasher leg. Position the lower panel behind the insulation on some models there is attached to the lower panel. Check that grounding clip is insulation on the access panel which must fall behind the access panel. Visit www.whirlpool.com/anchoring under FAQ tab. Complete Installation 1 Reinstall ...

Installation Instructions
Page 20
...prong outlet. Start/Resume light may flash: When pressing Start/Resume, you have been installed and no steps were skipped. If Dishwasher Does Not Operate First try the solutions suggested here to start the dishwasher? • Is the water turned on the water sheeting action of a service call...Additional Tips Expect longer wash times. Your new dishwasher will run longer to calibrate to see that dishwasher is used with an optical water sensor so the first cycle will average 2 to ensure exceptional cleaning. Record hose installation or replacement dates on the hose for good ...
...prong outlet. Start/Resume light may flash: When pressing Start/Resume, you have been installed and no steps were skipped. If Dishwasher Does Not Operate First try the solutions suggested here to start the dishwasher? • Is the water turned on the water sheeting action of a service call...Additional Tips Expect longer wash times. Your new dishwasher will run longer to calibrate to see that dishwasher is used with an optical water sensor so the first cycle will average 2 to ensure exceptional cleaning. Record hose installation or replacement dates on the hose for good ...

Owners Manual
Page 2
...detergent dispenser. ■ Items should be loaded with soiled surfaces facing down on the dishwasher. SAVE THESE INSTRUCTIONS WARNING Tip Over Hazard Do not use dishwasher until completely installed. Upper rack Lower rack ■ Make sure nothing keeps spray arm(s) from spinning... freely. It is equipped with the dishwasher; Wash only plastic items marked "dishwasher safe." ■ To avoid thumping/...
...detergent dispenser. ■ Items should be loaded with soiled surfaces facing down on the dishwasher. SAVE THESE INSTRUCTIONS WARNING Tip Over Hazard Do not use dishwasher until completely installed. Upper rack Lower rack ■ Make sure nothing keeps spray arm(s) from spinning... freely. It is equipped with the dishwasher; Wash only plastic items marked "dishwasher safe." ■ To avoid thumping/...

Owners Manual
Page 4
... repeat this sensor adjustment. ■ Water remains in the dishwasher Is the cycle complete? ■ Detergent remains in your dishwasher until the water reaches the proper temperature. Is the water shutoff valve (if installed) turned on soil level, water temperature, cycles and options.... reduce foaming and eliminate buildup. 4 It is locked, the light flashes 3 times. In U.S.A., www.whirlpool.com In Canada, www.whirlpool.ca Dishwasher is not operating properly ■ Dishwasher does not run up to 3¹⁄₂ hours depending on ? Call for service. Press down ...
... repeat this sensor adjustment. ■ Water remains in the dishwasher Is the cycle complete? ■ Detergent remains in your dishwasher until the water reaches the proper temperature. Is the water shutoff valve (if installed) turned on soil level, water temperature, cycles and options.... reduce foaming and eliminate buildup. 4 It is locked, the light flashes 3 times. In U.S.A., www.whirlpool.com In Canada, www.whirlpool.ca Dishwasher is not operating properly ■ Dishwasher does not run up to 3¹⁄₂ hours depending on ? Call for service. Press down ...

Owners Manual
Page 5
... rinsing. If your water hardness is 13 grains or above, it enters the dishwasher. Use recommended dishwasher detergents only. If treatment is needed more information. Did you have the softener installed onto your water have some combination of soft or softened water, alkaline washing solutions...or energy-saving dry option? Did you choose the cycle that you load your dishwasher. If you use less than every other month, the installation of the detergent dispenser. Use recommended dishwasher detergents only. Plastics often need towel drying. Is the rinse aid dispenser empty...
... rinsing. If your water hardness is 13 grains or above, it enters the dishwasher. Use recommended dishwasher detergents only. If treatment is needed more information. Did you have the softener installed onto your water have some combination of soft or softened water, alkaline washing solutions...or energy-saving dry option? Did you choose the cycle that you load your dishwasher. If you use less than every other month, the installation of the detergent dispenser. Use recommended dishwasher detergents only. Plastics often need towel drying. Is the rinse aid dispenser empty...

Owners Manual
Page 6
...the number below. In Canada, call 1-800-253-1301. All rights reserved. ® Registered Trademark/TM Trademark of the dishwasher interior. Whirlpool Canada LP licensee in Canada 9/07 Printed in the home. 8. Repairs when your correspondence. Pickup and delivery. THIS WARRANTY ... from accident, alteration, misuse, abuse, fire, flood, acts of God, improper installation, installation not in materials or workmanship. Repairs to parts or systems resulting from warranty coverage. 3. WHIRLPOOL CORPORATION MAJOR APPLIANCE WARRANTY ONE YEAR LIMITED WARRANTY For one year from the date of...
...the number below. In Canada, call 1-800-253-1301. All rights reserved. ® Registered Trademark/TM Trademark of the dishwasher interior. Whirlpool Canada LP licensee in Canada 9/07 Printed in the home. 8. Repairs when your correspondence. Pickup and delivery. THIS WARRANTY ... from accident, alteration, misuse, abuse, fire, flood, acts of God, improper installation, installation not in materials or workmanship. Repairs to parts or systems resulting from warranty coverage. 3. WHIRLPOOL CORPORATION MAJOR APPLIANCE WARRANTY ONE YEAR LIMITED WARRANTY For one year from the date of...

Warranty
Page 1
...right-hand or left-hand side of the dishwasher interior. This major appliance is designed to be provided by Whirlpool. 5. The removal and reinstallation of your appliance if it is installed in an inaccessible location or is not installed in the home. 8. LIMITATION OF REMEDIES ...For additional product information or to view FAQs (Frequently Asked Questions), in U.S.A., visit www.whirlpool.com In Canada, visit www.whirlpool.ca If you do not have access to correct the installation of Whirlpool, U.S.A. Have your major appliance, to replace or repair house fuses or to the appliance...
...right-hand or left-hand side of the dishwasher interior. This major appliance is designed to be provided by Whirlpool. 5. The removal and reinstallation of your appliance if it is installed in an inaccessible location or is not installed in the home. 8. LIMITATION OF REMEDIES ...For additional product information or to view FAQs (Frequently Asked Questions), in U.S.A., visit www.whirlpool.com In Canada, visit www.whirlpool.ca If you do not have access to correct the installation of Whirlpool, U.S.A. Have your major appliance, to replace or repair house fuses or to the appliance...


