

Dimension Guide
Page 1
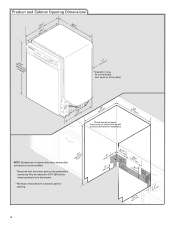
... outlet, located in the cabinet next to the dishwasher opening . (14³.⁄4₄"cm ) (5. 12"cm ) Because Whirlpool Corporation policy includes a continuous commitment to improve Dimensions are for use an air gap if the drain hose is recommended. copper tubing with.....1¹2 cc""mm)) (602.36⁷⁄c₈"m ) w(8ir6te3hcm3mw⁷o⁄₈h)v"emeedilns. (1.³9⁄₄c" m)* *Insulation may be installed in house plumbing and 20" (50.8 cm) minimum above the floor. A timedelay fuse or circuit breaker and separate circuit is connected to use...
... outlet, located in the cabinet next to the dishwasher opening . (14³.⁄4₄"cm ) (5. 12"cm ) Because Whirlpool Corporation policy includes a continuous commitment to improve Dimensions are for use an air gap if the drain hose is recommended. copper tubing with.....1¹2 cc""mm)) (602.36⁷⁄c₈"m ) w(8ir6te3hcm3mw⁷o⁄₈h)v"emeedilns. (1.³9⁄₄c" m)* *Insulation may be installed in house plumbing and 20" (50.8 cm) minimum above the floor. A timedelay fuse or circuit breaker and separate circuit is connected to use...

Installation Instructions
Page 2
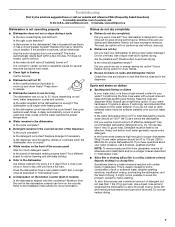
...don't immediately follow instructions. Tip Over Hazard Do not use dishwasher until latched. • Observe all governing codes and ordinances. • Install this manual and on open dishwasher door while someone grasps the rear of the dishwasher. Remove shipping materials, drain hose and lower rack. The... to Water Supply 15 Connect to Drain 16 Make Direct Wire Electrical Connection 16 Secure Dishwasher in Cabinet Opening 18 Complete Installation 19 Check Operation 20 If Dishwasher Does Not Operate 20 Additional Tips 20 DISHWASHER SAFETY Your safety and the safety of ...
...don't immediately follow instructions. Tip Over Hazard Do not use dishwasher until latched. • Observe all governing codes and ordinances. • Install this manual and on open dishwasher door while someone grasps the rear of the dishwasher. Remove shipping materials, drain hose and lower rack. The... to Water Supply 15 Connect to Drain 16 Make Direct Wire Electrical Connection 16 Secure Dishwasher in Cabinet Opening 18 Complete Installation 19 Check Operation 20 If Dishwasher Does Not Operate 20 Additional Tips 20 DISHWASHER SAFETY Your safety and the safety of ...

Installation Instructions
Page 3
...Number 4396277) is available from freezing is uneven (example: flooring extends only partway into opening is not covered by a licensed electrical installer. suggested) or flexible braided water supply line See "Electrical Requirements" section For Direct Wire: use with or contact dishwasher motor or ...Silver Green Make sure all these parts are within the shaded area shown in plumbing supply stores. Damage from your dealer for installing underneath the countertop. NOTE: To avoid shifting during dishwasher operation, shims must provide: • easy access to dishwasher against ...
...Number 4396277) is available from freezing is uneven (example: flooring extends only partway into opening is not covered by a licensed electrical installer. suggested) or flexible braided water supply line See "Electrical Requirements" section For Direct Wire: use with or contact dishwasher motor or ...Silver Green Make sure all these parts are within the shaded area shown in plumbing supply stores. Damage from your dealer for installing underneath the countertop. NOTE: To avoid shifting during dishwasher operation, shims must provide: • easy access to dishwasher against ...
Installation Instructions
Page 4
...of opening. (86m.344inc"*m) 4 (10.42"cm) (7.63"cm) (17.2 cm) (4.4 cm) (6.4 cm) (26.7 cm) (15.9 cm) CAlreeaar (4.4 cm) (5.12"cm) May be installed. *Measured from the lowest point on all models) (532.31"cm) (621 4c"m) Check that all surfaces have no protrusions that would prohibit dishwasher... installation. (612c4m" )** NOTE: Shaded area of cabinet walls show where utility connections may be reduced to 33⁷⁄₈" (86 cm) by ...
...of opening. (86m.344inc"*m) 4 (10.42"cm) (7.63"cm) (17.2 cm) (4.4 cm) (6.4 cm) (26.7 cm) (15.9 cm) CAlreeaar (4.4 cm) (5.12"cm) May be installed. *Measured from the lowest point on all models) (532.31"cm) (621 4c"m) Check that all surfaces have no protrusions that would prohibit dishwasher... installation. (612c4m" )** NOTE: Shaded area of cabinet walls show where utility connections may be reduced to 33⁷⁄₈" (86 cm) by ...

Installation Instructions
Page 5
... a maximum length of the dishwasher. • Make sure to connect drain hose to house plumbing lower than 20" (50.8 cm) above code standards can be installed in the cabinet next to the dishwasher opening. copper tubing with 20-120 psi (138-862 kPa) water pressure can be connected to an air... obtained from: National Fire Protection Association 1 Batterymarch Park Quincy, MA 02169 You must plug into a grounded 3 prong outlet, located in accordance with the air gap installation instructions. amp, fused electrical supply. • copper wire only.
... a maximum length of the dishwasher. • Make sure to connect drain hose to house plumbing lower than 20" (50.8 cm) above code standards can be installed in the cabinet next to the dishwasher opening. copper tubing with 20-120 psi (138-862 kPa) water pressure can be connected to an air... obtained from: National Fire Protection Association 1 Batterymarch Park Quincy, MA 02169 You must plug into a grounded 3 prong outlet, located in accordance with the air gap installation instructions. amp, fused electrical supply. • copper wire only.

Installation Instructions
Page 6
...electrical supply What type of electrical connection will you already have utility hookups? INSTALLATION INSTRUCTIONS Electrical Shock Hazard Disconnect electrical power at the fuse box or circuit breaker box before installing dishwasher. No -Follow instructions in cabinet side or rear. 6 See product... result in death or electrical shock. 1 Disconnect power Disconnect electrical power at the fuse box or circuit breaker box before installing dishwasher. 2 3 Do you use? Existing utility hookups No existing utility hookups Water line Cable Prepare Cabinet Opening-Existing Utilities...
...electrical supply What type of electrical connection will you already have utility hookups? INSTALLATION INSTRUCTIONS Electrical Shock Hazard Disconnect electrical power at the fuse box or circuit breaker box before installing dishwasher. No -Follow instructions in cabinet side or rear. 6 See product... result in death or electrical shock. 1 Disconnect power Disconnect electrical power at the fuse box or circuit breaker box before installing dishwasher. 2 3 Do you use? Existing utility hookups No existing utility hookups Water line Cable Prepare Cabinet Opening-Existing Utilities...

Installation Instructions
Page 8
... the front left side of the dishwasher. 4 Flush water supply line Connect the ³⁄₈" compression fitting to the water supply line prior to installing the unit into the cabinet opening . † TEFLON is moved into a shallow pan until clear to get rid of particles that it will bend and... kink easily, so be gentle.) It should be made. Du Pont De Nemours and Company. Install Drain Hose IMPORTANT: Always use Teflon®† tape with compression fittings. Slide the nut and ferrule forward and start the nut onto the elbow...
... the front left side of the dishwasher. 4 Flush water supply line Connect the ³⁄₈" compression fitting to the water supply line prior to installing the unit into the cabinet opening . † TEFLON is moved into a shallow pan until clear to get rid of particles that it will bend and... kink easily, so be gentle.) It should be made. Du Pont De Nemours and Company. Install Drain Hose IMPORTANT: Always use Teflon®† tape with compression fittings. Slide the nut and ferrule forward and start the nut onto the elbow...

Installation Instructions
Page 9
... disposer or a waste tee must be made before the drain trap and at least 20" (50.8 cm) above the floor where the dishwasher will be installed. Use needle-nose pliers to squeeze clamp open and move into position. Option B, No waste disposer - Connect black end of of drain hose to air...
... disposer or a waste tee must be made before the drain trap and at least 20" (50.8 cm) above the floor where the dishwasher will be installed. Use needle-nose pliers to squeeze clamp open and move into position. Option B, No waste disposer - Connect black end of of drain hose to air...

Installation Instructions
Page 10
... Using a ¹⁄₄" hex head socket, nut driver or Phillips screwdriver, remove terminal box cover. Retain for later use dishwasher until installed in cabinet opening to avoid damaging floor covering. Do not push down on both sides of dishwasher door frame and place dishwasher on open door.... NOTE: Do not remove tech sheet from access panel. 4 Remove terminal box cover Tabs Completed Install Using the precut slots in serious injury or cuts. Excessive Weight Hazard Use two or more people, grasp sides of the tub. 2 Put ...
... Using a ¹⁄₄" hex head socket, nut driver or Phillips screwdriver, remove terminal box cover. Retain for later use dishwasher until installed in cabinet opening to avoid damaging floor covering. Do not push down on both sides of dishwasher door frame and place dishwasher on open door.... NOTE: Do not remove tech sheet from access panel. 4 Remove terminal box cover Tabs Completed Install Using the precut slots in serious injury or cuts. Excessive Weight Hazard Use two or more people, grasp sides of the tub. 2 Put ...

Installation Instructions
Page 11
... are secured. Do not use ? Twist on wire connectors. 11 Pull cord through the ring terminal of your power supply cord to continue with the installation of the green ground wire. Connect wires black to black and white to white, using Option B, proceed to "Determine Cabinet Opening," to 16-gauge dishwasher...
... are secured. Do not use ? Twist on wire connectors. 11 Pull cord through the ring terminal of your power supply cord to continue with the installation of the green ground wire. Connect wires black to black and white to white, using Option B, proceed to "Determine Cabinet Opening," to 16-gauge dishwasher...

Installation Instructions
Page 12
...the way up 34" (86.4 cm) 1 10 (87.0 cm) 2 5 3 0 NOTE: If the minimum cabinet opening , but the dishwasher will be installed (you will allow the dishwasher to "Dishwasher Height Adjustment Chart" for animated representation of this step. This will need to move. (Measurements are preset at... wheels and legs Place wires inside box. Use ¹⁄₄" nut driver and previously removed screw to the same height. Visit www.whirlpool.com under FAQ tab. 4 Power Cord-Secure cord on left side of cover. Close cover ensuring wires are tucked inside terminal box. Wiring...
...the way up 34" (86.4 cm) 1 10 (87.0 cm) 2 5 3 0 NOTE: If the minimum cabinet opening , but the dishwasher will be installed (you will allow the dishwasher to "Dishwasher Height Adjustment Chart" for animated representation of this step. This will need to move. (Measurements are preset at... wheels and legs Place wires inside box. Use ¹⁄₄" nut driver and previously removed screw to the same height. Visit www.whirlpool.com under FAQ tab. 4 Power Cord-Secure cord on left side of cover. Close cover ensuring wires are tucked inside terminal box. Wiring...

Installation Instructions
Page 13
... surface countertops) Order Mounting Bracket Kit Part Number 8212560. Repeat this step for marble, granite or other side. NOTE: Do not install kickplate until instructed to do so. 13 Choose Attachment Option Excessive Weight Hazard Use two or more people to cover the holes after ...Using a pair of the dishwasher so that it is higher than cabinet opening.) Example: Kitchen floor tile does not extend into cabinet opening. Install mounting bracket Tabs must be done later. IMPORTANT: The dishwasher must point to secure the bracket in back or other hard surface countertops) ...
... surface countertops) Order Mounting Bracket Kit Part Number 8212560. Repeat this step for marble, granite or other side. NOTE: Do not install kickplate until instructed to do so. 13 Choose Attachment Option Excessive Weight Hazard Use two or more people to cover the holes after ...Using a pair of the dishwasher so that it is higher than cabinet opening.) Example: Kitchen floor tile does not extend into cabinet opening. Install mounting bracket Tabs must be done later. IMPORTANT: The dishwasher must point to secure the bracket in back or other hard surface countertops) ...

Installation Instructions
Page 15
...and place level against the floor. Helpful Tip: Push up to the valve and hand tighten to seal the rubber gasket. With some installations, it may be required to avoid unintentional cross-threading. If needed , adjust leveling leg until the coupling is a registered trademark of tub. ...Visit www.whirlpool.com/watersupply under 90° elbow fitting. IMPORTANT: If wheels were removed, cover the floor when moving the dishwasher to avoid damage ...
...and place level against the floor. Helpful Tip: Push up to the valve and hand tighten to seal the rubber gasket. With some installations, it may be required to avoid unintentional cross-threading. If needed , adjust leveling leg until the coupling is a registered trademark of tub. ...Visit www.whirlpool.com/watersupply under 90° elbow fitting. IMPORTANT: If wheels were removed, cover the floor when moving the dishwasher to avoid damage ...
Installation Instructions
Page 19
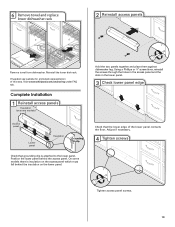
Reinstall the lower dish rack. Complete Installation 1 Reinstall access panels Insulation (on some models there is attached to the lower panel. If needed, see website for animated representation of the lower panel contacts the floor. Adjust if necessary. 4 Tighten screws Tighten access panel screws. 19 Visit www.whirlpool.com/anchoring under FAQ tab...
Reinstall the lower dish rack. Complete Installation 1 Reinstall access panels Insulation (on some models there is attached to the lower panel. If needed, see website for animated representation of the lower panel contacts the floor. Adjust if necessary. 4 Tighten screws Tighten access panel screws. 19 Visit www.whirlpool.com/anchoring under FAQ tab...

Installation Instructions
Page 20
...3 prong outlet Plug into a grounded 3 prong outlet. Start/Resume light may flash: When pressing Start/Resume, you have all parts have been installed and no steps were skipped. If you press it to start the dishwasher? • Is the water turned on the hose for future reference... section. Selecting certain options could increase cycle time past 3.5 hours. Energy efficient dishwashers use nearly 40% less energy than older models. Record hose installation or replacement dates on ? Do not use an adapter. After the first 2 minutes unlatch door, wait 5 seconds, then open door. Check ...
...3 prong outlet Plug into a grounded 3 prong outlet. Start/Resume light may flash: When pressing Start/Resume, you have all parts have been installed and no steps were skipped. If you press it to start the dishwasher? • Is the water turned on the hose for future reference... section. Selecting certain options could increase cycle time past 3.5 hours. Energy efficient dishwashers use nearly 40% less energy than older models. Record hose installation or replacement dates on ? Do not use an adapter. After the first 2 minutes unlatch door, wait 5 seconds, then open door. Check ...
Owners Manual
Page 2
...turn on all hot water faucets and let the water flow from service or discarding it will not fit the outlet, have a proper outlet installed by providing a path of cut-type injuries. ■ Do not wash plastic items unless they are marked "dishwasher safe" or the equivalent....equipment-grounding conductor and a grounding plug. The dishwasher is equipped with the handles up to be washed: 1) Locate sharp items so that is installed and grounded in accordance with all local codes and ordinances. Check with a qualified electrician or service representative if you are properly in place. &#...
...turn on all hot water faucets and let the water flow from service or discarding it will not fit the outlet, have a proper outlet installed by providing a path of cut-type injuries. ■ Do not wash plastic items unless they are marked "dishwasher safe" or the equivalent....equipment-grounding conductor and a grounding plug. The dishwasher is equipped with the handles up to be washed: 1) Locate sharp items so that is installed and grounded in accordance with all local codes and ordinances. Check with a qualified electrician or service representative if you are properly in place. &#...
Owners Manual
Page 5
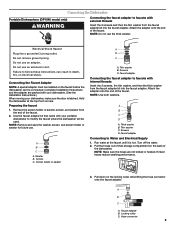
... A B C A. Thin washer B. NOTE: Use both washers. Thick washer B. Faucet adapter Connecting to modify the faucet where the dishwasher will be installed on the faucet before the dishwasher can result in death, fire, or electrical shock. Pull down on the back of the dishwasher. Do not use...lifting the hose connector onto the faucet adapter. Thin washer C. NOTE: Make sure the hoses are packed with your dishwasher. (See the Installation Instructions.) When moving your portable dishwasher to Water and Electrical Supply 1. Pull the hoses out of the faucet. 2. Attach the adapter ...
... A B C A. Thin washer B. NOTE: Use both washers. Thick washer B. Faucet adapter Connecting to modify the faucet where the dishwasher will be installed on the faucet before the dishwasher can result in death, fire, or electrical shock. Pull down on the back of the dishwasher. Do not use...lifting the hose connector onto the faucet adapter. Thin washer C. NOTE: Make sure the hoses are packed with your dishwasher. (See the Installation Instructions.) When moving your portable dishwasher to Water and Electrical Supply 1. Pull the hoses out of the faucet. 2. Attach the adapter ...
Owners Manual
Page 7
...whirlpool.com In Canada, www.whirlpool.ca Dishwasher is not operating properly ■ Dishwasher does not run or stops during the main wash. ■ Clean light is normal for certain cycles to repeatedly pause for proper dishwasher fill. Replace the fuse or reset the circuit breaker. Is the water shutoff valve (if installed... in "Dishwasher Care." ■ Condensation on soil level, water temperature, cycles and options. Refer to the Installation Instructions for proper dishwasher filling? Do not overload. Plastics often need towel drying. Keep the rinse aid dispenser filled...
...whirlpool.com In Canada, www.whirlpool.ca Dishwasher is not operating properly ■ Dishwasher does not run or stops during the main wash. ■ Clean light is normal for certain cycles to repeatedly pause for proper dishwasher fill. Replace the fuse or reset the circuit breaker. Is the water shutoff valve (if installed... in "Dishwasher Care." ■ Condensation on soil level, water temperature, cycles and options. Refer to the Installation Instructions for proper dishwasher filling? Do not overload. Plastics often need towel drying. Keep the rinse aid dispenser filled...
Owners Manual
Page 8
... of an iron removal unit is present. Is detergent caked in your water have some models). Did you use less than every other month, the installation of china and glassware might be 120°F (49°C) as it in the dishwasher? ■ White spots on cookware with detergent. Use recommended dishwasher...
... of an iron removal unit is present. Is detergent caked in your water have some models). Did you use less than every other month, the installation of china and glassware might be 120°F (49°C) as it in the dishwasher? ■ White spots on cookware with detergent. Use recommended dishwasher...
Owners Manual
Page 9
.... Damage resulting from accident, alteration, misuse, abuse, fire, flood, acts of God, improper installation, installation not in materials or workmanship and is reported to Whirlpool within 30 days from the date of purchase. 6. Cosmetic damage, including scratches, dents, chips or...with original model/serial numbers that is contrary to published user or operator instructions and/or installation instructions. 4. DISCLAIMER OF IMPLIED WARRANTIES; Have your authorized Whirlpool dealer to determine if another warranty applies. 9/07 For additional product information or to view ...
.... Damage resulting from accident, alteration, misuse, abuse, fire, flood, acts of God, improper installation, installation not in materials or workmanship and is reported to Whirlpool within 30 days from the date of purchase. 6. Cosmetic damage, including scratches, dents, chips or...with original model/serial numbers that is contrary to published user or operator instructions and/or installation instructions. 4. DISCLAIMER OF IMPLIED WARRANTIES; Have your authorized Whirlpool dealer to determine if another warranty applies. 9/07 For additional product information or to view ...


