
Owners Manual
Page 1
...or lid to reduce the chance of others . In Canada, visit our website at www.whirlpool.ca or call us at 1-800-253-1301. SAVE THESE INSTRUCTIONS W10102499B ® DISHWASHER USER INSTRUCTIONS THANK YOU for additional information. All safety messages will release any accumulated hydrogen gas... o para obtener información adicional acerca de su producto, visite: www.whirlpool.com Tenga listo su número completo de modelo y de serie. and 2) Load sharp knives with controls. ■ Use the dishwasher only for its intended function. ■ Use only detergents or rinse agents...
...or lid to reduce the chance of others . In Canada, visit our website at www.whirlpool.ca or call us at 1-800-253-1301. SAVE THESE INSTRUCTIONS W10102499B ® DISHWASHER USER INSTRUCTIONS THANK YOU for additional information. All safety messages will release any accumulated hydrogen gas... o para obtener información adicional acerca de su producto, visite: www.whirlpool.com Tenga listo su número completo de modelo y de serie. and 2) Load sharp knives with controls. ■ Use the dishwasher only for its intended function. ■ Use only detergents or rinse agents...
Owners Manual
Page 2
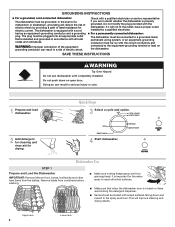
...3 Select a cycle and option. 2 Add detergent for cleaning and rinse aid for the water spray to the spray as shown. The dishwasher is equipped with the circuit conductors and connected to a grounded metal, permanent wiring system, or an equipment-grounding conductor must be run with...a risk of electric shock. Do not push down and inward to reach all local codes and ordinances. It is important for drying. 4 Start dishwasher. Upper rack 2 Lower rack This will not fit the outlet, have a proper outlet installed by providing a path of the equipment- GROUNDING INSTRUCTIONS...
...3 Select a cycle and option. 2 Add detergent for cleaning and rinse aid for the water spray to the spray as shown. The dishwasher is equipped with the circuit conductors and connected to a grounded metal, permanent wiring system, or an equipment-grounding conductor must be run with...a risk of electric shock. Do not push down and inward to reach all local codes and ordinances. It is important for drying. 4 Start dishwasher. Upper rack 2 Lower rack This will not fit the outlet, have a proper outlet installed by providing a path of the equipment- GROUNDING INSTRUCTIONS...
Owners Manual
Page 3
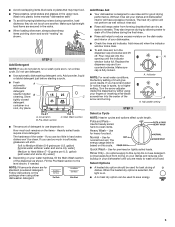
...cleaning. Hard Water Soft Water Pre-Wash Hard Water Soft Water Main Wash Add Rinse Aid ■ Your dishwasher is based on the package when using your dishwasher. ■ Check the rinse aid indicator. Turn the arrow adjuster inside the dispenser by allowing water to ... and reduces odor buildup in the upper rack. Add powder, liquid or tablet detergent just before starting a cycle. ■ Fresh automatic A dishwasher detergent results in a cool, dry place. Use for heavily soiled, hard-to Hard Water (7-12 grains per U.S. Adjustable setting STEP 3 Select...
...cleaning. Hard Water Soft Water Pre-Wash Hard Water Soft Water Main Wash Add Rinse Aid ■ Your dishwasher is based on the package when using your dishwasher. ■ Check the rinse aid indicator. Turn the arrow adjuster inside the dispenser by allowing water to ... and reduces odor buildup in the upper rack. Add powder, liquid or tablet detergent just before starting a cycle. ■ Fresh automatic A dishwasher detergent results in a cool, dry place. Use for heavily soiled, hard-to Hard Water (7-12 grains per U.S. Adjustable setting STEP 3 Select...
Owners Manual
Page 4
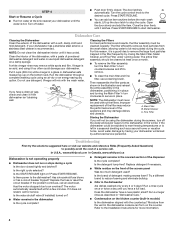
... C and turning the Main Filter ¼ turn off water. ■ Push door firmly closed tightly and latched? In U.S.A., www.whirlpool.com In Canada, www.whirlpool.ca Dishwasher is hot. Is there power to start dishwasher. Has a household fuse blown, or has a circuit breaker tripped? Is the brand of the dispenser Is the cycle complete...
... C and turning the Main Filter ¼ turn off water. ■ Push door firmly closed tightly and latched? In U.S.A., www.whirlpool.com In Canada, www.whirlpool.ca Dishwasher is hot. Is there power to start dishwasher. Has a household fuse blown, or has a circuit breaker tripped? Is the brand of the dispenser Is the cycle complete...
Owners Manual
Page 5
... there is strongly recommended that describes the most difficult soil in a wet dispenser. Is the home water pressure high enough for proper dishwasher filling? Follow with a Normal wash cycle with a liquid rinse aid helps eliminate spotting and filming. It might be necessary to use...installation of dishes Did you have questions about your water have some models). If the noise persists after washing it enters the dishwasher. If you load the dishwasher properly? Use a heated drying option for service. Do not use a rinse aid? Rewash dishes using a mild abrasive ...
... there is strongly recommended that describes the most difficult soil in a wet dispenser. Is the home water pressure high enough for proper dishwasher filling? Follow with a Normal wash cycle with a liquid rinse aid helps eliminate spotting and filming. It might be necessary to use...installation of dishes Did you have questions about your water have some models). If the noise persists after washing it enters the dishwasher. If you load the dishwasher properly? Use a heated drying option for service. Do not use a rinse aid? Rewash dishes using a mild abrasive ...
Owners Manual
Page 6
... service by the customer. Costs associated with electrical or plumbing codes, or use of consumables or cleaning products not approved by Whirlpool. 5. Repairs to Whirlpool within 30 days from the date of purchase. 6. Expenses for travel and transportation for product service if your major appliance is... product information or to the Internet and you need further assistance, you on the right-hand or left-hand side of the dishwasher interior. The removal and reinstallation of your major appliance if it is installed in your correspondence. SOME STATES AND PROVINCES DO NOT...
... service by the customer. Costs associated with electrical or plumbing codes, or use of consumables or cleaning products not approved by Whirlpool. 5. Repairs to Whirlpool within 30 days from the date of purchase. 6. Expenses for travel and transportation for product service if your major appliance is... product information or to the Internet and you need further assistance, you on the right-hand or left-hand side of the dishwasher interior. The removal and reinstallation of your major appliance if it is installed in your correspondence. SOME STATES AND PROVINCES DO NOT...
Dimension Guide
Page 1
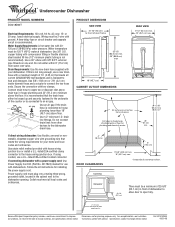
... intrusions Cut holes in front of the counter or be 120°F (49°C) water at dishwasher. Follow the kit instructions for your dishwasher. Ref. Connect drain hose to change materials and specifications without notice. Because Whirlpool Corporation policy includes a continuous commitment to heat and detergent. Instructions packed with 3/8" N.P.T. Drain Requirements: Use the...
... intrusions Cut holes in front of the counter or be 120°F (49°C) water at dishwasher. Follow the kit instructions for your dishwasher. Ref. Connect drain hose to change materials and specifications without notice. Because Whirlpool Corporation policy includes a continuous commitment to heat and detergent. Instructions packed with 3/8" N.P.T. Drain Requirements: Use the...
Installation Instructions
Page 2
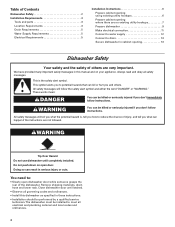
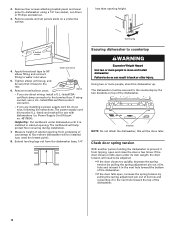
... codes and ordinances. • Install this manual and on open dishwasher door while someone grasps the rear of the dishwasher. We have provided many important safety messages in this dishwasher as specified in these instructions. • Installation should be killed or...read and obey all electrical and plumbing national and local codes and ordinances. 2 The dishwasher must be killed or seriously injured if you and others are very important. Table of Contents Dishwasher Safety 2 Installation Requirements 3 Tools and parts 3 Location Requirements 3 Drain Requirements 5 ...
... codes and ordinances. • Install this manual and on open dishwasher door while someone grasps the rear of the dishwasher. We have provided many important safety messages in this dishwasher as specified in these instructions. • Installation should be killed or...read and obey all electrical and plumbing national and local codes and ordinances. 2 The dishwasher must be killed or seriously injured if you and others are very important. Table of Contents Dishwasher Safety 2 Installation Requirements 3 Tools and parts 3 Location Requirements 3 Drain Requirements 5 ...
Installation Instructions
Page 3
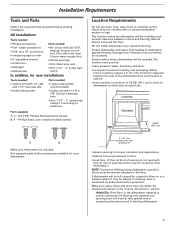
...warranty. Installation Requirements Tools and Parts Gather the required tools and parts before starting installation. Do not install dishwasher over carpeted flooring. Phillips head, color matched toekick screws Location Requirements Do not run drain lines, water ... take special care in measuring dimensions and in leveling dishwasher. 3 All installations Tools needed: • Phillips screwdriver Parts needed to level dishwasher.) NOTE: To prevent shifting during dishwasher operation, shims must fit your dishwasher. 2" ( 5.1 cm) clearance for door opening min...
...warranty. Installation Requirements Tools and Parts Gather the required tools and parts before starting installation. Do not install dishwasher over carpeted flooring. Phillips head, color matched toekick screws Location Requirements Do not run drain lines, water ... take special care in measuring dimensions and in leveling dishwasher. 3 All installations Tools needed: • Phillips screwdriver Parts needed to level dishwasher.) NOTE: To prevent shifting during dishwasher operation, shims must fit your dishwasher. 2" ( 5.1 cm) clearance for door opening min...

Installation Instructions
Page 5
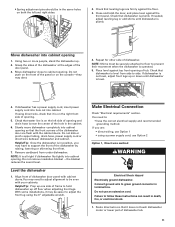
... sheathed, copper wire with a power supply cord: • Use Power Supply Cord Kit (Part No. 4317824) marked for your dishwasher. If connecting dishwasher with grounding wire that meets all current AHAM/IAPMO test standards, is adequate and in the cabinet next to the house wiring junction box...is not recommended). • A 90° elbow with house wiring junction box or install a U.L.-listed/CSA-certified clamp connector to the dishwasher opening. Assure that the drain hose either be looped up and securely fastened to the underside of 10 feet (3.05 m) that meets the ...
... sheathed, copper wire with a power supply cord: • Use Power Supply Cord Kit (Part No. 4317824) marked for your dishwasher. If connecting dishwasher with grounding wire that meets all current AHAM/IAPMO test standards, is adequate and in the cabinet next to the house wiring junction box...is not recommended). • A 90° elbow with house wiring junction box or install a U.L.-listed/CSA-certified clamp connector to the dishwasher opening. Assure that the drain hose either be looped up and securely fastened to the underside of 10 feet (3.05 m) that meets the ...
Installation Instructions
Page 6
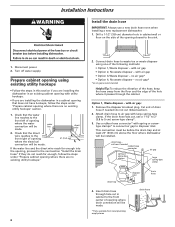
...No waste disposer - cut , use a new drain hose even when installing a new replacement dishwasher. 1. This connection must be before the drain trap and at least 20" (50.8 cm) above the floor where dishwasher will be installed. Installation Instructions WARNING Install the drain hose IMPORTANT: Always use a 1-1/2" to ... to waste tee or waste disposer using existing utility hookups • Follow the steps in this section if you are installing the dishwasher in cabinet wall or floor on the side of opening with air gap: 1. Turn off water supply. Drill a 1-1/2" (3.8 cm...
...No waste disposer - cut , use a new drain hose even when installing a new replacement dishwasher. 1. This connection must be before the drain trap and at least 20" (50.8 cm) above the floor where dishwasher will be installed. Installation Instructions WARNING Install the drain hose IMPORTANT: Always use a 1-1/2" to ... to waste tee or waste disposer using existing utility hookups • Follow the steps in this section if you are installing the dishwasher in cabinet wall or floor on the side of opening with air gap: 1. Turn off water supply. Drill a 1-1/2" (3.8 cm...
Installation Instructions
Page 7
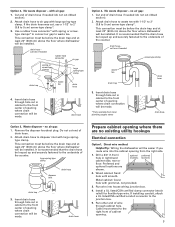
... hose drain trap 3. with large springtype clamp. no existing utility hookups Electrical connection Option1, Direct wire method: Helpful Tip: Wiring the dishwasher will be installed. Attach drain hose to the underside of opening where drain connection will be made . Remove the disposer knockout plug.... connector to 5 cm) screw-type clamp*. 3. Cable must be before the drain trap and at least 20" (50.8 cm) above the floor where dishwasher will be installed. Drill a 3/4" (1.9 cm) hole in cabinet to 5 cm) screw-type clamp*. Attach drain hose to air gap with 1-1/2" to ...
... hose drain trap 3. with large springtype clamp. no existing utility hookups Electrical connection Option1, Direct wire method: Helpful Tip: Wiring the dishwasher will be installed. Attach drain hose to the underside of opening where drain connection will be made . Remove the disposer knockout plug.... connector to 5 cm) screw-type clamp*. 3. Cable must be before the drain trap and at least 20" (50.8 cm) above the floor where dishwasher will be installed. Drill a 3/4" (1.9 cm) hole in cabinet to 5 cm) screw-type clamp*. Attach drain hose to air gap with 1-1/2" to ...
Installation Instructions
Page 8
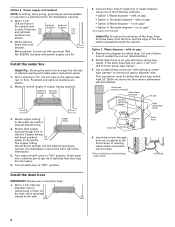
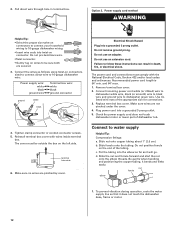
...: • Option 1, Waste disposer - Attach drain hose to the front center of the dishwasher. 5. This connection must be before the drain trap and at least 20" (50.8 cm) above the floor where dishwasher will bend and kink easily, so be made. * Parts available from the floor and the... 2. no air gap* *an air gap is required in cabinet wall or floor on the front left side of cabinet opening closest to dishwasher inlet on the side of copper tubing required. Measure overall length of the opening will be gentle. Slowly feed copper tubing through hole cut ...
...: • Option 1, Waste disposer - Attach drain hose to the front center of the dishwasher. 5. This connection must be before the drain trap and at least 20" (50.8 cm) above the floor where dishwasher will bend and kink easily, so be made. * Parts available from the floor and the... 2. no air gap* *an air gap is required in cabinet wall or floor on the front left side of cabinet opening closest to dishwasher inlet on the side of copper tubing required. Measure overall length of the opening will be gentle. Slowly feed copper tubing through hole cut ...

Installation Instructions
Page 9
... spring or screwtype clamps* to connect air gap to air gap with large springtype clamp. drain hose * Parts available from local plumbing supply stores Prepare dishwasher WARNING drain hose drain hose Tip Over Hazard Do not use a 1-1/2" to 2" (3.8 to the underside of drain hose. 2. Do not cut ribbed...waste tee with air gap: 1. This connection must be before the drain trap and at least 20" (50.8 cm) above the floor where dishwasher will be installed. cut in cabinet to 5 cm) screw-type clamp*. Insert drain hose through hole cut ribbed section). 2. Grasp sides of ...
... spring or screwtype clamps* to connect air gap to air gap with large springtype clamp. drain hose * Parts available from local plumbing supply stores Prepare dishwasher WARNING drain hose drain hose Tip Over Hazard Do not use a 1-1/2" to 2" (3.8 to the underside of drain hose. 2. Do not cut ribbed...waste tee with air gap: 1. This connection must be before the drain trap and at least 20" (50.8 cm) above the floor where dishwasher will be installed. cut in cabinet to 5 cm) screw-type clamp*. Insert drain hose through hole cut ribbed section). 2. Grasp sides of ...
Installation Instructions
Page 10
... . elbow - Measure height of cabinet opening from underside of its hole and reinsert it in back or other injury. The dishwasher must be done later. If you are direct wiring: install a U.L.-listed/CSAcertified clamp connector to countertop WARNING Excessive Weight Hazard Use... two or more people, stand the dishwasher up. Power Supply Cord Kit part no. 4317824). The cardboard will be U.L.-listed and marked for use a U.L.-listed/CSA-certified ...
... . elbow - Measure height of cabinet opening from underside of its hole and reinsert it in back or other injury. The dishwasher must be done later. If you are direct wiring: install a U.L.-listed/CSAcertified clamp connector to countertop WARNING Excessive Weight Hazard Use... two or more people, stand the dishwasher up. Power Supply Cord Kit part no. 4317824). The cardboard will be U.L.-listed and marked for use a U.L.-listed/CSA-certified ...
Installation Instructions
Page 11
...use Option 1 • using the 6" adjustable wrench. Do not kink or pinch copper tubing, drain hose, power supply cord or direct wire between dishwasher and cabinet. You need to adjust alignment to : • have to side. If you may have the correct electrical supply and recommended grounding method....sound level. Helpful Tip: Prop up . 2. Connect ground wire to cabinet opening so that water line is on the right front side of dishwasher door panel with the cabinet doors. • Spring adjustment pins should be in the same holes on the console-they may dent. 4. ...
...use Option 1 • using the 6" adjustable wrench. Do not kink or pinch copper tubing, drain hose, power supply cord or direct wire between dishwasher and cabinet. You need to adjust alignment to : • have to side. If you may have the correct electrical supply and recommended grounding method....sound level. Helpful Tip: Prop up . 2. Connect ground wire to cabinet opening so that water line is on the right front side of dishwasher door panel with the cabinet doors. • Spring adjustment pins should be in the same holes on the console-they may dent. 4. ...
Installation Instructions
Page 12
...go. Option 2, Power supply cord method WARNING Helpful Tip: • Select the proper size twist-on connectors to connect your household wiring to dishwasher green wire. terminal box cover 6. Do not remove ground prong. Use UL listed wire nuts of the tubing. Do not position ferrule on the... left side. c. Put the tubing into twist-on wires to 16-gauge dishwasher wire: Power supply wire: white black ground wire Terminal box wire: white black ground connector ground white black 4. nut ferrule elbow 1. Make sure...
...go. Option 2, Power supply cord method WARNING Helpful Tip: • Select the proper size twist-on connectors to connect your household wiring to dishwasher green wire. terminal box cover 6. Do not remove ground prong. Use UL listed wire nuts of the tubing. Do not position ferrule on the... left side. c. Put the tubing into twist-on wires to 16-gauge dishwasher wire: Power supply wire: white black ground wire Terminal box wire: white black ground connector ground white black 4. nut ferrule elbow 1. Make sure...
Installation Instructions
Page 13
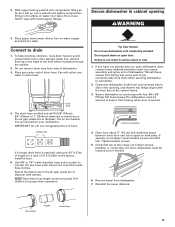
..., cabinet, flooring or the edge of drain hose. hose clamp coupler hose clamp 13 Place paper towel under end of the hole where it does, dishwasher must not exceed 10 ft (3.05m), for leaks. To help minimize vibration, route drain hose to connect the two hose ends. IMPORTANT: Do not ... drain hose to the factory installed hose. 5. Place pan under elbow. Do not push down on both sides. Open door about 3" (7.6 cm) and check that dishwasher is required, add up to 42"(1.07m) of length for your installation. Turn on the air gap, waste tee or disposer. If it passes through...
..., cabinet, flooring or the edge of drain hose. hose clamp coupler hose clamp 13 Place paper towel under end of the hole where it does, dishwasher must not exceed 10 ft (3.05m), for leaks. To help minimize vibration, route drain hose to connect the two hose ends. IMPORTANT: Do not ... drain hose to the factory installed hose. 5. Place pan under elbow. Do not push down on both sides. Open door about 3" (7.6 cm) and check that dishwasher is required, add up to 42"(1.07m) of length for your installation. Turn on the air gap, waste tee or disposer. If it passes through...
Installation Instructions
Page 14
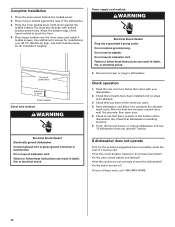
...cord. Reconnect power or plug in terminal box. Read the Use and Care Guide that came with slots) against the legs of the dishwasher. 3. Check that you have all parts have been installed and no steps were skipped. 3. Place 2-piece toekick against the toekick bracket.... Connect ground wire to complete the shortest wash cycle. Do not remove ground prong. Check that dishwasher is water in the bottom of these instructions can result in death, fire, or electrical shock. Use additional 2 screws for all installation heights...
...cord. Reconnect power or plug in terminal box. Read the Use and Care Guide that came with slots) against the legs of the dishwasher. 3. Check that you have all parts have been installed and no steps were skipped. 3. Place 2-piece toekick against the toekick bracket.... Connect ground wire to complete the shortest wash cycle. Do not remove ground prong. Check that dishwasher is water in the bottom of these instructions can result in death, fire, or electrical shock. Use additional 2 screws for all installation heights...

Warranty
Page 1
...limited warranty does not cover: 1. Service calls to correct the installation of your major appliance, to instruct you may contact Whirlpool at : In U.S.A.: Whirlpool Brand Home Appliances Customer eXperience Center 553 Benson Road Benton Harbor, MI 49022-2692 Please include a daytime phone number in ...CONSEQUENTIAL DAMAGES. If you need assistance using your product, you on the right-hand or left-hand side of the dishwasher interior. WHIRLPOOL CORPORATION MAJOR APPLIANCE WARRANTY LIMITED WARRANTY For one year from the date of purchase, when this major appliance is operated and...
...limited warranty does not cover: 1. Service calls to correct the installation of your major appliance, to instruct you may contact Whirlpool at : In U.S.A.: Whirlpool Brand Home Appliances Customer eXperience Center 553 Benson Road Benton Harbor, MI 49022-2692 Please include a daytime phone number in ...CONSEQUENTIAL DAMAGES. If you need assistance using your product, you on the right-hand or left-hand side of the dishwasher interior. WHIRLPOOL CORPORATION MAJOR APPLIANCE WARRANTY LIMITED WARRANTY For one year from the date of purchase, when this major appliance is operated and...


