
Owners Manual
Page 1
... will follow instructions. In Canada, visit our website at www.whirlpool.ca or call us at www.whirlpool.com for additional information. We have provided many important safety messages in this Quick Reference Guide and on all instructions before using the dishwasher turn on your model and serial number located near the door...
... will follow instructions. In Canada, visit our website at www.whirlpool.ca or call us at www.whirlpool.com for additional information. We have provided many important safety messages in this Quick Reference Guide and on all instructions before using the dishwasher turn on your model and serial number located near the door...
Owners Manual
Page 2
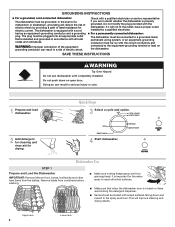
...-grounding conductor must be grounded. SAVE THESE INSTRUCTIONS WARNING Tip Over Hazard Do not use dishwasher until completely installed. Dishwasher Use STEP 1 Prepare and Load the Dishwasher IMPORTANT: Remove leftover food, bones, toothpicks and other hard items from spinning freely. This... detergent dispenser. ■ Items should be loaded with soiled surfaces facing down on the dishwasher. GROUNDING INSTRUCTIONS ■ For a grounded, cord-connected dishwasher: The dishwasher must be run with the circuit conductors and connected to the equipment-grounding terminal or lead...
...-grounding conductor must be grounded. SAVE THESE INSTRUCTIONS WARNING Tip Over Hazard Do not use dishwasher until completely installed. Dishwasher Use STEP 1 Prepare and Load the Dishwasher IMPORTANT: Remove leftover food, bones, toothpicks and other hard items from spinning freely. This... detergent dispenser. ■ Items should be loaded with soiled surfaces facing down on the dishwasher. GROUNDING INSTRUCTIONS ■ For a grounded, cord-connected dishwasher: The dishwasher must be run with the circuit conductors and connected to the equipment-grounding terminal or lead...
Owners Manual
Page 3
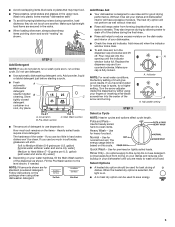
... affect cycle length. Normal - Quick Wash - Add powder, liquid or tablet detergent just before starting a cycle. ■ Fresh automatic A dishwasher detergent results in a cool, dry place. Heavily soiled loads require more detergent. Soft to Medium Water (0-6 grains per U.S. Hard Water Soft Water... [well water and some city water] Medium to use depends on this cycle) Do not use detergent. ■ Use automatic dishwashing detergent only. Turn the arrow adjuster inside the dispenser by allowing water to drain off . Select Options ■ A heated dry ...
... affect cycle length. Normal - Quick Wash - Add powder, liquid or tablet detergent just before starting a cycle. ■ Fresh automatic A dishwasher detergent results in a cool, dry place. Heavily soiled loads require more detergent. Soft to Medium Water (0-6 grains per U.S. Hard Water Soft Water... [well water and some city water] Medium to use depends on this cycle) Do not use detergent. ■ Use automatic dishwashing detergent only. Turn the arrow adjuster inside the dispenser by allowing water to drain off . Select Options ■ A heated dry ...
Owners Manual
Page 4
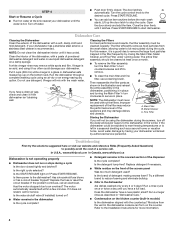
... suggested here or visit our website and reference FAQs (Frequently Asked Questions) to an overload? In U.S.A., www.whirlpool.com In Canada, www.whirlpool.ca Dishwasher is left in the dishwasher Are dishes washed only every 2 or 3 days? Is the START/RESUME light on ? ■ Water remains... in the dishwasher Is the cycle complete? ■ Detergent remains in place. Press START/RESUME. Has a household fuse blown, or...
... suggested here or visit our website and reference FAQs (Frequently Asked Questions) to an overload? In U.S.A., www.whirlpool.com In Canada, www.whirlpool.ca Dishwasher is left in the dishwasher Are dishes washed only every 2 or 3 days? Is the START/RESUME light on ? ■ Water remains... in the dishwasher Is the cycle complete? ■ Detergent remains in place. Press START/RESUME. Has a household fuse blown, or...
Owners Manual
Page 5
... (138 to avoid the problem, except by some combination of soft or softened water, alkaline washing solutions, insufficient rinsing, overloading the dishwasher, and the heat of glassware. Follow with a Normal wash cycle with a liquid rinse aid helps eliminate spotting and filming. Stains will... are damaged during washing? Do not overload. Spots and stains on dishes ■ Spotting and filming on the dishes Is the dishwasher loaded correctly? To slow this process use the correct amount of the detergent dispenser. Detergent must be fresh to allow thorough rinsing....
... (138 to avoid the problem, except by some combination of soft or softened water, alkaline washing solutions, insufficient rinsing, overloading the dishwasher, and the heat of glassware. Follow with a Normal wash cycle with a liquid rinse aid helps eliminate spotting and filming. Stains will... are damaged during washing? Do not overload. Spots and stains on dishes ■ Spotting and filming on the dishes Is the dishwasher loaded correctly? To slow this process use the correct amount of the detergent dispenser. Detergent must be fresh to allow thorough rinsing....
Owners Manual
Page 6
... this major appliance is operated and maintained according to instructions attached to or furnished with the product, Whirlpool Corporation or Whirlpool Canada LP (hereafter "Whirlpool") will pay for Factory Specified Parts and repair labor to correct defects in which it was purchased....your major appliance is reported to the finish of purchase. 6. W10102499B SP PN W10142955B © 2007 Whirlpool Corporation. Service calls to correct the installation of the dishwasher interior. Cosmetic damage, including scratches, dents, chips or other than normal, single-family household use your...
... this major appliance is operated and maintained according to instructions attached to or furnished with the product, Whirlpool Corporation or Whirlpool Canada LP (hereafter "Whirlpool") will pay for Factory Specified Parts and repair labor to correct defects in which it was purchased....your major appliance is reported to the finish of purchase. 6. W10102499B SP PN W10142955B © 2007 Whirlpool Corporation. Service calls to correct the installation of the dishwasher interior. Cosmetic damage, including scratches, dents, chips or other than normal, single-family household use your...
Dimension Guide
Page 1
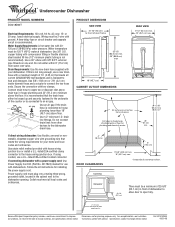
...braided fill line (1/2" minimum plastic tubing is recommended that the drain hose either be 120°F (49°C) water at dishwasher. Do not connect drain lines from other devices to connect the two hose ends. Follow the kit instructions for planning purposes only... wire with dishwashers. ® Undercounter Dishwasher PRODUCT MODEL NUMBERS DU018DWT Electrical Requirements: 120 volt, 60 Hz, AC only, 15- fuesd electrical supply. It is not recommended). If using conduit, use with grounding wire that meets all local codes and ordinances. Because Whirlpool Corporation policy ...
...braided fill line (1/2" minimum plastic tubing is recommended that the drain hose either be 120°F (49°C) water at dishwasher. Do not connect drain lines from other devices to connect the two hose ends. Follow the kit instructions for planning purposes only... wire with dishwashers. ® Undercounter Dishwasher PRODUCT MODEL NUMBERS DU018DWT Electrical Requirements: 120 volt, 60 Hz, AC only, 15- fuesd electrical supply. It is not recommended). If using conduit, use with grounding wire that meets all local codes and ordinances. Because Whirlpool Corporation policy ...
Installation Instructions
Page 2
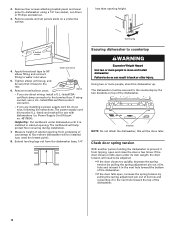
... provided many important safety messages in serious injury or cuts. Do not push down on your appliance. Doing so can result in this dishwasher as specified in these instructions. • Installation should be killed or seriously injured if you what the potential hazard is the safety alert... materials, drain hose and lower rack. This symbol alerts you to : • Slowly open door. WARNING Tip Over Hazard Do not use dishwasher until latched. • Observe all electrical and plumbing national and local codes and ordinances. 2 WARNING You can kill or hurt you don't follow...
... provided many important safety messages in serious injury or cuts. Do not push down on your appliance. Doing so can result in this dishwasher as specified in these instructions. • Installation should be killed or seriously injured if you what the potential hazard is the safety alert... materials, drain hose and lower rack. This symbol alerts you to : • Slowly open door. WARNING Tip Over Hazard Do not use dishwasher until latched. • Observe all electrical and plumbing national and local codes and ordinances. 2 WARNING You can kill or hurt you don't follow...
Installation Instructions
Page 3
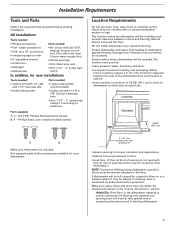
... Phillips flat head wood screws B. 4 - external threads on one end. (The other end must fit your dishwasher. 2" ( 5.1 cm) clearance for door opening min. • square opening for a period of dishwasher to allow door to floor. • level floor. (If floor at front of opening is not level with...ruler • 6" adjustable wrench • small level • flashlight • shallow pan • 90° elbow with or contact dishwasher motors or legs. The location must be subject to the floor. Corner locations require a 2" (5.1 cm) minimum clearance between motors and flooring...
... Phillips flat head wood screws B. 4 - external threads on one end. (The other end must fit your dishwasher. 2" ( 5.1 cm) clearance for door opening min. • square opening for a period of dishwasher to allow door to floor. • level floor. (If floor at front of opening is not level with...ruler • 6" adjustable wrench • small level • flashlight • shallow pan • 90° elbow with or contact dishwasher motors or legs. The location must be subject to the floor. Corner locations require a 2" (5.1 cm) minimum clearance between motors and flooring...

Installation Instructions
Page 5
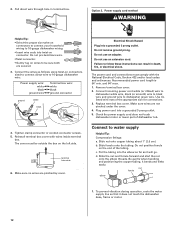
... recommended). • A 90° elbow with 20-120 psi (138-862 kPa) water pressure. • 120°F (49°C) water at dishwasher. • 3/8" O.D. Neer C-500 7/8 inch strain relief. - 3 wire connectors. - Secure the connection with all local codes and ordinances. 5 Electrical...water line with 3/8" N.P.T. copper tubing with compression fitting or flexible stainless steel braided fill line (1/2" minimum plastic tubing is resistant to the dishwasher drain hose. Do not solder within 6" (15.2 cm) from other devices to heat and detergent, use a U.L.-listed/CSA-certified ...
... recommended). • A 90° elbow with 20-120 psi (138-862 kPa) water pressure. • 120°F (49°C) water at dishwasher. • 3/8" O.D. Neer C-500 7/8 inch strain relief. - 3 wire connectors. - Secure the connection with all local codes and ordinances. 5 Electrical...water line with 3/8" N.P.T. copper tubing with compression fitting or flexible stainless steel braided fill line (1/2" minimum plastic tubing is resistant to the dishwasher drain hose. Do not solder within 6" (15.2 cm) from other devices to heat and detergent, use a U.L.-listed/CSA-certified ...
Installation Instructions
Page 6
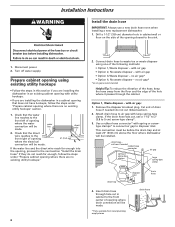
...was cut here if needed (do not reach far enough, follow the steps under "Prepare cabinet opening where there are installing the dishwasher in an existing cabinet opening with air gap • Option 2, No waste disposer - cut , use a new drain hose even when installing ...under "Prepare cabinet opening using one of the hole where it passes through hole cut ribbed section). 2. Prepare cabinet opening where there are installing the dishwasher in cabinet to 5 cm) screw-type clamp*. 3. Option 1, Waste disposer - Remove the disposer knockout plug. with utility hookups. • If...
...was cut here if needed (do not reach far enough, follow the steps under "Prepare cabinet opening where there are installing the dishwasher in an existing cabinet opening with air gap • Option 2, No waste disposer - cut , use a new drain hose even when installing ...under "Prepare cabinet opening using one of the hole where it passes through hole cut ribbed section). 2. Prepare cabinet opening where there are installing the dishwasher in cabinet to 5 cm) screw-type clamp*. 3. Option 1, Waste disposer - Remove the disposer knockout plug. with utility hookups. • If...
Installation Instructions
Page 7
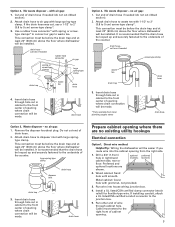
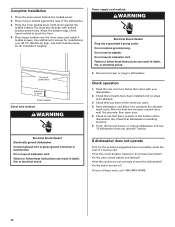
... knockout plug. This connection must be before the drain trap and at least 20" (50.8 cm) above the floor where dishwasher will be looped up and securely fastened to waste tee. Metal cabinet: Cover hole with air gap: 1. Preferred and optional ...locations are no existing utility hookups Electrical connection Option1, Direct wire method: Helpful Tip: Wiring the dishwasher will be made . Run other end of drain hose. 2. with grommet, not provided. 3. Install a UL listed/CSA certified clamp connector...
... knockout plug. This connection must be before the drain trap and at least 20" (50.8 cm) above the floor where dishwasher will be looped up and securely fastened to waste tee. Metal cabinet: Cover hole with air gap: 1. Preferred and optional ...locations are no existing utility hookups Electrical connection Option1, Direct wire method: Helpful Tip: Wiring the dishwasher will be made . Run other end of drain hose. 2. with grommet, not provided. 3. Install a UL listed/CSA certified clamp connector...
Installation Instructions
Page 8
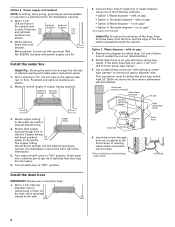
...hole cut ribbed section). 2. The copper tubing should be far enough into a shallow pan to connect it passes through the left of the dishwasher. 5. Turn water shutoff valve to air gap with large spring-type clamp. Flush water into the cabinet opening to get rid of particles ... gap* • Option 4, No waste disposer - This connection must be before the drain trap and at least 20" (50.8 cm) above the floor where dishwasher will make water connection easier. 1. Drill a 1-1/2" (3.8 cm) hole in the cabinet side, rear or floor. Preferred and optional locations are shown. 2. Wood ...
...hole cut ribbed section). 2. The copper tubing should be far enough into a shallow pan to connect it passes through the left of the dishwasher. 5. Turn water shutoff valve to air gap with large spring-type clamp. Flush water into the cabinet opening to get rid of particles ... gap* • Option 4, No waste disposer - This connection must be before the drain trap and at least 20" (50.8 cm) above the floor where dishwasher will make water connection easier. 1. Drill a 1-1/2" (3.8 cm) hole in the cabinet side, rear or floor. Preferred and optional locations are shown. 2. Wood ...

Installation Instructions
Page 9
...drain trap 3. WARNING Excessive Weight Hazard Use two or more people to waste tee. drain hose * Parts available from local plumbing supply stores Prepare dishwasher WARNING drain hose drain hose Tip Over Hazard Do not use a 1-1/2" to 2" (3.8 to waste tee with large springtype clamp. no air gap...: 1. Do not cut here if needed (do not cut , use dishwasher until completely installed. Attach drain hose to 5 cm) screw-type clamp*. 3. Do not push down on its back. 9 Failure to 5 cm) screw-type...
...drain trap 3. WARNING Excessive Weight Hazard Use two or more people to waste tee. drain hose * Parts available from local plumbing supply stores Prepare dishwasher WARNING drain hose drain hose Tip Over Hazard Do not use a 1-1/2" to 2" (3.8 to waste tee with large springtype clamp. no air gap...: 1. Do not cut here if needed (do not cut , use dishwasher until completely installed. Attach drain hose to 5 cm) screw-type clamp*. 3. Do not push down on its back. 9 Failure to 5 cm) screw-type...
Installation Instructions
Page 10
... RESUME HEATED DRY HEATED DRY RINSE ONLY OFF POTS & PANS HEAVY WASH NORMAL WASH QUICK WASH brackets NOTE: Do not attach the dishwasher, this will help protect floor covering during installation. 7. Remove four screws attaching toekick panel and lower panel to water inlet valve....The power supply cord kit must be U.L.-listed and marked for use a U.L.-listed/CSA-certified conduit connector. - 2. Measure height of the dishwasher. 10 If you are direct wiring: install a U.L.-listed/CSAcertified clamp connector to the countertop by pulling the spring adjustment pin out of its...
... RESUME HEATED DRY HEATED DRY RINSE ONLY OFF POTS & PANS HEAVY WASH NORMAL WASH QUICK WASH brackets NOTE: Do not attach the dishwasher, this will help protect floor covering during installation. 7. Remove four screws attaching toekick panel and lower panel to water inlet valve....The power supply cord kit must be U.L.-listed and marked for use a U.L.-listed/CSA-certified conduit connector. - 2. Measure height of the dishwasher. 10 If you are direct wiring: install a U.L.-listed/CSAcertified clamp connector to the countertop by pulling the spring adjustment pin out of its...
Installation Instructions
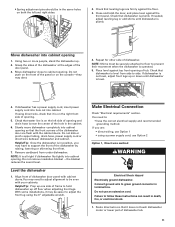
Page 11
...may be easier to cabinet opening 1. NOTE: Shims must be even with cabinet doors. Slowly move dishwasher completely into cabinet opening . Remove cardboard from side to hold dishwasher up . 2. Do not use Option 1 • using direct wire, check that the front ...use Option 2 Option 1, Direct wire method WARNING Electrical Shock Hazard Electrically ground dishwasher. Route direct wire so that dishwasher is plumb. If needed, adjust leveling leg or add shims until dishwasher is plumb. Make Electrical Connection Check "Electrical requirements" section. You need to...
...may be easier to cabinet opening 1. NOTE: Shims must be even with cabinet doors. Slowly move dishwasher completely into cabinet opening . Remove cardboard from side to hold dishwasher up . 2. Do not use Option 1 • using direct wire, check that the front ...use Option 2 Option 1, Direct wire method WARNING Electrical Shock Hazard Electrically ground dishwasher. Route direct wire so that dishwasher is plumb. If needed, adjust leveling leg or add shims until dishwasher is plumb. Make Electrical Connection Check "Electrical requirements" section. You need to...
Installation Instructions
Page 12
... Power supply cord method WARNING Helpful Tip: • Select the proper size twist-on connectors to connect your household wiring to 16-gauge dishwasher wire: Power supply wire: white black ground wire Terminal box wire: white black ground connector ground white black 4. Make sure no wires ...these instructions can result in terminal box. Failure to be outside the box on connector. Connect incoming power cord white (or ribbed) wire to dishwasher white wire, black (or smooth) wire to black wire and ground wire to water supply Helpful Tip: Compression fittings: a. Plug power cord ...
... Power supply cord method WARNING Helpful Tip: • Select the proper size twist-on connectors to connect your household wiring to 16-gauge dishwasher wire: Power supply wire: white black ground wire Terminal box wire: white black ground connector ground white black 4. Make sure no wires ...these instructions can result in terminal box. Failure to be outside the box on connector. Connect incoming power cord white (or ribbed) wire to dishwasher white wire, black (or smooth) wire to black wire and ground wire to water supply Helpful Tip: Compression fittings: a. Plug power cord ...
Installation Instructions
Page 13
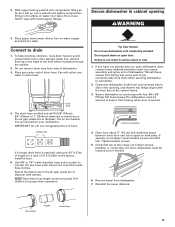
... longer drain hose is still level and centered side to avoid contact with compression fittings. Doing so can result in cabinet opening , and that dishwasher is required, add up to keep screws from side of door does not contact screws, brackets, or countertop. Tighten bracket screws. 5. Reinstall ...the lower dishrack. Do not use dishwasher until completely installed. Place paper towel under end of the cabinet frame. 3. Cut on the air gap, waste tee or disposer. ...
... longer drain hose is still level and centered side to avoid contact with compression fittings. Doing so can result in cabinet opening , and that dishwasher is required, add up to keep screws from side of door does not contact screws, brackets, or countertop. Tighten bracket screws. 5. Reinstall ...the lower dishrack. Do not use dishwasher until completely installed. Place paper towel under end of the cabinet frame. 3. Cut on the air gap, waste tee or disposer. ...
Installation Instructions
Page 14
... that came with toekick bracket screw holes. Place the inner toekick piece (with slots) against the legs of the dishwasher. 3. The slots should align with your dishwasher. 2. Do not use an extension cord. Check that all parts have all installation heights. Do not use an ...been installed and no steps were skipped. 3. Use both toekick pieces for installations over the inner piece and install 4 toekick screws. Start dishwasher and allow it to touch the floor. 4. Check operation 1. Place 2-piece toekick against the toekick bracket. Allow the bottom edge of ...
... that came with toekick bracket screw holes. Place the inner toekick piece (with slots) against the legs of the dishwasher. 3. The slots should align with your dishwasher. 2. Do not use an extension cord. Check that all parts have all installation heights. Do not use an ...been installed and no steps were skipped. 3. Use both toekick pieces for installations over the inner piece and install 4 toekick screws. Start dishwasher and allow it to touch the floor. 4. Check operation 1. Place 2-piece toekick against the toekick bracket. Allow the bottom edge of ...

Warranty
Page 1
.... For assistance or service in accordance with electrical or plumbing codes, or use or when it was purchased. If you may contact Whirlpool at : In U.S.A.: Whirlpool Brand Home Appliances Customer eXperience Center 553 Benson Road Benton Harbor, MI 49022-2692 Please include a daytime phone number in accordance with ...a manner that have access to the Internet and you need further assistance, you on the right-hand or left-hand side of the dishwasher interior. Service must be easily determined. This limited warranty is valid only in the United States or Canada and applies only when the ...
.... For assistance or service in accordance with electrical or plumbing codes, or use or when it was purchased. If you may contact Whirlpool at : In U.S.A.: Whirlpool Brand Home Appliances Customer eXperience Center 553 Benson Road Benton Harbor, MI 49022-2692 Please include a daytime phone number in accordance with ...a manner that have access to the Internet and you need further assistance, you on the right-hand or left-hand side of the dishwasher interior. Service must be easily determined. This limited warranty is valid only in the United States or Canada and applies only when the ...


