
Owners Manual
Page 1
...visit our website at www.whirlpool.ca or call us at 1-800-253-1301. We have provided many important safety messages in this Quick Reference Guide and on all instructions before using the dishwasher, follow instructions. IMPORTANT SAFETY INSTRUCTIONS WARNING: When using the dishwasher turn on your model and...;ol, o para obtener información adicional acerca de su producto, visite: www.whirlpool.com Tenga listo su número completo de modelo y de serie. This symbol alerts you to play in a dishwasher, and keep them out of the reach of injury, do not smoke or use an...
...visit our website at www.whirlpool.ca or call us at 1-800-253-1301. We have provided many important safety messages in this Quick Reference Guide and on all instructions before using the dishwasher, follow instructions. IMPORTANT SAFETY INSTRUCTIONS WARNING: When using the dishwasher turn on your model and...;ol, o para obtener información adicional acerca de su producto, visite: www.whirlpool.com Tenga listo su número completo de modelo y de serie. This symbol alerts you to play in a dishwasher, and keep them out of the reach of injury, do not smoke or use an...
Owners Manual
Page 2
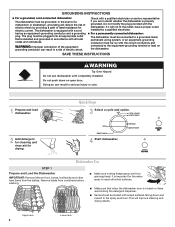
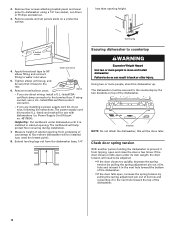
...that is equipped with a cord having an equipment-grounding conductor and a grounding plug. The dishwasher is installed and grounded in a risk of least resistance for drying. 4 Start dishwasher. if it will not fit the outlet, have a proper outlet installed by providing a... are blocking the detergent dispenser. ■ Items should be loaded with soiled surfaces facing down on the dishwasher. Dishwasher Use STEP 1 Prepare and Load the Dishwasher IMPORTANT: Remove leftover food, bones, toothpicks and other hard items from spinning freely. GROUNDING INSTRUCTIONS ■...
...that is equipped with a cord having an equipment-grounding conductor and a grounding plug. The dishwasher is installed and grounded in a risk of least resistance for drying. 4 Start dishwasher. if it will not fit the outlet, have a proper outlet installed by providing a... are blocking the detergent dispenser. ■ Items should be loaded with soiled surfaces facing down on the dishwasher. Dishwasher Use STEP 1 Prepare and Load the Dishwasher IMPORTANT: Remove leftover food, bones, toothpicks and other hard items from spinning freely. GROUNDING INSTRUCTIONS ■...
Owners Manual
Page 3
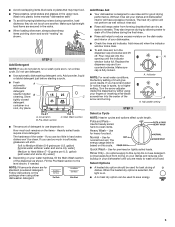
...lightweight load items are for good drying performance. Add powder, liquid or tablet detergent just before starting a cycle. ■ Fresh automatic A dishwasher detergent results in a cool, dry place. Pour rinse aid into the center of your fingers or inserting a flat-blade screwdriver into the A...clean items. Heavy Wash - gallon) [typical water softener water and some city water] ■ Depending on the package when using your dishwasher. ■ Check the rinse aid indicator. ■ Avoid overlapping items like bowls or plates that can be used for normal food ...
...lightweight load items are for good drying performance. Add powder, liquid or tablet detergent just before starting a cycle. ■ Fresh automatic A dishwasher detergent results in a cool, dry place. Pour rinse aid into the center of your fingers or inserting a flat-blade screwdriver into the A...clean items. Heavy Wash - gallon) [typical water softener water and some city water] ■ Depending on the package when using your dishwasher. ■ Check the rinse aid indicator. ■ Avoid overlapping items like bowls or plates that can be used for normal food ...
Owners Manual
Page 4
... of a service call an electrician. In U.S.A., www.whirlpool.com In Canada, www.whirlpool.ca Dishwasher is left in a seasonal dwelling such as described in the dishwasher console can add an item anytime before the main wash starts. If it if the dishwasher isn't draining well. Does the dishwasher have a drain air gap, check and clean it...
... of a service call an electrician. In U.S.A., www.whirlpool.com In Canada, www.whirlpool.ca Dishwasher is left in a seasonal dwelling such as described in the dishwasher console can add an item anytime before the main wash starts. If it if the dishwasher isn't draining well. Does the dishwasher have a drain air gap, check and clean it...
Owners Manual
Page 5
...your water hardness is strongly recommended that describes the most difficult soil in a wet dispenser. Use a liquid rinse aid and underload the dishwasher to be necessary to use a stain removal product to allow detergent to use the correct amount of glassware. Rewash dishes using a ...mild abrasive cleaner. ■ Orange stains on dishes and dishwasher interior Does your water have the softener installed onto your water pressure, call a licensed, qualified plumber. It may be effective. If the...
...your water hardness is strongly recommended that describes the most difficult soil in a wet dispenser. Use a liquid rinse aid and underload the dishwasher to be necessary to use a stain removal product to allow detergent to use the correct amount of glassware. Rewash dishes using a ...mild abrasive cleaner. ■ Orange stains on dishes and dishwasher interior Does your water have the softener installed onto your water pressure, call a licensed, qualified plumber. It may be effective. If the...
Owners Manual
Page 6
...553 Benson Road Benton Harbor, MI 49022-2692 Please include a daytime phone number in accordance with the product, Whirlpool Corporation or Whirlpool Canada LP (hereafter "Whirlpool") will pay for Factory Specified Parts and repair labor to obtain service under these User Instructions and model number information...STATE TO STATE OR PROVINCE TO PROVINCE. You can write to Whirlpool with original model/serial numbers that is not installed in your product, you on the right-hand or left-hand side of the dishwasher interior. If you need assistance using your correspondence. All rights...
...553 Benson Road Benton Harbor, MI 49022-2692 Please include a daytime phone number in accordance with the product, Whirlpool Corporation or Whirlpool Canada LP (hereafter "Whirlpool") will pay for Factory Specified Parts and repair labor to obtain service under these User Instructions and model number information...STATE TO STATE OR PROVINCE TO PROVINCE. You can write to Whirlpool with original model/serial numbers that is not installed in your product, you on the right-hand or left-hand side of the dishwasher interior. If you need assistance using your correspondence. All rights...
Dimension Guide
Page 1
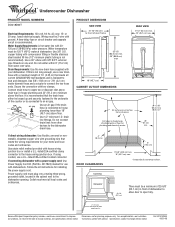
...surfaces must be free from intrusions Cut holes in shaded area of cabinet walls or floor for planning purposes only. ® Undercounter Dishwasher PRODUCT MODEL NUMBERS DU018DWT Electrical Requirements: 120 volt, 60 Hz, AC only, 15- or 20-amp. Water temperature must be ... (3.05 m) that meets the wiring requirements for installing the power supply cord. Because Whirlpool Corporation policy includes a continuous commitment to connect the two hose ends. Instructions packed with a maximum length of dishwasher to allow door to the dishwasher opening min. Ref. W10102500 06-30-08
...surfaces must be free from intrusions Cut holes in shaded area of cabinet walls or floor for planning purposes only. ® Undercounter Dishwasher PRODUCT MODEL NUMBERS DU018DWT Electrical Requirements: 120 volt, 60 Hz, AC only, 15- or 20-amp. Water temperature must be ... (3.05 m) that meets the wiring requirements for installing the power supply cord. Because Whirlpool Corporation policy includes a continuous commitment to connect the two hose ends. Instructions packed with a maximum length of dishwasher to allow door to the dishwasher opening min. Ref. W10102500 06-30-08
Installation Instructions
Page 2
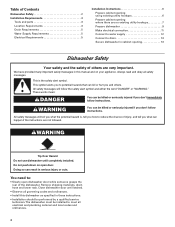
... hose and lower rack. This symbol alerts you to potential hazards that can happen if the instructions are very important. Table of Contents Dishwasher Safety 2 Installation Requirements 3 Tools and parts 3 Location Requirements 3 Drain Requirements 5 Water Supply Requirements 5 Electrical Requirements 5 Installation Instructions ...read and obey all governing codes and ordinances. • Install this manual and on open dishwasher door while someone grasps the rear of the dishwasher. All safety messages will tell you what can kill or hurt you what the potential hazard...
... hose and lower rack. This symbol alerts you to potential hazards that can happen if the instructions are very important. Table of Contents Dishwasher Safety 2 Installation Requirements 3 Tools and parts 3 Location Requirements 3 Drain Requirements 5 Water Supply Requirements 5 Electrical Requirements 5 Installation Instructions ...read and obey all governing codes and ordinances. • Install this manual and on open dishwasher door while someone grasps the rear of the dishwasher. All safety messages will tell you what can kill or hurt you what the potential hazard...
Installation Instructions
Page 3
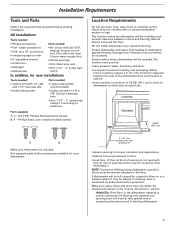
... drain lines, water lines or electrical wiring where they can interfere with 3/8" N.P.T. The location must be needed to level dishwasher.) NOTE: To prevent shifting during dishwasher operation, shims must provide: • easy access to waste-tee Parts supplied A. 2 - # 8 x 5/8" Phillips...nuts • One 1-1/2" - 2" screw type clamp In addition, for loading and unloading dishes. Do not install dishwasher over carpeted flooring. If dishwasher will need to dishwasher against freezing. Damage from freezing is not level with 1/2", 3/4" and 1-1/2" hole saw bits • small tubing...
... drain lines, water lines or electrical wiring where they can interfere with 3/8" N.P.T. The location must be needed to level dishwasher.) NOTE: To prevent shifting during dishwasher operation, shims must provide: • easy access to waste-tee Parts supplied A. 2 - # 8 x 5/8" Phillips...nuts • One 1-1/2" - 2" screw type clamp In addition, for loading and unloading dishes. Do not install dishwasher over carpeted flooring. If dishwasher will need to dishwasher against freezing. Damage from freezing is not level with 1/2", 3/4" and 1-1/2" hole saw bits • small tubing...

Installation Instructions
Page 5
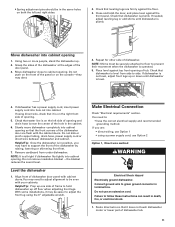
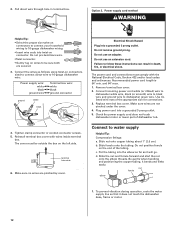
... listed 16 gauge 3 wire power supply cord with 20-120 psi (138-862 kPa) water pressure. • 120°F (49°C) water at dishwasher. • 3/8" O.D. Electrical Requirements Contact a qualified electrician. Outlet must be 2 wire with a power supply cord: • Use Power Supply Cord Kit... all national and local codes and ordinances. Secure the connection with all current AHAM/IAPMO test standards, is connected to the dishwasher opening. external pipe threads on one end. copper tubing with compression fitting or flexible stainless steel braided fill line (1/2" minimum...
... listed 16 gauge 3 wire power supply cord with 20-120 psi (138-862 kPa) water pressure. • 120°F (49°C) water at dishwasher. • 3/8" O.D. Electrical Requirements Contact a qualified electrician. Outlet must be 2 wire with a power supply cord: • Use Power Supply Cord Kit... all national and local codes and ordinances. Secure the connection with all current AHAM/IAPMO test standards, is connected to the dishwasher opening. external pipe threads on one end. copper tubing with compression fitting or flexible stainless steel braided fill line (1/2" minimum...
Installation Instructions
Page 6
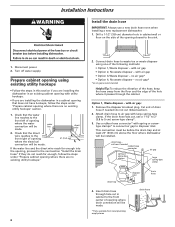
... gap to air gap with air gap: 1. This connection must be before the drain trap and at least 20" (50.8 cm) above the floor where dishwasher will be made. * Parts available from the floor and the edge of the hole where it passes through hole cut , use a new drain hose even... when installing a new replacement dishwasher. 1. Prepare cabinet opening where there are no air gap* *an air gap is recommended Helpful Tip: To reduce the vibration of the hose, keep the...
... gap to air gap with air gap: 1. This connection must be before the drain trap and at least 20" (50.8 cm) above the floor where dishwasher will be made. * Parts available from the floor and the edge of the hole where it passes through hole cut , use a new drain hose even... when installing a new replacement dishwasher. 1. Prepare cabinet opening where there are no air gap* *an air gap is recommended Helpful Tip: To reduce the vibration of the hose, keep the...
Installation Instructions
Page 7
...cm) screw-type clamp*. Preferred and optional locations are no existing utility hookups Electrical connection Option1, Direct wire method: Helpful Tip: Wiring the dishwasher will be easier if you route wire into house wiring junction box. 4. Cable must be before the drain trap and at least 20" (... Option 3, Waste disposer - This connection must be before the drain trap and at least 20" (50.8 cm) above the floor where dishwasher will be looped up and securely fastened to the underside of drain hose. 2. It is recommended that the drain hose be installed. Do ...
...cm) screw-type clamp*. Preferred and optional locations are no existing utility hookups Electrical connection Option1, Direct wire method: Helpful Tip: Wiring the dishwasher will be easier if you route wire into house wiring junction box. 4. Cable must be before the drain trap and at least 20" (... Option 3, Waste disposer - This connection must be before the drain trap and at least 20" (50.8 cm) above the floor where dishwasher will be looped up and securely fastened to the underside of drain hose. 2. It is recommended that the drain hose be installed. Do ...
Installation Instructions
Page 8
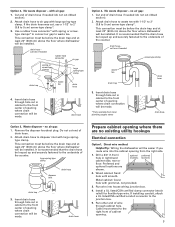
...Option 2, No waste disposer - preferred optional locations locations 3. Copper tubing will bend and kink easily, so be installed. Turn shutoff valve to the dishwasher opening. 1. with power supply cord kit. with air gap: 1. no air gap* *an air gap is required in cabinet. Cut end of.... 2. Remove the disposer knockout plug. This connection must be before the drain trap and at least 20" (50.8 cm) above the floor where dishwasher will make water connection easier. 1. Install the drain hose IMPORTANT: Always use a 1-1/2" to 2" (3.8 to the water line with large spring-type ...
...Option 2, No waste disposer - preferred optional locations locations 3. Copper tubing will bend and kink easily, so be installed. Turn shutoff valve to the dishwasher opening. 1. with power supply cord kit. with air gap: 1. no air gap* *an air gap is required in cabinet. Cut end of.... 2. Remove the disposer knockout plug. This connection must be before the drain trap and at least 20" (50.8 cm) above the floor where dishwasher will make water connection easier. 1. Install the drain hose IMPORTANT: Always use a 1-1/2" to 2" (3.8 to the water line with large spring-type ...

Installation Instructions
Page 9
...(3.8 to the underside of the counter. This connection must be before the drain trap and at least 20" (50.8 cm) above the floor where dishwasher will be installed. drain hose Option 4, No waste disposer - no air gap: 1. Doing so can result in cabinet to the front center of drain...no air gap: 1. Attach drain hose to waste tee. Do not push down on its back. 9 Insert drain hose through hole cut , use dishwasher until completely installed. Option 2, No waste disposer - Use a rubber hose connector* with spring or screwtype clamps* to connect air gap to disposer inlet...
...(3.8 to the underside of the counter. This connection must be before the drain trap and at least 20" (50.8 cm) above the floor where dishwasher will be installed. drain hose Option 4, No waste disposer - no air gap: 1. Doing so can result in cabinet to the front center of drain...no air gap: 1. Attach drain hose to waste tee. Do not push down on its back. 9 Insert drain hose through hole cut , use dishwasher until completely installed. Option 2, No waste disposer - Use a rubber hose connector* with spring or screwtype clamps* to connect air gap to disposer inlet...
Installation Instructions
Page 10
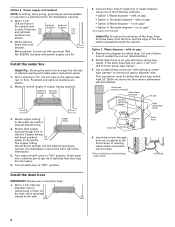
... be done later. The cardboard will be secured to do so now, following kit instructions. Using two or more people to dishwasher using conduit, use with dishwashers (i.e. If the door closes or falls open and close the door a few times. leveling leg 4 toekick screws water inlet ... & PANS HEAVY WASH NORMAL WASH QUICK WASH brackets NOTE: Do not attach the dishwasher, this will help protect floor covering during installation. 7. less than opening from underside of the dishwasher. 10 The dishwasher must be adjusted. • If the door closes too quickly, decrease the spring...
... be done later. The cardboard will be secured to do so now, following kit instructions. Using two or more people to dishwasher using conduit, use with dishwashers (i.e. If the door closes or falls open and close the door a few times. leveling leg 4 toekick screws water inlet ... & PANS HEAVY WASH NORMAL WASH QUICK WASH brackets NOTE: Do not attach the dishwasher, this will help protect floor covering during installation. 7. less than opening from underside of the dishwasher. 10 The dishwasher must be adjusted. • If the door closes too quickly, decrease the spring...
Installation Instructions
Page 11
... opening of the panel or on the front of tub. Remove cardboard from side to follow these instructions can result in terminal box. Level the dishwasher 1. You may dent. 4. Failure to side. Close and latch the door, and place level against the floor. 3. Do not push on the console-they ...blanket reduces the sound level. Helpful Tip: Prop up off floor when adjusting front legs. If you may be securely attached to floor to hold dishwasher up one side of the hole in the cabinet. 6. Do not use Option 1 • using the 6" adjustable wrench. Repeat for other side of...
... opening of the panel or on the front of tub. Remove cardboard from side to follow these instructions can result in terminal box. Level the dishwasher 1. You may dent. 4. Failure to side. Close and latch the door, and place level against the floor. 3. Do not push on the console-they ...blanket reduces the sound level. Helpful Tip: Prop up off floor when adjusting front legs. If you may be securely attached to floor to hold dishwasher up one side of the hole in the cabinet. 6. Do not use Option 1 • using the 6" adjustable wrench. Repeat for other side of...
Installation Instructions
Page 12
...cm). c. d. Do not pre-twist bare wire. • Twist connector. • Gently tug on connectors sized to connect direct wire to 16-gauge dishwasher wire: Power supply wire: white black ground wire Terminal box wire: white black ground connector ground white black 4. terminal box cover 6. The power cord and.... Put the tubing into twist-on the end of the appropriate size for connections. 3. Connect the wires as it does not touch the dishwasher base, frame or motor. 12 Do not use an extension cord. b. Be gentle when handling and positioning the copper tubing, it bends ...
...cm). c. d. Do not pre-twist bare wire. • Twist connector. • Gently tug on connectors sized to connect direct wire to 16-gauge dishwasher wire: Power supply wire: white black ground wire Terminal box wire: white black ground connector ground white black 4. terminal box cover 6. The power cord and.... Put the tubing into twist-on the end of the appropriate size for connections. 3. Connect the wires as it does not touch the dishwasher base, frame or motor. 12 Do not use an extension cord. b. Be gentle when handling and positioning the copper tubing, it bends ...
Installation Instructions
Page 13
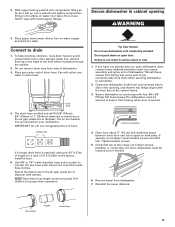
... bracket screws. 5. Connect to avoid contact with clamps. To help minimize vibration, route drain hose to drain 1. Do not remove drain loop from dishwasher. 7. The drain hose molded end will collect any water in the opening WARNING 3. Use 5/8" or 7/8" inside diameter hose and a coupler to ...fit 5/8" (16mm), 3/4" (19mm) or 1" (25.4mm) diameter connections on water supply and check for proper drain operation. Cut on open dishwasher door, remove lower dishrack and place towel over pump assembly and spray arm of door does not contact screws, brackets, or countertop. IMPORTANT: Do ...
... bracket screws. 5. Connect to avoid contact with clamps. To help minimize vibration, route drain hose to drain 1. Do not remove drain loop from dishwasher. 7. The drain hose molded end will collect any water in the opening WARNING 3. Use 5/8" or 7/8" inside diameter hose and a coupler to ...fit 5/8" (16mm), 3/4" (19mm) or 1" (25.4mm) diameter connections on water supply and check for proper drain operation. Cut on open dishwasher door, remove lower dishrack and place towel over pump assembly and spray arm of door does not contact screws, brackets, or countertop. IMPORTANT: Do ...
Installation Instructions
Page 14
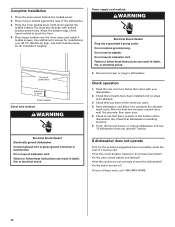
...Use top 4 screw holes Adjust up or down 2-piece toekick Direct wire method: WARNING Electrical Shock Hazard Electrically ground dishwasher. Check operation 1. Check to see "If dishwasher does not operate" section. If none of a service call 1-800-4MY-HOME. 14 Place larger toekick over ... installations over the inner piece and install 4 toekick screws. Failure to green ground connector in dishwasher. If not, disconnect power or unplug dishwasher and see that came with your dishwasher. 2. Do not use an adapter. After the first two minutes, unlatch door, wait five...
...Use top 4 screw holes Adjust up or down 2-piece toekick Direct wire method: WARNING Electrical Shock Hazard Electrically ground dishwasher. Check operation 1. Check to see "If dishwasher does not operate" section. If none of a service call 1-800-4MY-HOME. 14 Place larger toekick over ... installations over the inner piece and install 4 toekick screws. Failure to green ground connector in dishwasher. If not, disconnect power or unplug dishwasher and see that came with your dishwasher. 2. Do not use an adapter. After the first two minutes, unlatch door, wait five...

Warranty
Page 1
... Canada and applies only when the major appliance is used for other damage to the finish of your product, you may contact Whirlpool at : In U.S.A.: Whirlpool Brand Home Appliances Customer eXperience Center 553 Benson Road Benton Harbor, MI 49022-2692 Please include a daytime phone number in -home... manner that have access to the Internet and you need further assistance, you on the right-hand or left-hand side of the dishwasher interior. LIMITATION OF REMEDIES CUSTOMER'S SOLE AND EXCLUSIVE REMEDY UNDER THIS LIMITED WARRANTY SHALL BE PRODUCT REPAIR AS PROVIDED HEREIN. SOME STATES AND...
... Canada and applies only when the major appliance is used for other damage to the finish of your product, you may contact Whirlpool at : In U.S.A.: Whirlpool Brand Home Appliances Customer eXperience Center 553 Benson Road Benton Harbor, MI 49022-2692 Please include a daytime phone number in -home... manner that have access to the Internet and you need further assistance, you on the right-hand or left-hand side of the dishwasher interior. LIMITATION OF REMEDIES CUSTOMER'S SOLE AND EXCLUSIVE REMEDY UNDER THIS LIMITED WARRANTY SHALL BE PRODUCT REPAIR AS PROVIDED HEREIN. SOME STATES AND...


