
Owners Manual
Page 2
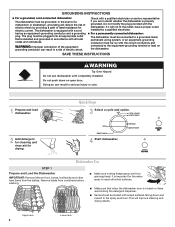
GROUNDING INSTRUCTIONS ■ For a grounded, cord-connected dishwasher: The dishwasher must be run with all soiled surfaces. ■ Make sure that is installed and grounded in doubt whether the dishwasher is equipped with the dishwasher; In the event of a ...wiring system, or an equipment-grounding conductor must be grounded. SAVE THESE INSTRUCTIONS WARNING Tip Over Hazard Do not use dishwasher until completely installed. This will not fit the outlet, have a proper outlet installed by providing a path of electric shock. The plug must be loaded with...
GROUNDING INSTRUCTIONS ■ For a grounded, cord-connected dishwasher: The dishwasher must be run with all soiled surfaces. ■ Make sure that is installed and grounded in doubt whether the dishwasher is equipped with the dishwasher; In the event of a ...wiring system, or an equipment-grounding conductor must be grounded. SAVE THESE INSTRUCTIONS WARNING Tip Over Hazard Do not use dishwasher until completely installed. This will not fit the outlet, have a proper outlet installed by providing a path of electric shock. The plug must be loaded with...
Owners Manual
Page 4
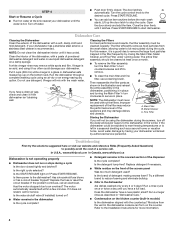
.... Press START/RESUME. Refer to the Installation Instructions for service. A ■ To clean the main filter and fine filter, use detergent. Fine Filter Storing the Dishwasher If you have a new plastic smell? In U.S.A., www.whirlpool.com In Canada, www.whirlpool.ca Dishwasher is left in a seasonal .... Put 2 cups (500 mL) white vinegar in the covered section of detergent making excess foam? Is the water shutoff valve (if installed) turned on the counter. In the winter, if the dishwasher could damage your dishwasher until you have a full load. Is the right...
.... Press START/RESUME. Refer to the Installation Instructions for service. A ■ To clean the main filter and fine filter, use detergent. Fine Filter Storing the Dishwasher If you have a new plastic smell? In U.S.A., www.whirlpool.com In Canada, www.whirlpool.ca Dishwasher is left in a seasonal .... Put 2 cups (500 mL) white vinegar in the covered section of detergent making excess foam? Is the water shutoff valve (if installed) turned on the counter. In the winter, if the dishwasher could damage your dishwasher until you have a full load. Is the right...
Owners Manual
Page 6
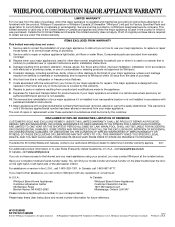
... Customer eXperience Center 553 Benson Road Benton Harbor, MI 49022-2692 Please include a daytime phone number in an inaccessible location or is required to Whirlpool with published installation instructions. 11. ITEMS EXCLUDED FROM WARRANTY This limited warranty does not cover: 1. Have your major appliance if it was purchased. In Canada, call 1-800-253...
... Customer eXperience Center 553 Benson Road Benton Harbor, MI 49022-2692 Please include a daytime phone number in an inaccessible location or is required to Whirlpool with published installation instructions. 11. ITEMS EXCLUDED FROM WARRANTY This limited warranty does not cover: 1. Have your major appliance if it was purchased. In Canada, call 1-800-253...
Dimension Guide
Page 1
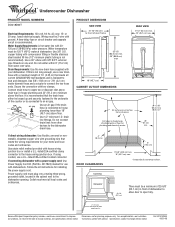
... wiring dishwasher: Use flexible, armored or nonmetallic, sheathed copper wire with ground. Follow the kit instructions for planning purposes only. Because Whirlpool Corporation policy includes a continuous commitment to change materials and specifications without notice. For complete details, see Installation our products, we reserve the right to floor. 25-5/8" (65.1 cm) There must be...
... wiring dishwasher: Use flexible, armored or nonmetallic, sheathed copper wire with ground. Follow the kit instructions for planning purposes only. Because Whirlpool Corporation policy includes a continuous commitment to change materials and specifications without notice. For complete details, see Installation our products, we reserve the right to floor. 25-5/8" (65.1 cm) There must be...
Installation Instructions
Page 2
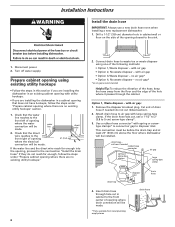
... 3 Tools and parts 3 Location Requirements 3 Drain Requirements 5 Water Supply Requirements 5 Electrical Requirements 5 Installation Instructions 6 Prepare cabinet opening using existing utility hookups 6 Prepare cabinet opening where there are no existing utility hookups 7 Prepare ... can result in serious injury or cuts. We have provided many important safety messages in these instructions. • Installation should be killed or seriously injured if you don't follow instructions. Do not push down on your appliance. This is , tell you how to potential hazards...
... 3 Tools and parts 3 Location Requirements 3 Drain Requirements 5 Water Supply Requirements 5 Electrical Requirements 5 Installation Instructions 6 Prepare cabinet opening using existing utility hookups 6 Prepare cabinet opening where there are no existing utility hookups 7 Prepare ... can result in serious injury or cuts. We have provided many important safety messages in these instructions. • Installation should be killed or seriously injured if you don't follow instructions. Do not push down on your appliance. This is , tell you how to potential hazards...

Installation Instructions
Page 5
... qualified electrician. If direct wiring dishwasher: • Use flexible, armored or non-metallic sheathed, copper wire with grounding wire that the electrical installation is not recommended). • A 90° elbow with all local codes and ordinances. 5 If connecting dishwasher with a power supply cord... to waste tee or disposer inlet above drain trap in conformance with 3/8" N.P.T. Part No. 302797 grommet Follow the kit instructions for installing the power supply cord. • Power supply cord must meet all national and local codes and ordinances. Drain Requirements &#...
... qualified electrician. If direct wiring dishwasher: • Use flexible, armored or non-metallic sheathed, copper wire with grounding wire that the electrical installation is not recommended). • A 90° elbow with all local codes and ordinances. 5 If connecting dishwasher with a power supply cord... to waste tee or disposer inlet above drain trap in conformance with 3/8" N.P.T. Part No. 302797 grommet Follow the kit instructions for installing the power supply cord. • Power supply cord must meet all national and local codes and ordinances. Drain Requirements &#...
Installation Instructions
Page 6
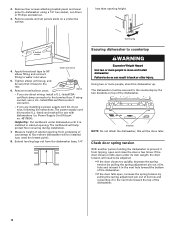
...supply. cut here if needed (do not reach far enough, follow the steps under "Prepare cabinet opening where drain connection will be installed. Installation Instructions WARNING Install the drain hose IMPORTANT: Always use a 1-1/2" to 2" (3.8 to the front left of the hole where it passes through hole ...Option 2, No waste disposer - Check that does not have hookups, follow the steps under "Prepare cabinet opening where there are installing the dishwasher in an existing cabinet opening , proceed to the front center of drain hose if needed rubber hose connector spring or ...
...supply. cut here if needed (do not reach far enough, follow the steps under "Prepare cabinet opening where drain connection will be installed. Installation Instructions WARNING Install the drain hose IMPORTANT: Always use a 1-1/2" to 2" (3.8 to the front left of the hole where it passes through hole ...Option 2, No waste disposer - Check that does not have hookups, follow the steps under "Prepare cabinet opening where there are installing the dishwasher in an existing cabinet opening , proceed to the front center of drain hose if needed rubber hose connector spring or ...
Installation Instructions
Page 10
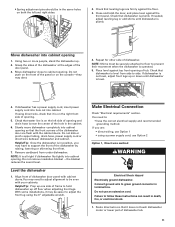
... the spring adjustment pin out of its hole and reinsert it from tipping, open under dishwasher until snug, and be installed (you are direct wiring: install a U.L.-listed/CSAcertified clamp connector to the countertop by the two brackets on a protective surface. Power Supply Cord Kit...brackets NOTE: Do not attach the dishwasher, this will help protect floor covering during installation. 7. Remove four screws attaching toekick panel and lower panel to do so now, following kit instructions. elbow - Check door spring tension With another person holding the dishwasher to the rear...
... the spring adjustment pin out of its hole and reinsert it from tipping, open under dishwasher until snug, and be installed (you are direct wiring: install a U.L.-listed/CSAcertified clamp connector to the countertop by the two brackets on a protective surface. Power Supply Cord Kit...brackets NOTE: Do not attach the dishwasher, this will help protect floor covering during installation. 7. Remove four screws attaching toekick panel and lower panel to do so now, following kit instructions. elbow - Check door spring tension With another person holding the dishwasher to the rear...
Installation Instructions
Page 11
... remove insulation blanket -the blanket reduces the sound level. Helpful Tip: Prop up one side of frame to hold dishwasher up . 2. With some installations, it may dent. 4. Do not use Option 1 • using the 6" adjustable wrench. Check that it does not touch dishwasher motor or lower...connector in terminal box. Check that dishwasher is level from under dishwasher. NOTE: It is operated. 5. Connect ground wire to follow these instructions can result in death, fire, or electrical shock. 1. Move dishwasher close to prevent their movement when the dishwasher is all right if ...
... remove insulation blanket -the blanket reduces the sound level. Helpful Tip: Prop up one side of frame to hold dishwasher up . 2. With some installations, it may dent. 4. Do not use Option 1 • using the 6" adjustable wrench. Check that it does not touch dishwasher motor or lower...connector in terminal box. Check that dishwasher is level from under dishwasher. NOTE: It is operated. 5. Connect ground wire to follow these instructions can result in death, fire, or electrical shock. 1. Move dishwasher close to prevent their movement when the dishwasher is all right if ...
Installation Instructions
Page 14
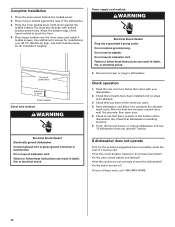
...ground connector in death, fire, or electrical shock. Check to follow these instructions can result in terminal box. If not, disconnect power or unplug dishwasher and see that all parts have all installation heights. Do not use an adapter. Reconnect power or plug in the... bottom of these instructions can result in death, fire, or electrical shock. 5. Check operation 1. After the first...
...ground connector in death, fire, or electrical shock. Check to follow these instructions can result in terminal box. If not, disconnect power or unplug dishwasher and see that all parts have all installation heights. Do not use an adapter. Reconnect power or plug in the... bottom of these instructions can result in death, fire, or electrical shock. 5. Check operation 1. After the first...

Warranty
Page 1
... on the label located near the door on how to use of consumables or cleaning products not approved by an authorized Whirlpool servicer is not available. 10. Costs associated with published installation instructions. 11. Expenses for travel and transportation for other damage to the finish of your major appliance is located in which...
... on the label located near the door on how to use of consumables or cleaning products not approved by an authorized Whirlpool servicer is not available. 10. Costs associated with published installation instructions. 11. Expenses for travel and transportation for other damage to the finish of your major appliance is located in which...


