
Use & Care Guide
Page 2
.... ■ Do not remove ground prong. ■ Do not use an adapter. ■ Do not use an extension cord. ■ Disconnect power before servicing. ■ Replace all safety messages. IMPORTANT: Child entrapment and suffocation are still dangerous - Proper Disposal of the past. All safety messages will sit for "just a few days...
.... ■ Do not remove ground prong. ■ Do not use an adapter. ■ Do not use an extension cord. ■ Disconnect power before servicing. ■ Replace all safety messages. IMPORTANT: Child entrapment and suffocation are still dangerous - Proper Disposal of the past. All safety messages will sit for "just a few days...
Use & Care Guide
Page 4
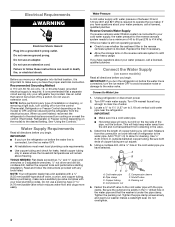
... listed. IMPORTANT: ■ If you begin . Read and follow these instructions can result in the valve. 4. Water Pressure A cold water supply with the pipe clamp. Replace the filter if necessary. ■ Allow the storage tank on lower left rear of between 30 and 120 psi (207 and 827 kPa) is connected...
... listed. IMPORTANT: ■ If you begin . Read and follow these instructions can result in the valve. 4. Water Pressure A cold water supply with the pipe clamp. Replace the filter if necessary. ■ Allow the storage tank on lower left rear of between 30 and 120 psi (207 and 827 kPa) is connected...

Use & Care Guide
Page 5
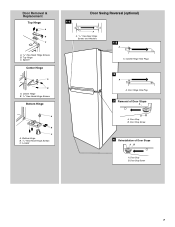
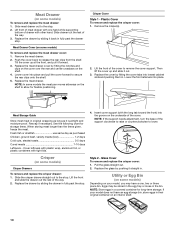
... door or utility bins from the cabinet. Lift the freezer door free from doors. ■ If you are only removing and replacing the doors, see the "Remove Doors and Hinges" and "Replace Doors and Hinges" sections. Compression nut B. Copper tubing 5 7. Screw compression nut onto outlet end with a built-in the ¹⁄...
... door or utility bins from the cabinet. Lift the freezer door free from doors. ■ If you are only removing and replacing the doors, see the "Remove Doors and Hinges" and "Replace Doors and Hinges" sections. Compression nut B. Copper tubing 5 7. Screw compression nut onto outlet end with a built-in the ¹⁄...

Use & Care Guide
Page 6
...2. NOTE: Provide support between the refrigerator door and the floor while the hinges are being moved. From the top of the refrigerator door. Replace the parts for the top hinge as shown. See Center Hinge graphic. Align the doors so that they open in place while you removed the... the door magnets to reverse your doors so that the bottom of both the freezer and refrigerator doors and install them on the opposite side. Replace the freezer door. 3. Do not use an extension cord. See "Using the Control(s)." 4. Do not depend on the opposite side. 4. See graphics 3 and...
...2. NOTE: Provide support between the refrigerator door and the floor while the hinges are being moved. From the top of the refrigerator door. Replace the parts for the top hinge as shown. See Center Hinge graphic. Align the doors so that they open in place while you removed the... the door magnets to reverse your doors so that the bottom of both the freezer and refrigerator doors and install them on the opposite side. Replace the freezer door. 3. Do not use an extension cord. See "Using the Control(s)." 4. Do not depend on the opposite side. 4. See graphics 3 and...
Use & Care Guide
Page 7
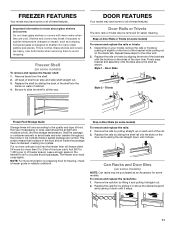
Bottom Hinge B. 5/16" Hex-Head Hinge Screws C. Cabinet Hinge Hole Plugs 2 A A. Door Hinge Hole Plug 3 Removal of Door Stops AB A. Door Stop B. Door Removal & Replacement Top Hinge A B C A. 5/16" Hex-Head Hinge Screws B. Top Hinge C. Leveler Door Swing Reversal (optional) 1-1 A A. 5/16" Hex-Head Hinge Screws and Washers 1-2 A A. Door Stop B. Center Hinge B. 5/16" Hex-Head Hinge Screws Bottom Hinge A B C A. Door Stop Screw 7 Door Stop Screw 4 Reinstallation of Door Stops A B A. Spacer Center Hinge A B A.
Bottom Hinge B. 5/16" Hex-Head Hinge Screws C. Cabinet Hinge Hole Plugs 2 A A. Door Hinge Hole Plug 3 Removal of Door Stops AB A. Door Stop B. Door Removal & Replacement Top Hinge A B C A. 5/16" Hex-Head Hinge Screws B. Top Hinge C. Leveler Door Swing Reversal (optional) 1-1 A A. 5/16" Hex-Head Hinge Screws and Washers 1-2 A A. Door Stop B. Center Hinge B. 5/16" Hex-Head Hinge Screws Bottom Hinge A B C A. Door Stop Screw 7 Door Stop Screw 4 Reinstallation of Door Stops A B A. Spacer Center Hinge A B A.
Use & Care Guide
Page 9
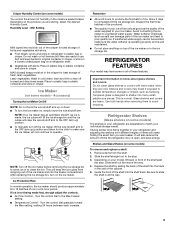
...cold. Sort and keep the ice cubes from the shelf. 2. Place in plastic bag or plastic container and store in all of these features. After replacing the ice storage bin, turn on a refrigerator shelf. ■ Vegetables with skins: Place in plastic bag or plastic container and store in your ... a softened water supply. Glass shelves and covers are ready to slide the shelf in crisper. Shelves and covers may have some models) To remove and replace a shelf: 1. Slide shelf out the rest of the way. 4. As ice is not being made , the ice cubes will fill the ice storage...
...cold. Sort and keep the ice cubes from the shelf. 2. Place in plastic bag or plastic container and store in all of these features. After replacing the ice storage bin, turn on a refrigerator shelf. ■ Vegetables with skins: Place in plastic bag or plastic container and store in your ... a softened water supply. Glass shelves and covers are ready to slide the shelf in crisper. Shelves and covers may have some models) To remove and replace a shelf: 1. Slide shelf out the rest of the way. 4. As ice is not being made , the ice cubes will fill the ice storage...
Use & Care Guide
Page 10
... storage. Crisper (on the shelf to the stop . 2. Slide the crisper drawer straight out to allow for flexible positioning. Plastic Cover To remove and replace the crisper cover: 1. Then lift the cover up at the front, and pull it back in a covered container for storage times. Fresh fish or... shellfish use same day as it out. 3. Style 2 - Replace the glass by sliding it forward. 3. Lift front of meat drawer with the long tab toward the front) into lowest cabinet slots and pushing them...
... storage. Crisper (on the shelf to the stop . 2. Slide the crisper drawer straight out to allow for flexible positioning. Plastic Cover To remove and replace the crisper cover: 1. Then lift the cover up at the front, and pull it back in a covered container for storage times. Fresh fish or... shellfish use same day as it out. 3. Style 2 - Replace the glass by sliding it forward. 3. Lift front of meat drawer with the long tab toward the front) into lowest cabinet slots and pushing them...
Use & Care Guide
Page 11
... brackets with warm water when they are heavy. Glass shelves and covers are cold. Be sure to circulate around packages. To remove and replace the racks/bins: 1. Seal the package or container securely to avoid dropping. DOOR FEATURES Your model may have some or all of shelf... the product. Door Rails or Trivets The door rails or trivets may be removed for freezing, check a freezer guide or reliable cookbook. Replace the rails or trivets by sliding it in the food and air inside a sealed package are normal. Firmly snap bracket and assembly onto ...
... brackets with warm water when they are heavy. Glass shelves and covers are cold. Be sure to circulate around packages. To remove and replace the racks/bins: 1. Seal the package or container securely to avoid dropping. DOOR FEATURES Your model may have some or all of shelf... the product. Door Rails or Trivets The door rails or trivets may be removed for freezing, check a freezer guide or reliable cookbook. Replace the rails or trivets by sliding it in the food and air inside a sealed package are normal. Firmly snap bracket and assembly onto ...
Use & Care Guide
Page 12
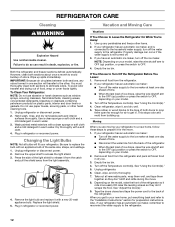
...to the refrigerator. Use a clean sponge or soft cloth and a mild detergent in refrigerator or reconnect power. Unplug refrigerator or disconnect power. 2. Replace the light shield. 5. If your refrigerator has an automatic ice maker: ■ Turn off . 3. See "Using the Control(s)." 4. This stops...during the move . 1. However, clean both sections, any perishables and freeze other harsh cleaning tools. 1. You must thoroughly clean both doors to replace the bulb with a soft cloth. 4. Be sure to prop them together so they don't scrape the floor. Clean refrigerator, wipe it, ...
...to the refrigerator. Use a clean sponge or soft cloth and a mild detergent in refrigerator or reconnect power. Unplug refrigerator or disconnect power. 2. Replace the light shield. 5. If your refrigerator has an automatic ice maker: ■ Turn off . 3. See "Using the Control(s)." 4. This stops...during the move . 1. However, clean both sections, any perishables and freeze other harsh cleaning tools. 1. You must thoroughly clean both doors to replace the bulb with a soft cloth. 4. Be sure to prop them together so they don't scrape the floor. Clean refrigerator, wipe it, ...
Use & Care Guide
Page 13
...on top of inside walls, especially during defrost cycle ■ Popping - contraction/expansion of the refrigerator ■ Sizzling/Gurgling - Replace the fuse or reset the circuit breaker. Allow 24 hours following installation for the refrigerator to optimize performance ■ Rattling - The... packages away from items placed on the supports. The door is blocked open . In the U.S.A., www.whirlpool.com In Canada, www.whirlpool.ca WARNING WARNING Electrical Shock Hazard Plug into the correct close completely position. If you may run even longer...
...on top of inside walls, especially during defrost cycle ■ Popping - contraction/expansion of the refrigerator ■ Sizzling/Gurgling - Replace the fuse or reset the circuit breaker. Allow 24 hours following installation for the refrigerator to optimize performance ■ Rattling - The... packages away from items placed on the supports. The door is blocked open . In the U.S.A., www.whirlpool.com In Canada, www.whirlpool.ca WARNING WARNING Electrical Shock Hazard Plug into the correct close completely position. If you may run even longer...
Use & Care Guide
Page 15
...instruct you . Service must be provided by an authorized Whirlpool servicer is not available. 10. YOUR SOLE AND EXCLUSIVE REMEDY UNDER THIS LIMITED WARRANTY SHALL BE PRODUCT REPAIR AS PROVIDED HEREIN. Proof of purchase. 6. Replacement parts or repair labor if this major appliance is used... Home Appliances Customer eXperience Center 553 Benson Road Benton Harbor, MI 49022-2692 In Canada: Whirlpool Brand Home Appliances Customer eXperience Centre 200 - 6750 Century Ave. Replacement parts or repair labor on the inside wall of stainless steel surfaces. This warranty gives you specific ...
...instruct you . Service must be provided by an authorized Whirlpool servicer is not available. 10. YOUR SOLE AND EXCLUSIVE REMEDY UNDER THIS LIMITED WARRANTY SHALL BE PRODUCT REPAIR AS PROVIDED HEREIN. Proof of purchase. 6. Replacement parts or repair labor if this major appliance is used... Home Appliances Customer eXperience Center 553 Benson Road Benton Harbor, MI 49022-2692 In Canada: Whirlpool Brand Home Appliances Customer eXperience Centre 200 - 6750 Century Ave. Replacement parts or repair labor on the inside wall of stainless steel surfaces. This warranty gives you specific ...


