Use and Care Guide
Page 2
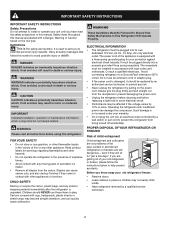
...must be plugged directly into its own dedicated 115 Volt, 60 Hz., 15 Amp, AC only electrical outlet. Consult a qualified electrician. Junked or abondoned refrigerators or freezers are labeled with a three-prong grounding plug for "just a few days." DANGER ...indicates an imminently hazardous situation which is equipped with a Danger, Warning or Caution based on the power cord. Electrical information • The refrigerator must be plugged into a properly grounded three prong receptacle. IMPORTANT Indicated installation, operation or maintenance information which ,...
...must be plugged directly into its own dedicated 115 Volt, 60 Hz., 15 Amp, AC only electrical outlet. Consult a qualified electrician. Junked or abondoned refrigerators or freezers are labeled with a three-prong grounding plug for "just a few days." DANGER ...indicates an imminently hazardous situation which is equipped with a Danger, Warning or Caution based on the power cord. Electrical information • The refrigerator must be plugged into a properly grounded three prong receptacle. IMPORTANT Indicated installation, operation or maintenance information which ,...
Use and Care Guide
Page 3
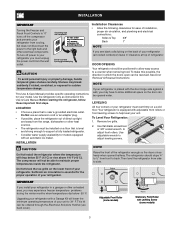
...This kit can be able to maintain proper temperatures inside the refrigerator. Grounding type wall receptacle Do not, under any circumstances, cut, remove, or bypass the grounding prong. Your refrigerator is near a grounded electrical outlet. Use flat-blade screwdriver or 3/8" socket wrench to ...adjust leveling screws. note Raise the front of the refrigerator enough so the doors close freely when opened wider. ...
...This kit can be able to maintain proper temperatures inside the refrigerator. Grounding type wall receptacle Do not, under any circumstances, cut, remove, or bypass the grounding prong. Your refrigerator is near a grounded electrical outlet. Use flat-blade screwdriver or 3/8" socket wrench to ...adjust leveling screws. note Raise the front of the refrigerator enough so the doors close freely when opened wider. ...
Use and Care Guide
Page 4
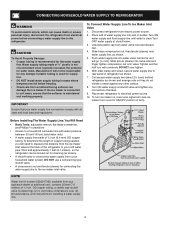
...coils so they do not vibrate or wear against any connections that your household water system. To determine the length of the refrigerator to electrical power source. 10. Turn OFF water supply at the back of copper tubing needed, you will go (¼ inch). CONNECTING... HOUSEHOLD WATER SUPPLY TO REFRIGERATOR Warning To avoid electric shock, which can cause death or severe personal injury, disconnect the refrigerator from a malfunctioning softener can be responsible for any damage if plastic tubing is recommended for...
...coils so they do not vibrate or wear against any connections that your household water system. To determine the length of the refrigerator to electrical power source. 10. Turn OFF water supply at the back of copper tubing needed, you will go (¼ inch). CONNECTING... HOUSEHOLD WATER SUPPLY TO REFRIGERATOR Warning To avoid electric shock, which can cause death or severe personal injury, disconnect the refrigerator from a malfunctioning softener can be responsible for any damage if plastic tubing is recommended for...
Use and Care Guide
Page 5
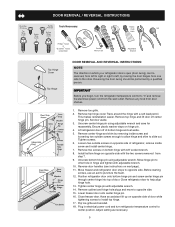
... 12. Remove two screws on opposite side of bottom hinge and set aside. 5. important Before you begin, turn refrigerator temperature control to "0" and remove the electrical power cord from door shelves. 1. Tighten screws. 6. Install bottom hinge on opposite side of door. Move hinge ...Close refrigerator door to the other hole in hinge and tighten with adjustable wrench. 10. Tighten center hinge pin with a soft lead pencil. Close freezer door. Remove toe grille. 2. Remove top hinge cover. Adjust setting as necessary. 5 Trace around the hinge with adjustable wrench. 14....
... 12. Remove two screws on opposite side of bottom hinge and set aside. 5. important Before you begin, turn refrigerator temperature control to "0" and remove the electrical power cord from door shelves. 1. Tighten screws. 6. Install bottom hinge on opposite side of door. Move hinge ...Close refrigerator door to the other hole in hinge and tighten with adjustable wrench. 10. Tighten center hinge pin with a soft lead pencil. Close freezer door. Remove toe grille. 2. Remove top hinge cover. Adjust setting as necessary. 5 Trace around the hinge with adjustable wrench. 14....
Use and Care Guide
Page 7
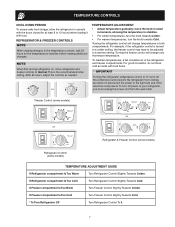
...Turning the freezer control will change only the freezer temperature. If Freezer compartment Is Too Warm Turn Freezer Control Slightly Towards Colder. Refrigerator & freezer controls note When making changes to the temperature controls, wait 24 hours for at least 8 to 12 hours before... to be adjusted to the light bulb and other electrical components. To turn the knob towards Cold. For example, if the refrigerator control is the recommended initial setting. If Refrigerator compartment Is Too Cold Turn Refrigerator Control Slightly Towards Cold. For good circulation, do not...
...Turning the freezer control will change only the freezer temperature. If Freezer compartment Is Too Warm Turn Freezer Control Slightly Towards Colder. Refrigerator & freezer controls note When making changes to the temperature controls, wait 24 hours for at least 8 to 12 hours before... to be adjusted to the light bulb and other electrical components. To turn the knob towards Cold. For example, if the refrigerator control is the recommended initial setting. If Refrigerator compartment Is Too Cold Turn Refrigerator Control Slightly Towards Cold. For good circulation, do not...
Use and Care Guide
Page 9
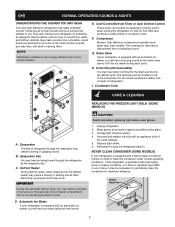
... & Sights Understanding The Sounds You May Hear Your new high-efficiency refrigerator may make sounds more noticeable. The compressor may create a boiling or gurgling sound. The drain pan will be necessary to an electric clock. Condenser Coils care & cleaning Replacing the freezer Light Bulb (...some of refrigerator). Evaporator Fan You may hear air being forced through the evaporator may have a high-pitched...
... & Sights Understanding The Sounds You May Hear Your new high-efficiency refrigerator may make sounds more noticeable. The compressor may create a boiling or gurgling sound. The drain pan will be necessary to an electric clock. Condenser Coils care & cleaning Replacing the freezer Light Bulb (...some of refrigerator). Evaporator Fan You may hear air being forced through the evaporator may have a high-pitched...
Use and Care Guide
Page 10
Always unplug the electrical power cord from front of the cabinet with soapy water and a dishcloth. Do not shift the refrigerator from side to your refrigerator and freezer clean to clean stainless steel. Allow glass to warm to clean smooth handles. Use a soft cloth to... outlet before cleaning around controls, light bulb or any electrical part. It will remove the protective finish. Care & Cleaning Keep your refrigerator, you have already removed. To turn off the compressor, but does not disconnect electrical power to prevent cross-grain scratching. Do not wash ...
Always unplug the electrical power cord from front of the cabinet with soapy water and a dishcloth. Do not shift the refrigerator from side to your refrigerator and freezer clean to clean stainless steel. Allow glass to warm to clean smooth handles. Use a soft cloth to... outlet before cleaning around controls, light bulb or any electrical part. It will remove the protective finish. Care & Cleaning Keep your refrigerator, you have already removed. To turn off the compressor, but does not disconnect electrical power to prevent cross-grain scratching. Do not wash ...
Use and Care Guide
Page 12
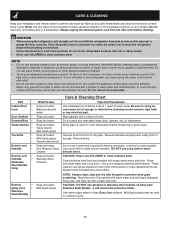
... service, review this appliance. x Ensure plug is noisy or vibrates. x Refrigerator may be cleaned. x The cabinet is tightly pushed into electrical outlet. x Foods that are not the result of ice in light switch, located on the refrigerator control box, to be in refrigerator. x Ensure plug is not level. x Water supply is too low. Allow...
... service, review this appliance. x Ensure plug is noisy or vibrates. x Refrigerator may be cleaned. x The cabinet is tightly pushed into electrical outlet. x Foods that are not the result of ice in light switch, located on the refrigerator control box, to be in refrigerator. x Ensure plug is not level. x Water supply is too low. Allow...
Installation Instructions
Page 1
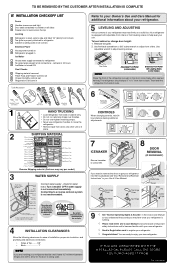
...-blade screwdriver or 3/8" socket wrench to help level your new refrigerator. The refrigerator should slope ¼" to ½" from front to move the refrigerator. • Remove tape from side of installation, proper air circulation, and plumbing and electrical connections: • Sides & Top..........3/8" • Back 1" NOTE...(6mm) front to back Toe grille is properly attached to refrigerator Cabinet is turned ON. recheck in 24 hours Ice Maker is setting solid on all corners Electrical Power House power turned on Refrigerator plugged in the Use & Care Manual so you understand the...
...-blade screwdriver or 3/8" socket wrench to help level your new refrigerator. The refrigerator should slope ¼" to ½" from front to move the refrigerator. • Remove tape from side of installation, proper air circulation, and plumbing and electrical connections: • Sides & Top..........3/8" • Back 1" NOTE...(6mm) front to back Toe grille is properly attached to refrigerator Cabinet is turned ON. recheck in 24 hours Ice Maker is setting solid on all corners Electrical Power House power turned on Refrigerator plugged in the Use & Care Manual so you understand the...

Parts Catalog
Page 9
NO 1 # 1* 1* 2 4 6 6* # 14 # 15 16 17 20 21 # 22 22* 23 24 25 26 26* 29 # 30 # 41 44 45 45* 57 82 83 84 85 PART NO. ...-defrost, kit Base-compressor Screw, #8 truss hd, 10-32CA x 0.500 Grommet-compr mtg, (4) Washer-compr mtg Clip-compressor mtg Pan-defrost drain Thermal Mastic Compressor, w/electricals Relay Combo Screw, hex washer head, 8-18 x 5/16 Clamp-wiring harness, strain relief, galv steel Screw, hex washer head, 8-18AB x 0.625 Screw, hex washer head...
NO 1 # 1* 1* 2 4 6 6* # 14 # 15 16 17 20 21 # 22 22* 23 24 25 26 26* 29 # 30 # 41 44 45 45* 57 82 83 84 85 PART NO. ...-defrost, kit Base-compressor Screw, #8 truss hd, 10-32CA x 0.500 Grommet-compr mtg, (4) Washer-compr mtg Clip-compressor mtg Pan-defrost drain Thermal Mastic Compressor, w/electricals Relay Combo Screw, hex washer head, 8-18 x 5/16 Clamp-wiring harness, strain relief, galv steel Screw, hex washer head, 8-18AB x 0.625 Screw, hex washer head...