Use and Care Guide
Page 1
Electric Range Use & Care Manual ETOD Control or no clock Welcome 2 Important Safety Instructions .....3-4 Before Setting Oven Controls ....6-7 Setting Clock & Minute Timer .....5-6 Setting Surface & Oven Controls .. 6-7 Care & Cleaning 8-10 Before You Call Solutions to Common Problems 11 Warranty Back Page Questions? 1-800-944-9044 (United States) 1-800-668-4606 (Canada) Visit the Frigidaire Web Site at: http://www.frigidaire.com READ AND SAVE THESE INSTRUCTIONS 316257134 (0809)
Electric Range Use & Care Manual ETOD Control or no clock Welcome 2 Important Safety Instructions .....3-4 Before Setting Oven Controls ....6-7 Setting Clock & Minute Timer .....5-6 Setting Surface & Oven Controls .. 6-7 Care & Cleaning 8-10 Before You Call Solutions to Common Problems 11 Warranty Back Page Questions? 1-800-944-9044 (United States) 1-800-668-4606 (Canada) Visit the Frigidaire Web Site at: http://www.frigidaire.com READ AND SAVE THESE INSTRUCTIONS 316257134 (0809)
Use and Care Guide
Page 2
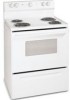
...Number: Serial Number: Purchase Date: The product serial plate will provide you 'll enjoy your new range and Thank You for your range. The graphics on your purchase of range frame. Serial plate location: Remove lower storage drawer or font panel. All rights reserved 2 Please...Registration Register Your Product The self-addressed PRODUCT REGISTRATION CARD should be practiced when installing, operating and maintaining any appliance. Your range may not look exactly like those shown. PLEASE CAREFULLY READ AND SAVE THESE INSTRUCTIONS This Use & Care Manual provides specific operating...
...Number: Serial Number: Purchase Date: The product serial plate will provide you 'll enjoy your new range and Thank You for your range. The graphics on your purchase of range frame. Serial plate location: Remove lower storage drawer or font panel. All rights reserved 2 Please...Registration Register Your Product The self-addressed PRODUCT REGISTRATION CARD should be practiced when installing, operating and maintaining any appliance. Your range may not look exactly like those shown. PLEASE CAREFULLY READ AND SAVE THESE INSTRUCTIONS This Use & Care Manual provides specific operating...

Use and Care Guide
Page 3
... of pressure may cause the range to recommend a qualified technician and an authorized repair service. Children climbing on Grease Fires-Smother the fire with the National Electrical Code ANSI/NFPA No. 70 latest edition and local electrical code requirements. Important Safety Instructions... Read all instructions before using the range. Never allow children to climb or play with packaging material...
... of pressure may cause the range to recommend a qualified technician and an authorized repair service. Children climbing on Grease Fires-Smother the fire with the National Electrical Code ANSI/NFPA No. 70 latest edition and local electrical code requirements. Important Safety Instructions... Read all instructions before using the range. Never allow children to climb or play with packaging material...
Use and Care Guide
Page 4
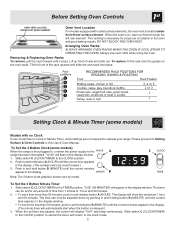
... Improper installation of these liners may result in risk of electric shock, or fire. Heating elements clean themselves during cooking may result in risk of Oven Racks. The oven vent is equipped with both hands to the side of the range when opening the door of clothing. Also, do not ...replace food in desired location while oven is equipped with ceramic-glass cook tops. Exposed fat and grease could melt or ignite. • Placement of electric shock, or fire. Do not allow dripping fat to accumulate on . Always place oven racks in the oven. • Keep Oven Vent Ducts ...
... Improper installation of these liners may result in risk of electric shock, or fire. Heating elements clean themselves during cooking may result in risk of Oven Racks. The oven vent is equipped with both hands to the side of the range when opening the door of clothing. Also, do not ...replace food in desired location while oven is equipped with ceramic-glass cook tops. Exposed fat and grease could melt or ignite. • Placement of electric shock, or fire. Do not allow dripping fat to accumulate on . Always place oven racks in the oven. • Keep Oven Vent Ducts ...
Use and Care Guide
Page 5
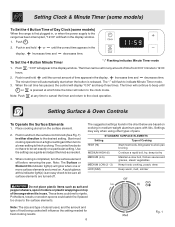
.... Push in and hold button B (MINUTE) until the correct minutes appear in this Use & Care Manual. Slide switch C (CLOCK/TIMER) to the range has been interrupted, "12:00" will show the maximum 1 hour and 59 minutes. This venting is necessary for any amount of time from 1 minute ... Lift up front of the rack upward and slide the rack back into place. 3, 4 or 5 2 or 3 1 1 Setting Clock & Minute Timer (some models) When the range is located under the left rear element. To Set the 3 Button Clock (some models) Models with coiled surface elements, the oven vent is first plugged...
.... Push in and hold button B (MINUTE) until the correct minutes appear in this Use & Care Manual. Slide switch C (CLOCK/TIMER) to the range has been interrupted, "12:00" will show the maximum 1 hour and 59 minutes. This venting is necessary for any amount of time from 1 minute ... Lift up front of the rack upward and slide the rack back into place. 3, 4 or 5 2 or 3 1 1 Setting Clock & Minute Timer (some models) When the range is located under the left rear element. To Set the 3 Button Clock (some models) Models with coiled surface elements, the oven vent is first plugged...
Use and Care Guide
Page 6
... SURFACE ELEMENTS Setting Type of Cooking HIGH (HI) Start most cooking operations on . Increases time and decreases time. Place cooking utensil on top of the range when it is in use. Use the settings as a guide and adjust the knob as salt and pepper shakers, spoon holders or plastic wrappings on... ignite. Setting Clock & Minute Timer (some models) To Set the 4 Button Time of Day Clock (some models) When the range is first plugged in, or when the power supply to the range has been interrupted, "12:00" will return to the clock mode. Increases time and decreases time. Push in and hold...
... SURFACE ELEMENTS Setting Type of Cooking HIGH (HI) Start most cooking operations on . Increases time and decreases time. Place cooking utensil on top of the range when it is in use. Use the settings as a guide and adjust the knob as salt and pepper shakers, spoon holders or plastic wrappings on... ignite. Setting Clock & Minute Timer (some models) To Set the 4 Button Time of Day Clock (some models) When the range is first plugged in, or when the power supply to the range has been interrupted, "12:00" will return to the clock mode. Increases time and decreases time. Push in and hold...
Use and Care Guide
Page 9
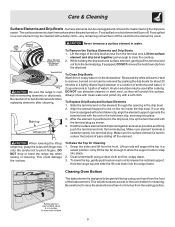
... push the terminal end into terminal plug. Make sure element terminal is seated properly into the terminal plug. DO NOT drop or bend the range top when raising or lowering. The surface elements clean themselves when they will scratch the surface. Lift the edge of the drip bowl across ...the terminal plug as they are turned on each rod to reduce the hazard of water). Hard to raise the element more than 4 or 5 inches from the front. After the element is designed to be removed by soaking the drip bowls for about 20 minutes in the drip bowl. 2. This...
... push the terminal end into terminal plug. Make sure element terminal is seated properly into the terminal plug. DO NOT drop or bend the range top when raising or lowering. The surface elements clean themselves when they will scratch the surface. Lift the edge of the drip bowl across ...the terminal plug as they are turned on each rod to reduce the hazard of water). Hard to raise the element more than 4 or 5 inches from the front. After the element is designed to be removed by soaking the drip bowls for about 20 minutes in the drip bowl. 2. This...
Use and Care Guide
Page 10
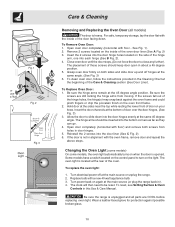
... Turn power back on the side of the oven door liner (See A Fig. 2) 3. Be sure the range is unplugged and all models) The door is located at the same 45 degree angle. Insert the 2 screws into... of the door facing down into the bottom corners as far as they can go. 4. Turn electrical power off hinges at the sides near the top while resting the lower front of the Care &... at the 45 degree angle position. Be sure the hinge arms remain at the main source or unplug the range. 2. Open oven door completely (horizontal with the inside of the hinge arm, one into the door liner ...
... Turn power back on the side of the oven door liner (See A Fig. 2) 3. Be sure the range is unplugged and all models) The door is located at the same 45 degree angle. Insert the 2 screws into... of the door facing down into the bottom corners as far as they can go. 4. Turn electrical power off hinges at the sides near the top while resting the lower front of the Care &... at the 45 degree angle position. Be sure the hinge arms remain at the main source or unplug the range. 2. Open oven door completely (horizontal with the inside of the hinge arm, one into the door liner ...
Use and Care Guide
Page 11
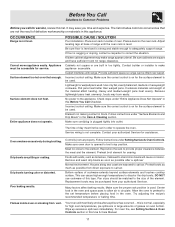
...bowls. Follow instructions under Setting Surface & Oven Controls. Contact your authorized Servicer. Poor baking results. DO NOT use cookware of range until the oven rack is not complete. It may be purchased from your authorized Servicer for service, review this is sagging or... of cookware extends beyond surface elements and touches cooktop surface. Oven smokes excessively during broiling. Reposition the rack to adequately support range. Replacement bowls may save you call for assistance. Center food in /on bowls will most likely smoke after a spillover Normal...
...bowls. Follow instructions under Setting Surface & Oven Controls. Contact your authorized Servicer. Poor baking results. DO NOT use cookware of range until the oven rack is not complete. It may be purchased from your authorized Servicer for service, review this is sagging or... of cookware extends beyond surface elements and touches cooktop surface. Oven smokes excessively during broiling. Reposition the rack to adequately support range. Replacement bowls may save you call for assistance. Center food in /on bowls will most likely smoke after a spillover Normal...