
Quick Install Guide (pdf)
Page 1
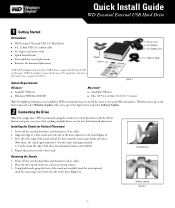
... file transfer time compared to the back (Figure 2). 3. Two stands for Vertical Placement 1. Four feet for easy access. Available USB port ! Power off the external hard drive and disconnect all its cables. 2. WD Essential™ External USB 2.0* Hard Drive ! 6 ft. (1.8m) USB 2.0 certified cable ! Mac users, go to the Apple menu and select Software Update. 2 Connecting the...
... file transfer time compared to the back (Figure 2). 3. Two stands for Vertical Placement 1. Four feet for easy access. Available USB port ! Power off the external hard drive and disconnect all its cables. 2. WD Essential™ External USB 2.0* Hard Drive ! 6 ft. (1.8m) USB 2.0 certified cable ! Mac users, go to the Apple menu and select Software Update. 2 Connecting the...
Quick Install Guide (pdf)
Page 2
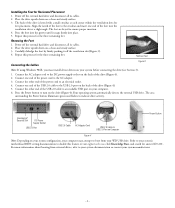
... the back of the foot to the USB 2.0 port on the drive (Figure 4). Refer to your system manufacturer. - 2 - Power off the external hard drive and disconnect all its cables. 2. Align the notch of the drive (Figure 4). 5. Carefully dislodge the foot by firmly pushing it snaps... flashes to the AC adapter. 3. Press the foot into the groove until it off the external hard drive and disconnect all its cables. 2. Your operating system automatically detects the external USB drive. Power off the ventilation slot (Figure 3). 4. Remove Feet Connecting the Cables Figure 3 Note...
... the back of the foot to the USB 2.0 port on the drive (Figure 4). Refer to your system manufacturer. - 2 - Power off the external hard drive and disconnect all its cables. 2. Align the notch of the drive (Figure 4). 5. Carefully dislodge the foot by firmly pushing it snaps... flashes to the AC adapter. 3. Press the foot into the groove until it off the external hard drive and disconnect all its cables. 2. Your operating system automatically detects the external USB drive. Power off the ventilation slot (Figure 3). 4. Remove Feet Connecting the Cables Figure 3 Note...


