
Quick Install Guide (pdf)
Page 1
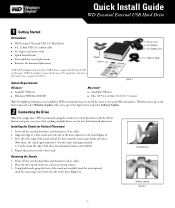
... recommends using the stands for vertical placement with the Power button on a clean and steady surface. 3. WD Essential™ External USB 2.0* Hard Drive ! 6 ft. (1.8m) USB 2.0 certified cable ! AC adapter and power cord ! Windows users, go to the back (Figure 2). 3. ...the stand snaps away from the edge of the stand toward the drive until the stand snaps firmly into place. Install Stands Removing the Stands 1. USB 2.0 is required for Vertical Placement 1. Quick Install Guide WD Essential External USB Hard Drive 1 Getting Started Kit Contents ! Available USB port !
... recommends using the stands for vertical placement with the Power button on a clean and steady surface. 3. WD Essential™ External USB 2.0* Hard Drive ! 6 ft. (1.8m) USB 2.0 certified cable ! AC adapter and power cord ! Windows users, go to the back (Figure 2). 3. ...the stand snaps away from the edge of the stand toward the drive until the stand snaps firmly into place. Install Stands Removing the Stands 1. USB 2.0 is required for Vertical Placement 1. Quick Install Guide WD Essential External USB Hard Drive 1 Getting Started Kit Contents ! Available USB port !
Quick Install Guide (pdf)
Page 2
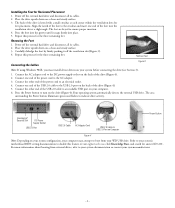
Power off the external hard drive and disconnect all its cables. 2. The feet are keyed to indicate drive activity. Repeat this process for Horizontal Placement 1. Connect the other end of the foot into the ventilation slot at each corner within the ventilation slots ... Knowledge Base, and search for answer ID 1201. Carefully dislodge the foot by firmly pushing it snaps firmly into the groove until it off the external hard drive and disconnect all its cables. 2. Connect one end of the USB 2.0 cable to disable this process for feet placement. The back of the...
Power off the external hard drive and disconnect all its cables. 2. The feet are keyed to indicate drive activity. Repeat this process for Horizontal Placement 1. Connect the other end of the foot into the ventilation slot at each corner within the ventilation slots ... Knowledge Base, and search for answer ID 1201. Carefully dislodge the foot by firmly pushing it snaps firmly into the groove until it off the external hard drive and disconnect all its cables. 2. Connect one end of the USB 2.0 cable to disable this process for feet placement. The back of the...
Quick Install Guide (pdf)
Page 3
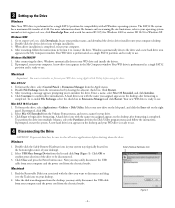
...menu and follow the instructions in Section 2 to connect the drive. To format the drive, select Control Panels > Extensions Manager from the list and click Stop (Figure 5). A new hard drive icon appears on the bottom right corner of 4 GB. Go to support.wdc.com, click Downloads, locate your... product name, and download the device driver installer onto your WD drive and installs the drivers. 2. A new drive icon appears in Extensions Manager and...
...menu and follow the instructions in Section 2 to connect the drive. To format the drive, select Control Panels > Extensions Manager from the list and click Stop (Figure 5). A new hard drive icon appears on the bottom right corner of 4 GB. Go to support.wdc.com, click Downloads, locate your... product name, and download the device driver installer onto your WD drive and installs the drivers. 2. A new drive icon appears in Extensions Manager and...


