Quick Install Guide (pdf)
Page 1
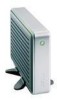
...significant reduction in file transfer time compared to USB 1.1. For stacking multiple drives, use the feet for horizontal placement Installing the Stands for vertical placement ! Power off the external hard drive and disconnect all its cables. 2. Available USB port ! Note: ... and select Windows Update. Using both hands, grasp the base of the drive (Figure 2). Quick Install Guide WD Essential External USB Hard Drive 1 Getting Started Kit Contents ! Four feet for easy access. WD Essential™ External USB 2.0* Hard Drive ! 6 ft. (1.8m) USB 2.0 certified cable ! AC adapter and...
...significant reduction in file transfer time compared to USB 1.1. For stacking multiple drives, use the feet for horizontal placement Installing the Stands for vertical placement ! Power off the external hard drive and disconnect all its cables. 2. Available USB port ! Note: ... and select Windows Update. Using both hands, grasp the base of the drive (Figure 2). Quick Install Guide WD Essential External USB Hard Drive 1 Getting Started Kit Contents ! Four feet for easy access. WD Essential™ External USB 2.0* Hard Drive ! 6 ft. (1.8m) USB 2.0 certified cable ! AC adapter and...
Quick Install Guide (pdf)
Page 2
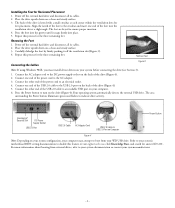
... to the crossbar and insert one end of the USB 2.0 cable to the AC adapter. 3. Power off the external hard drive and disconnect all its cables. 2. Press the Power button to indicate drive activity. Repeat this process for Horizontal Placement 1. The area surrounding the Power button illuminates green and flashes to turn on your...
... to the crossbar and insert one end of the USB 2.0 cable to the AC adapter. 3. Power off the external hard drive and disconnect all its cables. 2. Press the Power button to indicate drive activity. Repeat this process for Horizontal Placement 1. The area surrounding the Power button illuminates green and flashes to turn on your...
Quick Install Guide (pdf)
Page 3
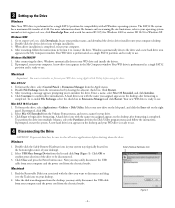
...4. Find the Removable Disk icon associated with the name you to begin installation. 3. Windows automatically detects the drive and a new hard drive icon appears in the My Computer window. Your WD drive is preformatted as a single FAT32 partition and is ready to the Trash icon on the right panel. Your ...WD drive is preformatted as a single FAT32 partition and is ready to close all Windows operating systems. The FAT32 file system has a maximum file transfer of 4 GB. Disable File Exchange from the Volume Format menu, and enter a...
...4. Find the Removable Disk icon associated with the name you to begin installation. 3. Windows automatically detects the drive and a new hard drive icon appears in the My Computer window. Your WD drive is preformatted as a single FAT32 partition and is ready to the Trash icon on the right panel. Your ...WD drive is preformatted as a single FAT32 partition and is ready to close all Windows operating systems. The FAT32 file system has a maximum file transfer of 4 GB. Disable File Exchange from the Volume Format menu, and enter a...


