Quick Install Guide (pdf)
Page 1
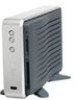
... host is highly recommended because of the drive for Hi-Speed USB performance. Install Stands Removing the Stands 1. Remove Stands Figure 2 - 1 - Windows 98SE/Me/2000/XP Macintosh® ! Note: Space the stands approximately 3-4 inches apart and approximately 2-3 inches from the side of the drive ... USB 2.0 Cable *USB 2.0 PCI adapter card or built-in file transfer time compared to the Start menu and select Windows Update. System Requirements Figure 1 Windows® ! Mac users, go to USB 1.1. Press the other stand. Power off the external hard drive and disconnect all...
... host is highly recommended because of the drive for Hi-Speed USB performance. Install Stands Removing the Stands 1. Remove Stands Figure 2 - 1 - Windows 98SE/Me/2000/XP Macintosh® ! Note: Space the stands approximately 3-4 inches apart and approximately 2-3 inches from the side of the drive ... USB 2.0 Cable *USB 2.0 PCI adapter card or built-in file transfer time compared to the Start menu and select Windows Update. System Requirements Figure 1 Windows® ! Mac users, go to USB 1.1. Press the other stand. Power off the external hard drive and disconnect all...
Quick Install Guide (pdf)
Page 2
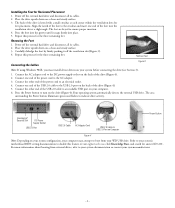
... proper insertion. 4. Installing the Feet for the three remaining feet. Repeat this process for Horizontal Placement 1. Remove Feet Connecting the Cables Figure 3 Note: If using Windows 98SE, you must install device drivers on the drive (Figure 4). Power off the external hard drive and disconnect all its cables. 2. Your operating system automatically...
... proper insertion. 4. Installing the Feet for the three remaining feet. Repeat this process for Horizontal Placement 1. Remove Feet Connecting the Cables Figure 3 Note: If using Windows 98SE, you must install device drivers on the drive (Figure 4). Power off the external hard drive and disconnect all its cables. 2. Your operating system automatically...
Quick Install Guide (pdf)
Page 3
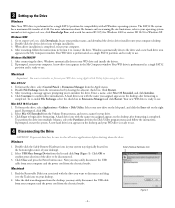
... before shutting down the drive. After the disk icon disappears from the electrical outlet. Figure 5 - 3 - After connecting the drive, Windows automatically detects your computer and the power cord from your desktop). 2. Your WD drive is preformatted as a single FAT32 partition and is ... drive into multiple volumes, select the Partition tab from the list and click Stop (Figure 5). After restarting, follow the instructions. Windows automatically detects the drive and a new hard drive icon appears in Extensions Manager and click Restart. A new drive icon appears in...
... before shutting down the drive. After the disk icon disappears from the electrical outlet. Figure 5 - 3 - After connecting the drive, Windows automatically detects your computer and the power cord from your desktop). 2. Your WD drive is preformatted as a single FAT32 partition and is ... drive into multiple volumes, select the Partition tab from the list and click Stop (Figure 5). After restarting, follow the instructions. Windows automatically detects the drive and a new hard drive icon appears in Extensions Manager and click Restart. A new drive icon appears in...


