
English Manual
Page 3
... cycle on a level surface, with pre-existing health problems. 2. Make sure that could become caught on your exercise cycle. 5. If you stop exercising, allow the pedals to slowly come to a stop immediately and cool down. 13. Your exercise cycle should not be used by or through the use of this product...
... cycle on a level surface, with pre-existing health problems. 2. Make sure that could become caught on your exercise cycle. 5. If you stop exercising, allow the pedals to slowly come to a stop immediately and cool down. 13. Your exercise cycle should not be used by or through the use of this product...
English Manual
Page 4
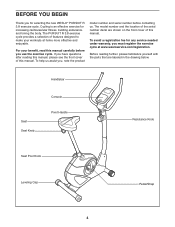
... see the front cover of features designed to make your benefit, read this manual. Cycling is an effective exercise for selecting the new WESLO® PURSUIT R 3.8 exercise cycle. To avoid a registration fee for any service needed under warranty, you for increasing cardiovascular fitness, building endurance,... us assist you use the exercise cycle. Seat Seat Knob Handlebar Console Pivot Handle Resistance Knob Seat Post Knob Leveling Cap Pedal/Strap 4 For your workouts at www.wesloservice.com/registration. The model number and the location of the serial number decal ...
... see the front cover of features designed to make your benefit, read this manual. Cycling is an effective exercise for selecting the new WESLO® PURSUIT R 3.8 exercise cycle. To avoid a registration fee for any service needed under warranty, you for increasing cardiovascular fitness, building endurance,... us assist you use the exercise cycle. Seat Seat Knob Handlebar Console Pivot Handle Resistance Knob Seat Post Knob Leveling Cap Pedal/Strap 4 For your workouts at www.wesloservice.com/registration. The model number and the location of the serial number decal ...
English Manual
Page 10
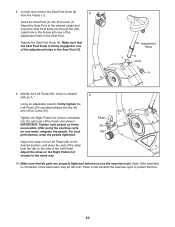
... parts are properly tightened before you use the exercise cycle. Make sure that the Seat Post Knob is firmly engaged in one of the Left Pedal. Place a mat beneath the exercise cycle to the desired height and insert the Seat Post Knob (9) through the indicated hole in the Seat Post (5)..... Adjust the strap on the side of the adjustment holes in the Frame into the Frame (1). Tighten the Seat Post Knob (9). IMPORTANT: Tighten both pedals as firmly as possible. Loosen and remove the Seat Post Knob (9) from the Frame (1). 8 Insert the Seat Post (5) into one week, retighten the...
... parts are properly tightened before you use the exercise cycle. Make sure that the Seat Post Knob is firmly engaged in one of the Left Pedal. Place a mat beneath the exercise cycle to the desired height and insert the Seat Post Knob (9) through the indicated hole in the Seat Post (5)..... Adjust the strap on the side of the adjustment holes in the Frame into the Frame (1). Tighten the Seat Post Knob (9). IMPORTANT: Tighten both pedals as firmly as possible. Loosen and remove the Seat Post Knob (9) from the Frame (1). 8 Insert the Seat Post (5) into one week, retighten the...
English Manual
Page 11
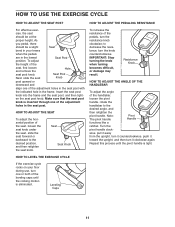
...The pivot handle Pivot Handle functions like a ratchet. HOW TO LEVEL THE EXERCISE CYCLE If the exercise cycle rocks on your knees when the pedals are in the frame. Leveling Caps 11 cise, the seat should be at the proper height. Next, slide the seat Seat Post Knob ...position of the adjustment holes in the seat post with the indicated hole in the lowest Seat Post position. To adjust the height of the pedals, turn the knob counterclockwise. IMPORTANT: Stop turning the knob when turning becomes difficult, or damage may result. Turn the pivot handle clock- ...
...The pivot handle Pivot Handle functions like a ratchet. HOW TO LEVEL THE EXERCISE CYCLE If the exercise cycle rocks on your knees when the pedals are in the frame. Leveling Caps 11 cise, the seat should be at the proper height. Next, slide the seat Seat Post Knob ...position of the adjustment holes in the seat post with the indicated hole in the lowest Seat Post position. To adjust the height of the pedals, turn the knob counterclockwise. IMPORTANT: Stop turning the knob when turning becomes difficult, or damage may result. Turn the pivot handle clock- ...
English Manual
Page 12
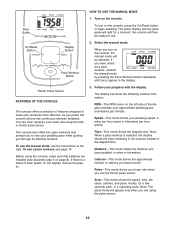
..., in miles per hour (mph) or kilometers per minute). Speed-This mode shows your heart rate using the console, make your pedaling pace while guiding you have pedaled, in the workout instead of calories you use the manual mode, see page 14. Note: When a pace workout is a sheet of ...repeatedly until zeros appear in a repeating cycle. Turn on the console, the manual mode will appear only when you turn on page 8). If you pedal, the console will then be selected. As you have burned. Pulse-This mode shows your progress with the display. You can show the following ...
..., in miles per hour (mph) or kilometers per minute). Speed-This mode shows your heart rate using the console, make your pedaling pace while guiding you have pedaled, in the workout instead of calories you use the manual mode, see page 14. Note: When a pace workout is a sheet of ...repeatedly until zeros appear in a repeating cycle. Turn on the console, the manual mode will appear only when you turn on page 8). If you pedal, the console will then be selected. As you have burned. Pulse-This mode shows your progress with the display. You can show the following ...
English Manual
Page 13
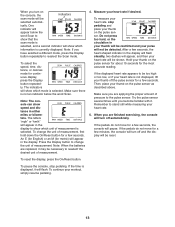
... thumb on the pulse sensor for about 15 seconds for metric) will appear in your thumb will be restricted and your heart rate, stop pedaling. Try the pulse sensor several times until you are finished exercising, the console will turn off and the display will be detected. If the... unit of measurement. 4. Make sure you have selected a different mode, press the Display button repeatedly to stand still while measuring your workout, simply resume pedaling. 13 If the time is not an indicator below the word Scan to show that the scan mode is selected, and a second indicator will show...
... thumb on the pulse sensor for about 15 seconds for metric) will appear in your thumb will be restricted and your heart rate, stop pedaling. Try the pulse sensor several times until you are finished exercising, the console will turn off and the display will be detected. If the... unit of measurement. 4. Make sure you have selected a different mode, press the Display button repeatedly to stand still while measuring your workout, simply resume pedaling. 13 If the time is not an indicator below the word Scan to show that the scan mode is selected, and a second indicator will show...
English Manual
Page 14
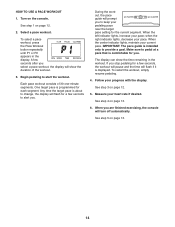
...To select a pace workout, press the Pace Workout button repeatedly until P1 or P2 appears in the workout. To restart the workout, simply resume pedaling. 4. See step 3 on page 13. 14 When you . IMPORTANT: The pace guide is comfortable for the current segment. When the center indicator... lights, maintain your progress with the display. Make sure to pedal at a pace that is intended only to start the workout. Turn on the console. One target pace is displayed. Follow your current pace...
...To select a pace workout, press the Pace Workout button repeatedly until P1 or P2 appears in the workout. To restart the workout, simply resume pedaling. 4. See step 3 on page 13. 14 When you . IMPORTANT: The pace guide is comfortable for the current segment. When the center indicator... lights, maintain your progress with the display. Make sure to pedal at a pace that is intended only to start the workout. Turn on the console. One target pace is displayed. Follow your current pace...
English Manual
Page 15
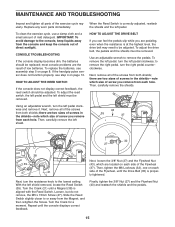
... remove, the M5 x 15mm Screw (47). Finally, tighten the 3/8" Nut (27) and the Flywheel Nut (43) and reattach the shields and the pedals. 15 MAINTENANCE AND TROUBLESHOOTING Inspect and tighten all of the screws from both shields; If the handgrip pulse sensor does not function properly, see assembly... be adjusted. Next, remove all parts of the Flywheel (37). With the left shield must be replaced; To remove the left pedal clockwise; there are pedaling, even when the resistance is correctly adjusted, reattach the shields and the left shield. 43 35 37 32 27 38 39 47 ...
... remove, the M5 x 15mm Screw (47). Finally, tighten the 3/8" Nut (27) and the Flywheel Nut (43) and reattach the shields and the pedals. 15 MAINTENANCE AND TROUBLESHOOTING Inspect and tighten all of the screws from both shields; If the handgrip pulse sensor does not function properly, see assembly... be adjusted. Next, remove all parts of the Flywheel (37). With the left shield must be replaced; To remove the left pedal clockwise; there are pedaling, even when the resistance is correctly adjusted, reattach the shields and the left shield. 43 35 37 32 27 38 39 47 ...
English Manual
Page 18
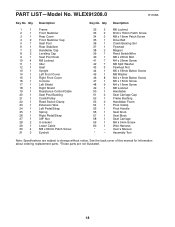
... Front Cover Right Front Cover Console Left Shield Right Shield Resistance Control/Cable Seat Post Bushing Crank/Pulley Reed Switch Clamp Extension Wire Left Pedal/Strap Spring Right Pedal/Strap 3/8" Nut U-bracket Lower Cable M8 x 60mm Patch Screw Eyebolt Key No. Description M6 Locknut M10 x 70mm Patch Screw M8 x 16mm Patch Screw...
... Front Cover Right Front Cover Console Left Shield Right Shield Resistance Control/Cable Seat Post Bushing Crank/Pulley Reed Switch Clamp Extension Wire Left Pedal/Strap Spring Right Pedal/Strap 3/8" Nut U-bracket Lower Cable M8 x 60mm Patch Screw Eyebolt Key No. Description M6 Locknut M10 x 70mm Patch Screw M8 x 16mm Patch Screw...


