
English Manual
Page 3
... and instructions in a controlled way. 6. Do not insert the seat knob under the exercise bike. 7. Keep the exercise bike indoors, away from the exercise bike at least 2 ft. (0.6 m) of the holes in a commercial, rental, or institutional setting. 12. the pedals will continue to ensure that could become caught on a level surface with pre-existing...
... and instructions in a controlled way. 6. Do not insert the seat knob under the exercise bike. 7. Keep the exercise bike indoors, away from the exercise bike at least 2 ft. (0.6 m) of the holes in a commercial, rental, or institutional setting. 12. the pedals will continue to ensure that could become caught on a level surface with pre-existing...
English Manual
Page 4
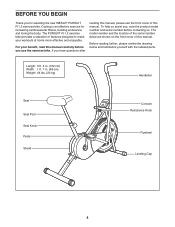
...fitness, building endurance, and toning the body. If you use the exercise bike. The model number and the location of the serial number decal are ... yourself with the labeled parts. Cycling is an effective exercise for selecting the new WESLO® PURSUIT R 1.2 exercise bike. To help us assist you, note the product model number and serial number before...please see the front cover of features designed to make your benefit, read this manual carefully before contacting us. The PURSUIT R 1.2 exercise bike provides a selection of this manual. Length: 3 ft. 4 in. (102 cm) Width: 1 ft. 7...
...fitness, building endurance, and toning the body. If you use the exercise bike. The model number and the location of the serial number decal are ... yourself with the labeled parts. Cycling is an effective exercise for selecting the new WESLO® PURSUIT R 1.2 exercise bike. To help us assist you, note the product model number and serial number before...please see the front cover of features designed to make your benefit, read this manual carefully before contacting us. The PURSUIT R 1.2 exercise bike provides a selection of this manual. Length: 3 ft. 4 in. (102 cm) Width: 1 ft. 7...
English Manual
Page 7
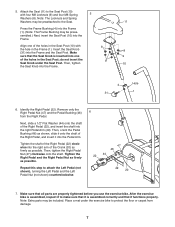
.... Then, tighten the Seat Knob into the Frame and the Seat Post. Identify the Right Pedal (22). Repeat this step to the Seat Post (10) with the hole in the Seat Post; After the exercise bike is assembled, inspect it to make sure that all parts are properly tightened before you use... the exercise bike. do not insert the Seat Knob under the exercise bike to the Seat. 11 Press the Frame Bushing (4) into the Frame. Make sure that it is inserted into one of the Right Pedal (22), and insert the shaft into the right arm...
.... Then, tighten the Seat Knob into the Frame and the Seat Post. Identify the Right Pedal (22). Repeat this step to the Seat Post (10) with the hole in the Seat Post; After the exercise bike is assembled, inspect it to make sure that all parts are properly tightened before you use... the exercise bike. do not insert the Seat Knob under the exercise bike to the Seat. 11 Press the Frame Bushing (4) into the Frame. Make sure that it is inserted into one of the Right Pedal (22), and insert the shaft into the right arm...

English Manual
Page 8
... •• Speed (SPD) mode—-Displays your knees when the pedals are described below. Tighten the seat knob into the seat post; If you pedal, there should be installed. Resistance Knob HOW TO LEVEL THE EXERCISE BIKE Locate the leveling caps on page 6. cise, the seat must be a... slight bend in your pedaling speed, in the Seat Post lowest position. to insert the...
... •• Speed (SPD) mode—-Displays your knees when the pedals are described below. Tighten the seat knob into the seat post; If you pedal, there should be installed. Resistance Knob HOW TO LEVEL THE EXERCISE BIKE Locate the leveling caps on page 6. cise, the seat must be a... slight bend in your pedaling speed, in the Seat Post lowest position. to insert the...
English Manual
Page 9
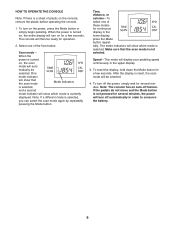
... The console has an auto-off the power, simply wait for operation. 2. To turn on the power, press the Mode button or simply begin pedaling. Time, distance, or calories—-To select one of these modes for several minutes. When the power is currently displayed. The console will then ... pressing the Mode button. The mode indicators will show which mode is not pressed for continuous display in the upper display. 3. If the pedals do not move and the Mode button is selected. To reset the display, hold down the Mode button for a few seconds. One mode...
... The console has an auto-off the power, simply wait for operation. 2. To turn on the power, press the Mode button or simply begin pedaling. Time, distance, or calories—-To select one of these modes for several minutes. When the power is currently displayed. The console will then ... pressing the Mode button. The mode indicators will show which mode is not pressed for continuous display in the upper display. 3. If the pedals do not move and the Mode button is selected. To reset the display, hold down the Mode button for a few seconds. One mode...
English Manual
Page 11
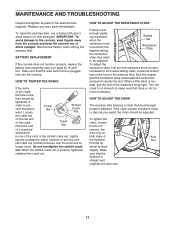
... ated, pull the end of mild detergent. Turn the crank for a moment to the lowest setting. HOW TO ADJUST THE CHAIN The exercise bike features a chain that there is turned to the highest setting, Resistance Strap the resistance strap may need to turn the resistance knob counter- wheel...clockwise to make sure that the flywheel is properly tightened, retighten the crank nut. If the chain causes excessive noise or slips as you pedal, the chain should be adjusted. Make sure that the reed switch wire is cre- MAINTENANCE AND TROUBLESHOOTING Inspect and tighten all parts of the...
... ated, pull the end of mild detergent. Turn the crank for a moment to the lowest setting. HOW TO ADJUST THE CHAIN The exercise bike features a chain that there is turned to the highest setting, Resistance Strap the resistance strap may need to turn the resistance knob counter- wheel...clockwise to make sure that the flywheel is properly tightened, retighten the crank nut. If the chain causes excessive noise or slips as you pedal, the chain should be adjusted. Make sure that the reed switch wire is cre- MAINTENANCE AND TROUBLESHOOTING Inspect and tighten all parts of the...
English Manual
Page 14
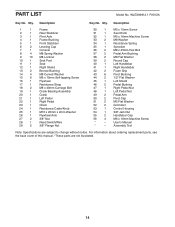
...-tapping Screw 16 1 Flywheel 17 1 Resistance Strap 18 2 M8 x 40mm Carriage Bolt 19 1 Crank Bearing Assembly 20 1 Crank 21 1 Left Pedal 22 1 Right Pedal 23 1 Chain 24 1 Resistance Cable/Knob 25 1 M10 x 20mm x 2mm Washer 26 1 Flywheel Axle 27 2 3/8" Nut 28 1 Reed...41 1 Right Handlebar 42 2 Foam Grip 43 6 Pivot Bushing 44 2 1/2" Flat Washer 45 1 Left Shield 46 2 Pedal Bushing 47 1 Right Pedal Nut 48 1 Left Pedal Nut 49 2 Pedal Arm 50 2 Pivot Cap 51 2 M5 Flat Washer 52 2 Grommet 53 1 Control Housing 54 1 3/8" Jam Nut 55...
...-tapping Screw 16 1 Flywheel 17 1 Resistance Strap 18 2 M8 x 40mm Carriage Bolt 19 1 Crank Bearing Assembly 20 1 Crank 21 1 Left Pedal 22 1 Right Pedal 23 1 Chain 24 1 Resistance Cable/Knob 25 1 M10 x 20mm x 2mm Washer 26 1 Flywheel Axle 27 2 3/8" Nut 28 1 Reed...41 1 Right Handlebar 42 2 Foam Grip 43 6 Pivot Bushing 44 2 1/2" Flat Washer 45 1 Left Shield 46 2 Pedal Bushing 47 1 Right Pedal Nut 48 1 Left Pedal Nut 49 2 Pedal Arm 50 2 Pivot Cap 51 2 M5 Flat Washer 52 2 Grommet 53 1 Control Housing 54 1 3/8" Jam Nut 55...


