
English Manual
Page 1
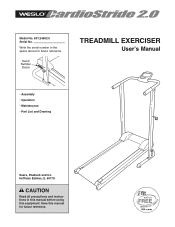
Write the serial number in this manual before using this manual for future reference. Hoffman Estates, IL 60179 CAUTION Read all precautions and instructions in the space above for future reference. Save this equipment. Model No. 831.24902.0 Serial No. Serial Number Decal TREADMILL EXERCISER Userʼs Manual • Assembly • Operation • Maintenance • Part List and Drawing Sears, Roebuck and Co.
Write the serial number in this manual before using this manual for future reference. Hoffman Estates, IL 60179 CAUTION Read all precautions and instructions in the space above for future reference. Save this equipment. Model No. 831.24902.0 Serial No. Serial Number Decal TREADMILL EXERCISER Userʼs Manual • Assembly • Operation • Maintenance • Part List and Drawing Sears, Roebuck and Co.

English Manual
Page 2
.... (One on each side) 2 TABLE OF CONTENTS WARNING DECAL PLACEMENT 2 IMPORTANT PRECAUTIONS 3 BEFORE YOU BEGIN 5 ASSEMBLY 6 TREADMILL OPERATION 9 HOW TO FOLD THE TREADMILL 11 TROUBLESHOOTING 12 EXERCISE GUIDELINES 13 PART LIST 14 EXPLODED DRAWING 15 ORDERING REPLACEMENT PARTS Back Cover 90 DAY FULL WARRANTY Back Cover WARNING DECAL PLACEMENT This drawing shows the location...
.... (One on each side) 2 TABLE OF CONTENTS WARNING DECAL PLACEMENT 2 IMPORTANT PRECAUTIONS 3 BEFORE YOU BEGIN 5 ASSEMBLY 6 TREADMILL OPERATION 9 HOW TO FOLD THE TREADMILL 11 TROUBLESHOOTING 12 EXERCISE GUIDELINES 13 PART LIST 14 EXPLODED DRAWING 15 ORDERING REPLACEMENT PARTS Back Cover 90 DAY FULL WARRANTY Back Cover WARNING DECAL PLACEMENT This drawing shows the location...

English Manual
Page 3
... near water. 5. To protect the floor or carpet from moisture and dust. Keep children under age 12 and pets away from the treadmill at all parts of the treadmill regularly. 17. Do not change the incline of the treadmill by persons weighing more than the procedures in this manual and all warnings on your...
... near water. 5. To protect the floor or carpet from moisture and dust. Keep children under age 12 and pets away from the treadmill at all parts of the treadmill regularly. 17. Do not change the incline of the treadmill by persons weighing more than the procedures in this manual and all warnings on your...
English Manual
Page 5
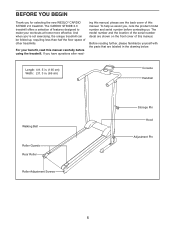
... yourself with the parts that are shown on the front cover of this manual. The CARDIO STRIDE 2.0 treadmill offers a selection of other treadmills. ing this manual, please see the back cover of this manual. Length: 4 ft. 5 in. (135 cm) Width: 2 ft. 3 in the drawing below. If you for selecting the new WESLO® CARDIO STRIDE 2.0 treadmill. And when you...
... yourself with the parts that are shown on the front cover of this manual. The CARDIO STRIDE 2.0 treadmill offers a selection of other treadmills. ing this manual, please see the back cover of this manual. Length: 4 ft. 5 in. (135 cm) Width: 2 ft. 3 in the drawing below. If you for selecting the new WESLO® CARDIO STRIDE 2.0 treadmill. And when you...

English Manual
Page 6
... the Nylon Nuts yet. 38 Orient the Left Upright (35) so that 1 the two indicated holes are the key numbers of the parts, from the PART LIST near the end of the packing materials until assembly is missing, call 1-866-699-3756. Do not dispose of this manual. Do... holes are the quantities needed for assembly. Attach the Right Upright (36) to the position shown. 2 35 36 6 Set the treadmill in the indicated location. To avoid damaging parts, do not use power tools for assembly. ASSEMBLY Assembly requires only the included hex key and wrench . Note: Some small...
... the Nylon Nuts yet. 38 Orient the Left Upright (35) so that 1 the two indicated holes are the key numbers of the parts, from the PART LIST near the end of the packing materials until assembly is missing, call 1-866-699-3756. Do not dispose of this manual. Do... holes are the quantities needed for assembly. Attach the Right Upright (36) to the position shown. 2 35 36 6 Set the treadmill in the indicated location. To avoid damaging parts, do not use power tools for assembly. ASSEMBLY Assembly requires only the included hex key and wrench . Note: Some small...

English Manual
Page 8
... batteries into the Adhesive Clip. Connect the wire on the Console to the Handrail with two M4 x 12mm Screws (3). Make sure that all parts are touching the springs in the indicated location. Remove the paper backing from the Adhesive Clip (30). 6. Hold the Console (1) near the ... that the wires are recommended. Then, attach the Console to the Handrail Wire (2). To protect the floor or carpet, place a mat under the treadmill. 8 make sure that the walking belt is properly tightened (see SYMPTOM 3 on the Battery Cover (27), and remove the Battery Cover. The Console...
... batteries into the Adhesive Clip. Connect the wire on the Console to the Handrail with two M4 x 12mm Screws (3). Make sure that all parts are touching the springs in the indicated location. Remove the paper backing from the Adhesive Clip (30). 6. Hold the Console (1) near the ... that the wires are recommended. Then, attach the Console to the Handrail Wire (2). To protect the floor or carpet, place a mat under the treadmill. 8 make sure that the walking belt is properly tightened (see SYMPTOM 3 on the Battery Cover (27), and remove the Battery Cover. The Console...

English Manual
Page 13
... heart rate in your cardiovascular system, you to find the proper intensity level. This is especially important for 20 to make exercise a regular and enjoyable part of your exercise until your heart rate is to strengthen your training zone. The lowest number is the heart rate for fat burning, the middle...
... heart rate in your cardiovascular system, you to find the proper intensity level. This is especially important for 20 to make exercise a regular and enjoyable part of your exercise until your heart rate is to strengthen your training zone. The lowest number is the heart rate for fat burning, the middle...

English Manual
Page 14
... Key No. Qty. 25 1 26 1 27 1 28 1 29 1 30 1 31 2 32 2 33 4 34 4 35 1 36 1 37 4 38 4 39 1 40 1 41 2 42 1 43 1 44 1 45 2 46 1 * - * - PART LIST Model No. 831.24902.0 R0611A Key No. If a part is missing, call 1-866-699-3756. 14 For information about ordering replacement...
... Key No. Qty. 25 1 26 1 27 1 28 1 29 1 30 1 31 2 32 2 33 4 34 4 35 1 36 1 37 4 38 4 39 1 40 1 41 2 42 1 43 1 44 1 45 2 46 1 * - * - PART LIST Model No. 831.24902.0 R0611A Key No. If a part is missing, call 1-866-699-3756. 14 For information about ordering replacement...

English Manual
Page 16
... if repair proves impossible). This warranty gives you specific legal rights, and you need to state. This warranty does not apply when the Treadmill Exerciser is used commercially or for the location of all major brand appliances, lawn and garden equipment, or heating and cooling systems, no matter... that you may also have other rights which vary from state to do-it-yourself. Sears, Roebuck and Co., Hoffman Estates, IL 60179 Part No. 318256 R0611A Printed in your home-of your home or ours! For Sears professional installation of home appliances and items like vacuums, lawn...
... if repair proves impossible). This warranty gives you specific legal rights, and you need to state. This warranty does not apply when the Treadmill Exerciser is used commercially or for the location of all major brand appliances, lawn and garden equipment, or heating and cooling systems, no matter... that you may also have other rights which vary from state to do-it-yourself. Sears, Roebuck and Co., Hoffman Estates, IL 60179 Part No. 318256 R0611A Printed in your home-of your home or ours! For Sears professional installation of home appliances and items like vacuums, lawn...


