
English Manual
Page 2
...Viheri., gentle:COO' cord.(see.HC .7rp.;et.im N .:rig ppwp3.c.pfip.p!tpago, 6. 4E:0:Children and pets;away:frOrglhe tread- Place the treadmill on a surface that all times. (innOtot.la.:n:.o..rloUudnqddeyde FORE YOU BEGIN onpage 4 if the treadMillIs ture and dust. Save the EXPLODED DRAWING and...TO FOLD AND MOVE THE TREADMILL TROUBLE-SHOOTING CONDITIONING GUIDELINES ORDERING REPLACEMENT PARTS LIMITED WARRANTY 2 4 5 7 11 12 14 Back Cover Back Cover Note: An EXPLODED DRAWING and a PART LIST are attached to ;ensure that blocks any air :11 NeVer move the walking belt while the po opening&...
...Viheri., gentle:COO' cord.(see.HC .7rp.;et.im N .:rig ppwp3.c.pfip.p!tpago, 6. 4E:0:Children and pets;away:frOrglhe tread- Place the treadmill on a surface that all times. (innOtot.la.:n:.o..rloUudnqddeyde FORE YOU BEGIN onpage 4 if the treadMillIs ture and dust. Save the EXPLODED DRAWING and...TO FOLD AND MOVE THE TREADMILL TROUBLE-SHOOTING CONDITIONING GUIDELINES ORDERING REPLACEMENT PARTS LIMITED WARRANTY 2 4 5 7 11 12 14 Back Cover Back Cover Note: An EXPLODED DRAWING and a PART LIST are attached to ;ensure that blocks any air :11 NeVer move the walking belt while the po opening&...

English Manual
Page 3
... not in general baart..rate 24. This tr• ea.dmil.lia..inten...d. lbarry.:. MOVETHE TREADMILL:on walking belt when starting treadmill. • Read User's Manual and follow warnings and operating instructions. • To prevent electrical ... • Misuse of this product may cause serious injury. • Don't stand on 'page 11 :' ; 'd: WA.. .R. Never leave the treadmill unattended while remove the motor hood unless instructed to play on the back cover of this manual). Pra eadMiltuntirltSprOopOrlyassartible&(See ineroial,.:..rental,.or:institutional setting...
... not in general baart..rate 24. This tr• ea.dmil.lia..inten...d. lbarry.:. MOVETHE TREADMILL:on walking belt when starting treadmill. • Read User's Manual and follow warnings and operating instructions. • To prevent electrical ... • Misuse of this product may cause serious injury. • Don't stand on 'page 11 :' ; 'd: WA.. .R. Never leave the treadmill unattended while remove the motor hood unless instructed to play on the back cover of this manual). Pra eadMiltuntirltSprOopOrlyassartible&(See ineroial,.:..rental,.or:institutional setting...
English Manual
Page 4
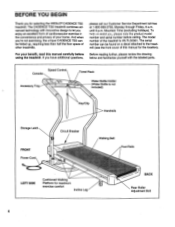
until 6 p.m. The model number of other treadmills. Walking Belt Foot Rails LEFT SIDE Cushioned Walking Platform for selecting the WESLO° CADENCE TS5 treadmill. Before reading further, please review the drawing below and familiarize yourself with innovative design to the treadmill (see the front cover of your benefit, read this manual for the location). Speed Control Console Accessory Tray Towel...
until 6 p.m. The model number of other treadmills. Walking Belt Foot Rails LEFT SIDE Cushioned Walking Platform for selecting the WESLO° CADENCE TS5 treadmill. Before reading further, please review the drawing below and familiarize yourself with innovative design to the treadmill (see the front cover of your benefit, read this manual for the location). Speed Control Console Accessory Tray Towel...
English Manual
Page 7
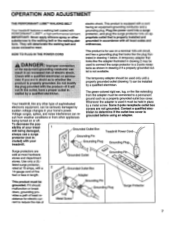
... looks like any other grounding plug. being damaged, always use on or off. Use only a UL- They will deteriorate the walking belt and ordinances. This product is grounded before using an adapter. grounded in accordance with a 2 14-gauge cord of sophisticated electronic equipment... or less in drawing 1 below. This product is equipped with a cord having an equipment-grounding conductor and a Your treadmill features a walking belt coated with your treadmill being turned on a nominal 120-volt circuit, HOW TO PLUG IN THE POWER CORD and has a grounding plug that...
... looks like any other grounding plug. being damaged, always use on or off. Use only a UL- They will deteriorate the walking belt and ordinances. This product is grounded before using an adapter. grounded in accordance with a 2 14-gauge cord of sophisticated electronic equipment... or less in drawing 1 below. This product is equipped with a cord having an equipment-grounding conductor and a Your treadmill features a walking belt coated with your treadmill being turned on a nominal 120-volt circuit, HOW TO PLUG IN THE POWER CORD and has a grounding plug that...

English Manual
Page 9
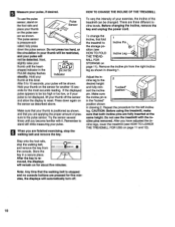
... treadmill. ING FAT on page 7.) Step oiito the foot rails of calories and fat calories you just installed batteries, the displays will not turn on the dis- Note: This display also shows your pulse when the pulse sensor is MIMI. SPEED u ON/RESET To stop the walking belt,...; TIME This display shows the length of fat calories.) Every seven seconds, the display will indicate which number is started. Note: Each time the walking belt Is stopped, the speed control must RCM be turned to the RESET position. 9 I -"1OP- DISTANCE 217LI • SPEED This display shows the...
... treadmill. ING FAT on page 7.) Step oiito the foot rails of calories and fat calories you just installed batteries, the displays will not turn on the dis- Note: This display also shows your pulse when the pulse sensor is MIMI. SPEED u ON/RESET To stop the walking belt,...; TIME This display shows the length of fat calories.) Every seven seconds, the display will indicate which number is started. Note: Each time the walking belt Is stopped, the speed control must RCM be turned to the RESET position. 9 I -"1OP- DISTANCE 217LI • SPEED This display shows the...
English Manual
Page 10
...Before changing the incline, remove the key and unplug the power cord. CAUTION: Before using the treadmill, make sure that the walking belt Is stopped and no console buttons are finished exercising, stop the walking belt, and remove the key from the right incline leg as shown. Do not use the pulse...fully Inserted at this level. Step onto the foot rails, stop the walking belt and remove the key. Note: Any time that both Incline pins are three different incline levels. sition (see HOW TO LOWER THE TREADMILL FOR USE on for five minutes, the displays will automatically turn off ...
...Before changing the incline, remove the key and unplug the power cord. CAUTION: Before using the treadmill, make sure that the walking belt Is stopped and no console buttons are finished exercising, stop the walking belt, and remove the key from the right incline leg as shown. Do not use the pulse...fully Inserted at this level. Step onto the foot rails, stop the walking belt and remove the key. Note: Any time that both Incline pins are three different incline levels. sition (see HOW TO LOWER THE TREADMILL FOR USE on for five minutes, the displays will automatically turn off ...

English Manual
Page 13
... a 14-gauge cord of five feet or less in the power cord, insert the key and run the treadmill for a few minutes. If the walking belt still slows when walked on page 8). Plug in the console. (See BATTERY INSTALLATION on , please call our Customer Service Department, toll... Switch (38) and the Magnet (39) on pages 5 and 6). 13 SYMPTOM: THE WALKING BELT IS OFF-CENTER WHEN WALKED ON a. Repeat until the walking belt is centered. Repeat until the walking belt is centered. 6. SYMPTOM: THE TREADMILL SITS UNEVENLY ON THE FLOOR a. If necessary, loosen the Screw (19) and move the...
... a 14-gauge cord of five feet or less in the power cord, insert the key and run the treadmill for a few minutes. If the walking belt still slows when walked on page 8). Plug in the console. (See BATTERY INSTALLATION on , please call our Customer Service Department, toll... Switch (38) and the Magnet (39) on pages 5 and 6). 13 SYMPTOM: THE WALKING BELT IS OFF-CENTER WHEN WALKED ON a. Repeat until the walking belt is centered. Repeat until the walking belt is centered. 6. SYMPTOM: THE TREADMILL SITS UNEVENLY ON THE FLOOR a. If necessary, loosen the Screw (19) and move the...


