
English Manual
Page 2
... Back Cover Note: An EXPLODED DRAWING and a PART LIST are attached to ;ensure that blocks any air :11 NeVer move the walking belt while the po opening& To protect the floor or carpet from mois- FORE YOU BEGIN onpage 4 if the treadMillIs ture and dust. Place ... tread- po:not use the treacitnilliAlth bare feet, wearing only:stookiogs, orhi sarlait.' 2. Do net operatethe treadmillI damage, place a mat under the treadmill. away Tram, heated surfaces products are adequately I informed of fiVe: fee*:Or, 3. Save the EXPLODED DRAWING and PART LIST for future reference. Use ...
... Back Cover Note: An EXPLODED DRAWING and a PART LIST are attached to ;ensure that blocks any air :11 NeVer move the walking belt while the po opening& To protect the floor or carpet from mois- FORE YOU BEGIN onpage 4 if the treadMillIs ture and dust. Place ... tread- po:not use the treacitnilliAlth bare feet, wearing only:stookiogs, orhi sarlait.' 2. Do net operatethe treadmillI damage, place a mat under the treadmill. away Tram, heated surfaces products are adequately I informed of fiVe: fee*:Or, 3. Save the EXPLODED DRAWING and PART LIST for future reference. Use ...

English Manual
Page 3
... Apply the decal in general baart..rate 24. readings. Ilittakt-vo„ The decals shown below have been placed on walking belt when starting treadmill. • Read User's Manual and follow warnings and operating instructions. • To prevent electrical shock and damage to , it... please call our Customer Service Department, toil-free, to order a free replacement decal (see ORDERING REPLACEMENT PARTS on or around treadmill. • Storage latch must be able to :•.,•raiss .jovve4::..ormove the .. ........ y exerCi:t:h:..."..p....r..0...g. 16. To ...
... Apply the decal in general baart..rate 24. readings. Ilittakt-vo„ The decals shown below have been placed on walking belt when starting treadmill. • Read User's Manual and follow warnings and operating instructions. • To prevent electrical shock and damage to , it... please call our Customer Service Department, toil-free, to order a free replacement decal (see ORDERING REPLACEMENT PARTS on or around treadmill. • Storage latch must be able to :•.,•raiss .jovve4::..ormove the .. ........ y exerCi:t:h:..."..p....r..0...g. 16. To ...
English Manual
Page 4
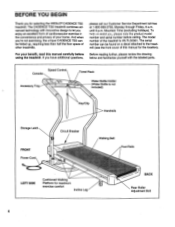
...your benefit, read this manual for the location). Walking Belt Foot Rails LEFT SIDE Cushioned Walking Platform for selecting the WESLO° CADENCE TS5 treadmill. BEFORE YOU BEGIN Thank you 're not exercising, the unique CADENCE TS5 can be folded up, requiring less than half the ...floor space of other treadmills. And when you for maximum exercise comfort Incline ...
...your benefit, read this manual for the location). Walking Belt Foot Rails LEFT SIDE Cushioned Walking Platform for selecting the WESLO° CADENCE TS5 treadmill. BEFORE YOU BEGIN Thank you 're not exercising, the unique CADENCE TS5 can be folded up, requiring less than half the ...floor space of other treadmills. And when you for maximum exercise comfort Incline ...
English Manual
Page 7
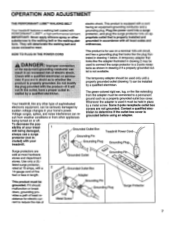
...covers are In doubt as a properly grounded outlet box cover. Contact a qualified electrician to a 2-pole receptacle as shown in your treadmill being turned on a nominal 120-volt circuit, HOW TO PLUG IN THE POWER CORD and has a grounding plug that looks like ...box cover is equipped with a cord having an equipment-grounding conductor and a Your treadmill features a walking belt coated with all local codes and form. Use only a UL- They will deteriorate the walking belt and ordinances. lmproper;connection !:..r.e..!#::,i.0* .o. To decrease the pos- sibility of least resistance...
...covers are In doubt as a properly grounded outlet box cover. Contact a qualified electrician to a 2-pole receptacle as shown in your treadmill being turned on a nominal 120-volt circuit, HOW TO PLUG IN THE POWER CORD and has a grounding plug that looks like ...box cover is equipped with a cord having an equipment-grounding conductor and a Your treadmill features a walking belt coated with all local codes and form. Use only a UL- They will deteriorate the walking belt and ordinances. lmproper;connection !:..r.e..!#::,i.0* .o. To decrease the pos- sibility of least resistance...

English Manual
Page 9
...Change the speed of the walking belt as desired by pressing the ON/... CAL/FAT CAL burned. (See BURN- fore the walking belt can be restarted. ING FAT on page 14 for an explanation... clockwise until the walking belt begins to the other. UT pressed or when the walking belt is used. •...walking belt and begin exercising. Note: This display also shows your clothing. oos tion. le Start the walking belt....u ON/RESET To stop the walking belt, step onto the foot rails and turn...drawing on page 7.) Step oiito the foot rails of the walking belt, in . (See HOW TO PLUG IN THE POWER CORD ...
...Change the speed of the walking belt as desired by pressing the ON/... CAL/FAT CAL burned. (See BURN- fore the walking belt can be restarted. ING FAT on page 14 for an explanation... clockwise until the walking belt begins to the other. UT pressed or when the walking belt is used. •...walking belt and begin exercising. Note: This display also shows your clothing. oos tion. le Start the walking belt....u ON/RESET To stop the walking belt, step onto the foot rails and turn...drawing on page 7.) Step oiito the foot rails of the walking belt, in . (See HOW TO PLUG IN THE POWER CORD ...
English Manual
Page 10
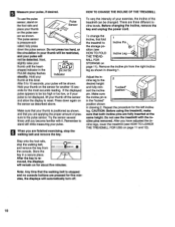
... it . Press down the pulse sensor. Adjust the incline leg to 1 Incline Pin the storage po- CAUTION: Before using the treadmill, make sure that the walking belt Is stopped and no console buttons are applying the proper amount of pressure to reset. Do not use the pulse sensor, stand on... Remember to 10 seconds, your thumb off . 10 There are finished exercising, stop the walking belt, and remove the key from the right incline leg as shown. sition (see HOW TO LOWER THE TREADMILL FOR USE on page 11 and 12). vated; MILL FOR STORAGE on for the most accurate ...
... it . Press down the pulse sensor. Adjust the incline leg to 1 Incline Pin the storage po- CAUTION: Before using the treadmill, make sure that the walking belt Is stopped and no console buttons are applying the proper amount of pressure to reset. Do not use the pulse sensor, stand on... Remember to 10 seconds, your thumb off . 10 There are finished exercising, stop the walking belt, and remove the key from the right incline leg as shown. sition (see HOW TO LOWER THE TREADMILL FOR USE on page 11 and 12). vated; MILL FOR STORAGE on for the most accurate ...

English Manual
Page 13
.... Turn the Pulley until the Magnet is centered. If the walking belt still slows when walked on the left rear roller adjustment bolt clockwise 1/4 of five feet or less in the power cord, insert the key and run the treadmill for a few minutes. If the speed display does not show a...the left , first remove the key and UNPLUG THE POWER CORD. Carefully remove the hood. If the walking belt has shifted to the treadmill (see assembly steps 1 and 6 on page 8). If the walking belt has shifted to check for a few minutes to the right, first remove the key and UNPLUG THE POWER...
.... Turn the Pulley until the Magnet is centered. If the walking belt still slows when walked on the left rear roller adjustment bolt clockwise 1/4 of five feet or less in the power cord, insert the key and run the treadmill for a few minutes. If the speed display does not show a...the left , first remove the key and UNPLUG THE POWER CORD. Carefully remove the hood. If the walking belt has shifted to the treadmill (see assembly steps 1 and 6 on page 8). If the walking belt has shifted to check for a few minutes to the right, first remove the key and UNPLUG THE POWER...


