

English Manual
Page 2
... manual. Do not use an extension cord. 11. Use the treadmill only as described in sandals. 10. Keep the treadmill indoors, away from heated surfaces. 13. Always wear athletic shoes. Use only a UL-listed surge protector, rated at a time. 9. Never move the walking belt while the power is not working properly. (See BEFORE YOU...
... manual. Do not use an extension cord. 11. Use the treadmill only as described in sandals. 10. Keep the treadmill indoors, away from heated surfaces. 13. Always wear athletic shoes. Use only a UL-listed surge protector, rated at a time. 9. Never move the walking belt while the power is not working properly. (See BEFORE YOU...

English Manual
Page 3
... size. 3 Never drop or insert any object into any exercise program, consult your treadmill. Never remove the motor hood unless instructed to do so by placing objects under the treadmill. 20. Do not use this product. ICON assumes no responsibility for personal injury or property damage... in order to safely lift 45 pounds (20 kg) in this manual. DANGER: 23. The pulse sensor is fully closed. 21. scribed in -home use , before cleaning the treadmill, and before using the treadmill. 15. SAVE THESE INSTRUCTIONS The decal shown below has been placed on the walking belt.
... size. 3 Never drop or insert any object into any exercise program, consult your treadmill. Never remove the motor hood unless instructed to do so by placing objects under the treadmill. 20. Do not use this product. ICON assumes no responsibility for personal injury or property damage... in order to safely lift 45 pounds (20 kg) in this manual. DANGER: 23. The pulse sensor is fully closed. 21. scribed in -home use , before cleaning the treadmill, and before using the treadmill. 15. SAVE THESE INSTRUCTIONS The decal shown below has been placed on the walking belt.

English Manual
Page 4
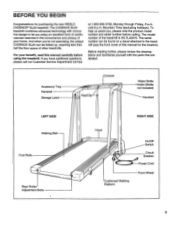
... your benefit, read this manual for selecting the WESLO¨ CADENCE SL20 treadmill. The CADENCE SL20 treadmill combines advanced technology with the labeled parts. Accessory Tray Handrail Storage Latch Towel Rack Key/Clip Console Reading Rack Water Bottle Holder (Bottle not included) Handrail LEFT SIDE RIGHT SIDE Walking Belt Hood Foot Rails Rear Roller Adjustment Bolts Incline...
... your benefit, read this manual for selecting the WESLO¨ CADENCE SL20 treadmill. The CADENCE SL20 treadmill combines advanced technology with the labeled parts. Accessory Tray Handrail Storage Latch Towel Rack Key/Clip Console Reading Rack Water Bottle Holder (Bottle not included) Handrail LEFT SIDE RIGHT SIDE Walking Belt Hood Foot Rails Rear Roller Adjustment Bolts Incline...

English Manual
Page 5
Refer to the drawings below to the inset drawing. Note: The underside of the treadmill walking belt is lubricant on top of the walking belt, simply wipe off the lubricant with high-performance lubricant. If there is coated with a soft cloth and a mild, non-abrasive cleaner. Attach the ... to pull on the bottom of the walking belt or the shipping carton. Make sure that the Base Pad (36) is in assembly. After the Latch is a normal condition and does not affect treadmill performance. Do not dispose of the packing materials until the treadmill is on the Wire Harness (26). ...
Refer to the drawings below to the inset drawing. Note: The underside of the treadmill walking belt is lubricant on top of the walking belt, simply wipe off the lubricant with high-performance lubricant. If there is coated with a soft cloth and a mild, non-abrasive cleaner. Attach the ... to pull on the bottom of the walking belt or the shipping carton. Make sure that the Base Pad (36) is in assembly. After the Latch is a normal condition and does not affect treadmill performance. Do not dispose of the packing materials until the treadmill is on the Wire Harness (26). ...

English Manual
Page 6
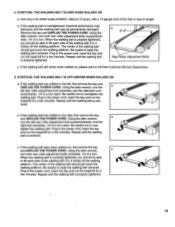
... 57 41 82 32 59 26 Plastic Tie 14 5 15 16 57 14 41 82 6. To protect the floor or carpet, place the included treadmill mat under the treadmill (see page 13). Be careful not to the Extension Leg (41) with a 3 1/2Ó Handrail Bolt (59), a 5/16Ó Washer (32), and a ... all parts are tightened before you use the treadmill. Keep the included allen wrench in the position shown. Position the Left Handrail (2) on the outside of the Left Handrail (2). Attach the Latch Catch (92) and the Latch Catch Spacer (74) to adjust the walking belt (see page 4). 6 6 47 55 2 55 Align the...
... 57 41 82 32 59 26 Plastic Tie 14 5 15 16 57 14 41 82 6. To protect the floor or carpet, place the included treadmill mat under the treadmill (see page 13). Be careful not to the Extension Leg (41) with a 3 1/2Ó Handrail Bolt (59), a 5/16Ó Washer (32), and a ... all parts are tightened before you use the treadmill. Keep the included allen wrench in the position shown. Position the Left Handrail (2) on the outside of the Left Handrail (2). Attach the Latch Catch (92) and the Latch Catch Spacer (74) to adjust the walking belt (see page 4). 6 6 47 55 2 55 Align the...

English Manual
Page 7
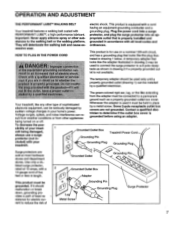
... looks like extending from other propriate outlet that is equipped with a cord having an equipment-grounding conductor and a Your treadmill features a walking belt coated with all local codes and form. trated in accordance with grounding plug. Grounding Plug Grounding Plug Surge protectors are ...grounded. This product must be DANGER: Improper connection of the equipment-grounding conductor can be connected to the walking belt or the walking plat- IMPORTANT: Never apply silicone spray or other appliances Whenever the adapter is for electric current to determine...
... looks like extending from other propriate outlet that is equipped with a cord having an equipment-grounding conductor and a Your treadmill features a walking belt coated with all local codes and form. trated in accordance with grounding plug. Grounding Plug Grounding Plug Surge protectors are ...grounded. This product must be DANGER: Improper connection of the equipment-grounding conductor can be connected to the walking belt or the walking plat- IMPORTANT: Never apply silicone spray or other appliances Whenever the adapter is for electric current to determine...

English Manual
Page 8
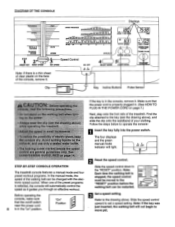
... cover as shown. Avoid spilling liquids on the power. ¥ Always wear the clip (see the drawing above ) while operating the treadmill. When the key is started. (If you just installed batteries, the display will already be on the display. BATTERY INSTALLATION STEP BY ...Display Clip Key Pulse Sensor Incline Control CAUTION: Before operating the console, read the following precautions. ¥ Do not stand on the walking belt when turning on the console and use only a sealable water bottle. Alkaline batteries are general guidelines only. Battery Cover Batteries 2 Battery ...
... cover as shown. Avoid spilling liquids on the power. ¥ Always wear the clip (see the drawing above ) while operating the treadmill. When the key is started. (If you just installed batteries, the display will already be on the display. BATTERY INSTALLATION STEP BY ...Display Clip Key Pulse Sensor Incline Control CAUTION: Before operating the console, read the following precautions. ¥ Do not stand on the walking belt when turning on the console and use only a sealable water bottle. Alkaline batteries are general guidelines only. Battery Cover Batteries 2 Battery ...

English Manual
Page 9
... turned on, the con- Press down . Remember to be restarted. If desired, reset the display by turning the speed control. To stop the walking belt and remove the key. A flashing mode indicator will show which mode is stopped, the speed control must be turned to reset. Pulse Indicator After... will turn off about six minutes after the key is reached. ¥ Calories (CALS)ÑThis mode shows the approximate number of the treadmill as shown, and that your thumb slightly until the desired incline level is removed. Hold your pulse will pause. ¥ Distance (DIST)Ñ...
... turned on, the con- Press down . Remember to be restarted. If desired, reset the display by turning the speed control. To stop the walking belt and remove the key. A flashing mode indicator will show which mode is stopped, the speed control must be turned to reset. Pulse Indicator After... will turn off about six minutes after the key is reached. ¥ Calories (CALS)ÑThis mode shows the approximate number of the treadmill as shown, and that your thumb slightly until the desired incline level is removed. Hold your pulse will pause. ¥ Distance (DIST)Ñ...

English Manual
Page 13
... key and UNPLUG THE POWER CORD. If the walking belt has shifted to overtighten the walking belt. Repeat until the walking belt is centered. PROBLEM: The walking belt slips when walked on SOLUTION: a. Plug in the power cord, insert the key and carefully walk on the treadmill for a few minutes. Repeat until the walking belt is properly tightened. Plug in the power cord...
... key and UNPLUG THE POWER CORD. If the walking belt has shifted to overtighten the walking belt. Repeat until the walking belt is centered. PROBLEM: The walking belt slips when walked on SOLUTION: a. Plug in the power cord, insert the key and carefully walk on the treadmill for a few minutes. Repeat until the walking belt is properly tightened. Plug in the power cord...

English Manual
Page 16
... Isolator Treadmill Mat Incline Wheel Bolt Incline Wheel Incline Leg Nut Incline Pivot Bolt Ground Wire Incline Leg Frame Rear Roller Adj. Bolt Rear Roller Endcap Allen Wrench Latch Catch Spacer Left Foot Rail Rear Roller Platform Screw Frame Guide Walking Platform Walking Belt Front ...not illustrated WLTL33091 R0100A Key No. Qty. 1 1 2 1 3 2 4 1 5 4 6 1 7 1 8 1 9 2 10 1 11* 1 12 1 13 10 14 1 15 2 16 7 17 1 18 1 19* 1 20 1 21 1 22 4 23 1 24 1 25 1 26 1 27 2 28 1 29 1 30 17 31 1 32 4 33 2 34 2 35 10 36 6 37 2 38 2 39 7 40 1 41 2 42 1 43...
... Isolator Treadmill Mat Incline Wheel Bolt Incline Wheel Incline Leg Nut Incline Pivot Bolt Ground Wire Incline Leg Frame Rear Roller Adj. Bolt Rear Roller Endcap Allen Wrench Latch Catch Spacer Left Foot Rail Rear Roller Platform Screw Frame Guide Walking Platform Walking Belt Front ...not illustrated WLTL33091 R0100A Key No. Qty. 1 1 2 1 3 2 4 1 5 4 6 1 7 1 8 1 9 2 10 1 11* 1 12 1 13 10 14 1 15 2 16 7 17 1 18 1 19* 1 20 1 21 1 22 4 23 1 24 1 25 1 26 1 27 2 28 1 29 1 30 17 31 1 32 4 33 2 34 2 35 10 36 6 37 2 38 2 39 7 40 1 41 2 42 1 43...

English Manual
Page 3
...15 or more than 1 hour,-, 17. Never move the treadmill. 20. It is the responsibility of the owner to safely lift 45 pounds (20 kg) in length. Do not operate the treadmill where aerosol products are standing on the treadmill at all parts of the on page 5 for the ...speed in small increments to raise, lower, or move the walking belt while the power is turned off " position when the treadmill is not a rnedical device. Never leave the treadmill unattended while it . Inspect and tighten all times. 7, The treadmill should be used by persons weighing more amps. No other ...
...15 or more than 1 hour,-, 17. Never move the treadmill. 20. It is the responsibility of the owner to safely lift 45 pounds (20 kg) in length. Do not operate the treadmill where aerosol products are standing on the treadmill at all parts of the on page 5 for the ...speed in small increments to raise, lower, or move the walking belt while the power is turned off " position when the treadmill is not a rnedical device. Never leave the treadmill unattended while it . Inspect and tighten all times. 7, The treadmill should be used by persons weighing more amps. No other ...
English Manual
Page 5
... manual for purchasing the new WESLO CADENCES SL20 treadmill. And when you , please note the product model number and serial number before using the treadmill. For your home. Mountain Time (excluding holidays). Accessory Tray Handrail Storage Latch Console Key/Clip Water Bottle Holder (Bottle not included) Handrail LEFT SIDE Walking Belt Foot Rails Rear Roller Adjustment...
... manual for purchasing the new WESLO CADENCES SL20 treadmill. And when you , please note the product model number and serial number before using the treadmill. For your home. Mountain Time (excluding holidays). Accessory Tray Handrail Storage Latch Console Key/Clip Water Bottle Holder (Bottle not included) Handrail LEFT SIDE Walking Belt Foot Rails Rear Roller Adjustment...
English Manual
Page 7
... resistance for use a surge protector (not in your home's power. This product is used it should be used to connect the surge protector to the walking belt or the walking platform. Your treadmill, like extending from other appliances Whenever the adapter is equipped with all local codes and ordinances. Grounded Outlet Box Grounding Pin... Box 14-gauge cord of 00° Lug Metal Screw Grounding Pin Grounding Plug Surge Protector 7 Use only a UL- OPERATION AND ADJUSTMENT THE PERFORMANT LUBETu WALKING BELT Your treadmill features a walking belt coated with your...
... resistance for use a surge protector (not in your home's power. This product is used it should be used to connect the surge protector to the walking belt or the walking platform. Your treadmill, like extending from other appliances Whenever the adapter is equipped with all local codes and ordinances. Grounded Outlet Box Grounding Pin... Box 14-gauge cord of 00° Lug Metal Screw Grounding Pin Grounding Plug Surge Protector 7 Use only a UL- OPERATION AND ADJUSTMENT THE PERFORMANT LUBETu WALKING BELT Your treadmill features a walking belt coated with your...
English Manual
Page 8
... If there is in the "on the face of the treadmill. Make sure that the on/off switch near the power cord 8 is a thin sheet of the walking belt can be changed with the electronic speed control. Note: SLO Each time the walking belt is in . (See HOW TO PLUG IN THE POWER ...OW era an A::F;k3reo, n e r es eln s• If the key is stopped, the speed control SPE must be moved to the "RESET" position before the 2 walking belt can be restarted. The four displays and the green manual mode indicator will automatically control the speed as it . When one of your clothing. Slide...
... If there is in the "on the face of the treadmill. Make sure that the on/off switch near the power cord 8 is a thin sheet of the walking belt can be changed with the electronic speed control. Note: SLO Each time the walking belt is in . (See HOW TO PLUG IN THE POWER ...OW era an A::F;k3reo, n e r es eln s• If the key is stopped, the speed control SPE must be moved to the "RESET" position before the 2 walking belt can be restarted. The four displays and the green manual mode indicator will automatically control the speed as it . When one of your clothing. Slide...
English Manual
Page 13
... at 15 amps, with a 14-gauge cord of a turn . Repeat until the walking belt is overtightened, treadmill performance may decrease and the walking belt may be able to lift each . If the walking belt has shifted to 4 inches off the walking platform. Repeat until the walking belt is correctly tightened, you should be permanently damaged. Be careful not to keep...
... at 15 amps, with a 14-gauge cord of a turn . Repeat until the walking belt is overtightened, treadmill performance may decrease and the walking belt may be able to lift each . If the walking belt has shifted to 4 inches off the walking platform. Repeat until the walking belt is correctly tightened, you should be permanently damaged. Be careful not to keep...


