
English Manual
Page 4
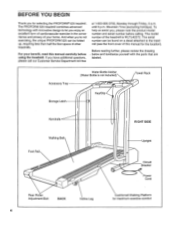
... other treadmills. For your home. below and familiarize yourself with innovative design to the treadmill (see the front cover of the treadmill is not included) Key/Clip Towel Rack Handrails Walking Belt Foot Rail Rear Roller Adjustment Bolt BACK Incline Leg 4 RIGHT SIDE Upright Circuit Breaker Power Cord Cushioned Walking Platform...
... other treadmills. For your home. below and familiarize yourself with innovative design to the treadmill (see the front cover of the treadmill is not included) Key/Clip Towel Rack Handrails Walking Belt Foot Rail Rear Roller Adjustment Bolt BACK Incline Leg 4 RIGHT SIDE Upright Circuit Breaker Power Cord Cushioned Walking Platform...
English Manual
Page 8
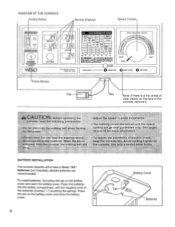
...ced z:= inabobob.4.,1:m itta 31.4 end dernv• b SPEED TRAlt, ING ZONES .x) S OW RESET FAST OPERATION POWER 0 INSERT KEY 0 RESET SPEED 0 SET SPEED Pulse Sensor Clip Key Note: If there is ..,...170:i:redpoethe:::06$sibility:OfOleOtrid.:Sho. W:Mr&fflf.MVARMEMILITROW,:.. 774FM. .;:,.:Before.operating the • Adjust...erniEd araa. etnoVed frOth-theOonsole the walking' belt will the:toriSoletiie.::..only::4sealed*Oter•:bOttle,.. atjill!ll• W6Pn the key is a thin sheet of clear plastic on the battery cover and close the battery cover. Press the tab on the face ...
...ced z:= inabobob.4.,1:m itta 31.4 end dernv• b SPEED TRAlt, ING ZONES .x) S OW RESET FAST OPERATION POWER 0 INSERT KEY 0 RESET SPEED 0 SET SPEED Pulse Sensor Clip Key Note: If there is ..,...170:i:redpoethe:::06$sibility:OfOleOtrid.:Sho. W:Mr&fflf.MVARMEMILITROW,:.. 774FM. .;:,.:Before.operating the • Adjust...erniEd araa. etnoVed frOth-theOonsole the walking' belt will the:toriSoletiie.::..only::4sealed*Oter•:bOttle,.. atjill!ll• W6Pn the key is a thin sheet of clear plastic on the battery cover and close the battery cover. Press the tab on the face ...
English Manual
Page 9
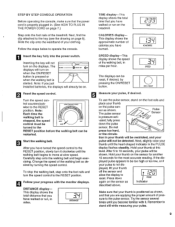
...by pressing the ON/RESET button. 0 ON / RESET Measure your pulse, if desired. Hold your clothing. Press down the pulse sensor. Insert the key fully into the power switch. Turn the speed con- CALORIES display- I DISTANCE TIME display-This display shows the total time that you have burned....with the monitor displays. The RATION displays will not turn it . I SPEED The displays can be on. If the dis- El Inserting the key will turn the speed control to the RESET position. Note: Each time the :ft walking belt is NJ : stopped, the speed SLOW FAST ...
...by pressing the ON/RESET button. 0 ON / RESET Measure your pulse, if desired. Hold your clothing. Press down the pulse sensor. Insert the key fully into the power switch. Turn the speed con- CALORIES display- I DISTANCE TIME display-This display shows the total time that you have burned....with the monitor displays. The RATION displays will not turn it . I SPEED The displays can be on. If the dis- El Inserting the key will turn the speed control to the RESET position. Note: Each time the :ft walking belt is NJ : stopped, the speed SLOW FAST ...
English Manual
Page 10
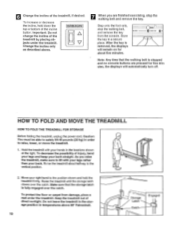
...; Fahrenheit. 10 Storage Latch Catch Engaged Step onto the foot rails, stop the walking belt and remove the key. Caution: You must be able to safely lift 45 pounds (20 kg) in a secure place. To ... console buttons are finished exercising, stop the walking belt, and remove the key from damage, place a mat under the treadmill. To increase or decrease the incline, hold the treadmill firmly.... Store the key in order to the position shown and hold down the top or bottom of injury, ...
...; Fahrenheit. 10 Storage Latch Catch Engaged Step onto the foot rails, stop the walking belt and remove the key. Caution: You must be able to safely lift 45 pounds (20 kg) in a secure place. To ... console buttons are finished exercising, stop the walking belt, and remove the key from damage, place a mat under the treadmill. To increase or decrease the incline, hold the treadmill firmly.... Store the key in order to the position shown and hold down the top or bottom of injury, ...
English Manual
Page 12
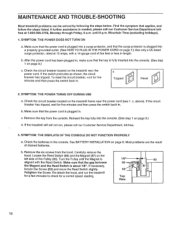
...wait for five minutes and then press the switch back in . above). b. c. Remove the six screws from the console. Make sure that the key is aligned with a 14-gauge cord of drained batteries. SYMPTOM: THE POWER TURNS OFF DURING USE a. c. If the treadmill still will not run...(85). If the circuit breaker has tripped, wait for a correct speed reading. 1/8" 86 63 Top View 85 8 12 Remove the key from the hood. Reinsert the key fully into the console. (See step 1 on page 8. Carefully remove the hood. until the Magnet is fully inserted into the console....
...wait for five minutes and then press the switch back in . above). b. c. Remove the six screws from the console. Make sure that the key is aligned with a 14-gauge cord of drained batteries. SYMPTOM: THE POWER TURNS OFF DURING USE a. c. If the treadmill still will not run...(85). If the circuit breaker has tripped, wait for a correct speed reading. 1/8" 86 63 Top View 85 8 12 Remove the key from the hood. Reinsert the key fully into the console. (See step 1 on page 8. Carefully remove the hood. until the Magnet is fully inserted into the console....
English Manual
Page 13
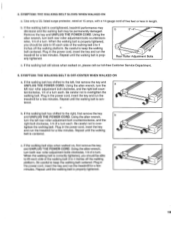
...WHEN WALKED ON a. Repeat until the walking belt is properly tightened. 3"-4" Rear Roller Adjustment Bolts c. Plug in the power cord, insert the key and run the treadmill for a few minutes. Be careful to the left rear roller adjustment bolt clockwise, and the right bolt coun- Be ...careful not to the right, first remove the key and UNPLUG THE POWER CORD. Repeat until the walking belt is properly tightened, you should be permanently damaged. Using the allen wrench, turn...
...WHEN WALKED ON a. Repeat until the walking belt is properly tightened. 3"-4" Rear Roller Adjustment Bolts c. Plug in the power cord, insert the key and run the treadmill for a few minutes. Be careful to the left rear roller adjustment bolt clockwise, and the right bolt coun- Be ...careful not to the right, first remove the key and UNPLUG THE POWER CORD. Repeat until the walking belt is properly tightened, you should be permanently damaged. Using the allen wrench, turn...
English Manual
Page 14
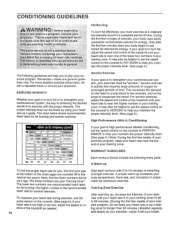
... three parts: A Warm-up increases your exercise must exercise at the bottom of the treadmill until your heart rate is in your cardiovascular system, the key to achieving the desired results is intended: only as needed. The three numbers are rounded off to 10 minutes of stretching at a relatively low intensity...
... three parts: A Warm-up increases your exercise must exercise at the bottom of the treadmill until your heart rate is in your cardiovascular system, the key to achieving the desired results is intended: only as needed. The three numbers are rounded off to 10 minutes of stretching at a relatively low intensity...
English Manual
Page 15
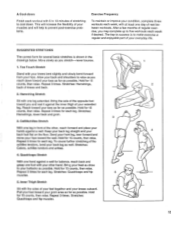
... and place your toes as far as possible. Stretches: Hamstrings, back of your feet together and your hips. Hold for 15 counts, then relax. The key to success is shown in front of regular exercise, you reach down . Inner Thigh Stretch Sit with your knees bent slightly and slowly bend forward...
... and place your toes as far as possible. Stretches: Hamstrings, back of your feet together and your hips. Hold for 15 counts, then relax. The key to success is shown in front of regular exercise, you reach down . Inner Thigh Stretch Sit with your knees bent slightly and slowly bend forward...
English Manual
Page 16
...; The NAME OF THE PRODUCT (PROFORM® 525 treadmill). • The SERIAL NUMBER OF THE PRODUCT (see the front cover of this manual). • The KEY NUMBER OF THE PART(S) (see the EXPLODED DRAWING and PART LIST attached to the center of this manual). • The DESCRIPTION OF THE PART(S) (see...
...; The NAME OF THE PRODUCT (PROFORM® 525 treadmill). • The SERIAL NUMBER OF THE PRODUCT (see the front cover of this manual). • The KEY NUMBER OF THE PART(S) (see the EXPLODED DRAWING and PART LIST attached to the center of this manual). • The DESCRIPTION OF THE PART(S) (see...
English Manual
Page 18
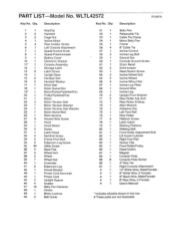
... 3 28 1 29 1 30 2 31 1 32 2 33 2 34 2 35 40 36 4 37 2 38 2 39 7 40 1 41 2 42 1 43 1 44 1 45 2 46 4 47 16 48 1 49 1 50 2 Key/Clip Handrail Cage Nut Incline Motor Rear Isolator Screw Left Console Attachment Speed Control Knob Speed Potentiometer Battery Cover Electronic Bracket Console Assembly Storage Latch... 8" Blue Wire, 2 Female User's Manual * Includes all parts shown in the box # These parts are not illustrated Qty. Qty. PART LIST Model No. WLTL42572 R1297A Key No.
... 3 28 1 29 1 30 2 31 1 32 2 33 2 34 2 35 40 36 4 37 2 38 2 39 7 40 1 41 2 42 1 43 1 44 1 45 2 46 4 47 16 48 1 49 1 50 2 Key/Clip Handrail Cage Nut Incline Motor Rear Isolator Screw Left Console Attachment Speed Control Knob Speed Potentiometer Battery Cover Electronic Bracket Console Assembly Storage Latch... 8" Blue Wire, 2 Female User's Manual * Includes all parts shown in the box # These parts are not illustrated Qty. Qty. PART LIST Model No. WLTL42572 R1297A Key No.


