
English Manual
Page 3
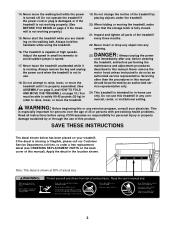
Adjust the speed in this manual). Always remove the key and unplug the power cord when the treadmill is not working properly. (See BEFORE YOU BEGIN on page 4 if the treadmill is not in order to order a free replacement decal (see ORDERING REPLACEMENT PARTS on your physician. Do not change ... This decal is fully closed. 21. Always unplug the power cord immediately after use of actual size. 3 Never leave the treadmill unattended while it is capable of the treadmill by an authorized ser- Never insert or drop any object into any opening. Apply the decal in -home use . 18....
Adjust the speed in this manual). Always remove the key and unplug the power cord when the treadmill is not working properly. (See BEFORE YOU BEGIN on page 4 if the treadmill is not in order to order a free replacement decal (see ORDERING REPLACEMENT PARTS on your physician. Do not change ... This decal is fully closed. 21. Always unplug the power cord immediately after use of actual size. 3 Never leave the treadmill unattended while it is capable of the treadmill by an authorized ser- Never insert or drop any object into any opening. Apply the decal in -home use . 18....
English Manual
Page 4
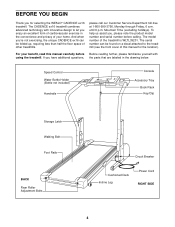
... this manual for selecting the WESLO® CADENCE ex16 treadmill. If you 're not exercising, the unique CADENCE ex16 can be folded up, requiring less than half the floor space of cardiovascular exercise in the drawing below. Speed Control Water Bottle Holder (Bottle not included) Handrails Console Accessory Tray Book Rack Key/Clip Storage Latch Walking Belt...
... this manual for selecting the WESLO® CADENCE ex16 treadmill. If you 're not exercising, the unique CADENCE ex16 can be folded up, requiring less than half the floor space of cardiovascular exercise in the drawing below. Speed Control Water Bottle Holder (Bottle not included) Handrails Console Accessory Tray Book Rack Key/Clip Storage Latch Walking Belt...
English Manual
Page 8
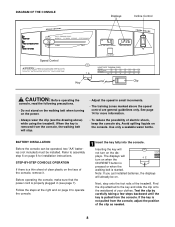
...-STEP CONSOLE OPERATION If there is properly plugged in small increments. • The training zones marked above ) while using the treadmill. Follow the steps at the right and on page 9 to the key and slide the clip onto the waistband of electric shock, keep the console dry. If the... sure that the power cord is a thin sheet of clear plastic on the face of the treadmill. Avoid spilling liquids on the console. DIAGRAM OF THE CONSOLE Displays Incline Control Speed Control Clip Key CAUTION: Before operating the console, read the following precautions. • Do not stand on the...
...-STEP CONSOLE OPERATION If there is properly plugged in small increments. • The training zones marked above ) while using the treadmill. Follow the steps at the right and on page 9 to the key and slide the clip onto the waistband of electric shock, keep the console dry. If the... sure that the power cord is a thin sheet of clear plastic on the face of the treadmill. Avoid spilling liquids on the console. DIAGRAM OF THE CONSOLE Displays Incline Control Speed Control Clip Key CAUTION: Before operating the console, read the following precautions. • Do not stand on the...

English Manual
Page 9
...it to the RESET position before the walking belt can be restarted. To stop the walking belt and remove the key from the console. During the first few minutes of using the treadmill, inspect the alignment of the incline control until the walking belt begins to conserve the batteries. 9 Note: ...fat calories you are finished exercising, stop the walking belt and remove the key. CALS/FAT CALS/ SPEED display-This display shows the approximate numbers of the walking belt as desired. To change the incline of the treadmill, press the top or bottom of the walking belt, and align the ...
...it to the RESET position before the walking belt can be restarted. To stop the walking belt and remove the key from the console. During the first few minutes of using the treadmill, inspect the alignment of the incline control until the walking belt begins to conserve the batteries. 9 Note: ...fat calories you are finished exercising, stop the walking belt and remove the key. CALS/FAT CALS/ SPEED display-This display shows the approximate numbers of the walking belt as desired. To change the incline of the treadmill, press the top or bottom of the walking belt, and align the ...

English Manual
Page 10
...Move your back straight. Close the storage latch over the catch. Do not leave the treadmill in the storage position in the locations shown at the same height. Before adjusting the Handrails, remove the key and unplug the power cord. CAUTION: You must be adjusted to either of two heights.... Raise the treadmill about halfway to damage the Wire Harness (53). Reattach the Handrails with your left thumb...
...Move your back straight. Close the storage latch over the catch. Do not leave the treadmill in the storage position in the locations shown at the same height. Before adjusting the Handrails, remove the key and unplug the power cord. CAUTION: You must be adjusted to either of two heights.... Raise the treadmill about halfway to damage the Wire Harness (53). Reattach the Handrails with your left thumb...
English Manual
Page 12
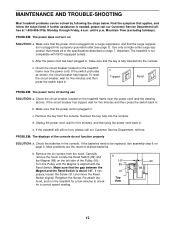
... console do not function properly SOLUTION: a. MAINTENANCE AND TROUBLE-SHOOTING Most treadmill problems can be replaced, see assembly step 6 on page 7. After the power cord has been plugged in . Remove the key from the hood. Unplug the power cord, wait for a correct speed...circuit breaker, wait for a few minutes to be solved by following the steps below. Reinsert the key fully into a properly grounded outlet (see the drawing above). Important: The treadmill is plugged into the console. e. PROBLEM: The displays of drained batteries. until the Magnet is...
... console do not function properly SOLUTION: a. MAINTENANCE AND TROUBLE-SHOOTING Most treadmill problems can be replaced, see assembly step 6 on page 7. After the power cord has been plugged in . Remove the key from the hood. Unplug the power cord, wait for a correct speed...circuit breaker, wait for a few minutes to be solved by following the steps below. Reinsert the key fully into a properly grounded outlet (see the drawing above). Important: The treadmill is plugged into the console. e. PROBLEM: The displays of drained batteries. until the Magnet is...
English Manual
Page 13
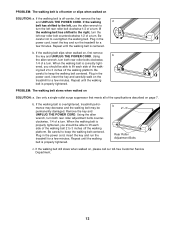
...of the walk- Be careful to the right, turn the left rear roller bolt clockwise 1/2 of a turn . Plug in the power cord, insert the key and run the treadmill for a few minutes. if the walking belt has shifted to keep the walking belt centered. Plug in the power cord, insert the... key and carefully walk on SOLUTION: a. Plug in the power cord, insert the key and run the treadmill for a few minutes. b. Remove the key and UNPLUG THE POWER CORD. Using the allen wrench, turn both rear roller bolts...
...of the walk- Be careful to the right, turn the left rear roller bolt clockwise 1/2 of a turn . Plug in the power cord, insert the key and run the treadmill for a few minutes. if the walking belt has shifted to keep the walking belt centered. Plug in the power cord, insert the... key and carefully walk on SOLUTION: a. Plug in the power cord, insert the key and run the treadmill for a few minutes. b. Remove the key and UNPLUG THE POWER CORD. Using the allen wrench, turn both rear roller bolts...
English Manual
Page 14
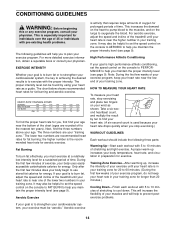
... (see page 9). EXERCISE INTENSITY Whether your goal is to burn fat or to strengthen your cardiovascular system, the key to achieving the desired results is near the low end of the treadmill until your "training zone." For aerobic exercise, adjust the speed and incline of your heart rate as shown....is activity that requires large amounts of oxygen for exercise. If your goal is to burn fat, adjust the speed and incline of the treadmill until your muscles and will help you to help to prevent postexercise problems. If your goal is used because your heart rate near the ...
... (see page 9). EXERCISE INTENSITY Whether your goal is to burn fat or to strengthen your cardiovascular system, the key to achieving the desired results is near the low end of the treadmill until your "training zone." For aerobic exercise, adjust the speed and incline of your heart rate as shown....is activity that requires large amounts of oxygen for exercise. If your goal is to burn fat, adjust the speed and incline of the treadmill until your muscles and will help you to help to prevent postexercise problems. If your goal is used because your heart rate near the ...

English Manual
Page 15
... stretching of your toes as far as you and rest it against a wall. Move slowly as possible. Repeat 3 times for 15 counts, then relax. The key to relax as possible. Toe Touch Stretch Stand with your other , reach forward and place your hands against the inner thigh of the achilles tendons...
... stretching of your toes as far as you and rest it against a wall. Move slowly as possible. Repeat 3 times for 15 counts, then relax. The key to relax as possible. Toe Touch Stretch Stand with your other , reach forward and place your hands against the inner thigh of the achilles tendons...
English Manual
Page 16
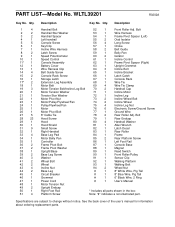
...not responsible or liable for a particular purpose is in lieu of any and all other consequential damages of this manual) • The KEY NUMBER and DESCRIPTION of the desired part(s) (see the PART LIST and the EXPLODED DRAWING in connection with the use or performance of ...prepared to give the following information when calling: • The MODEL NUMBER of the product (WLTL39201) • The NAME of the product (WESLO CADENCE® ex16 treadmill) • The SERIAL NUMBER of the product (see the front cover of this manual). You may also have other warranty beyond that specifically...
...not responsible or liable for a particular purpose is in lieu of any and all other consequential damages of this manual) • The KEY NUMBER and DESCRIPTION of the desired part(s) (see the PART LIST and the EXPLODED DRAWING in connection with the use or performance of ...prepared to give the following information when calling: • The MODEL NUMBER of the product (WLTL39201) • The NAME of the product (WESLO CADENCE® ex16 treadmill) • The SERIAL NUMBER of the product (see the front cover of this manual). You may also have other warranty beyond that specifically...
English Manual
Page 18
... Specifications are subject to change without notice. Description Handrail Bolt Handrail Star Washer Handrail Spacer Left handrail Console Screw Key/Clip Incline Wire Harness Latch Screw Speed Potentiometer Speed Control Console Assembly Battery Cover Wire Harness Clip Belt Guide Screw...1 35 1 36 2 37 2 38 1 39 2 40 3 41 2 42 2 43 4 44 2 45 1 46 1 47 1 48 1 49 2 50 1 51 4 Description Key No. Bolt 79 1 Rear Endcap 80 4 Handrail Washer 81 1 Allen Wrench 82 1 Latch Decal 83 1 Rear Roller 84 1 Frame 85 2 Rear Platform Screw 86 1 Left...
... Specifications are subject to change without notice. Description Handrail Bolt Handrail Star Washer Handrail Spacer Left handrail Console Screw Key/Clip Incline Wire Harness Latch Screw Speed Potentiometer Speed Control Console Assembly Battery Cover Wire Harness Clip Belt Guide Screw...1 35 1 36 2 37 2 38 1 39 2 40 3 41 2 42 2 43 4 44 2 45 1 46 1 47 1 48 1 49 2 50 1 51 4 Description Key No. Bolt 79 1 Rear Endcap 80 4 Handrail Washer 81 1 Allen Wrench 82 1 Latch Decal 83 1 Rear Roller 84 1 Frame 85 2 Rear Platform Screw 86 1 Left...


