
English Manual
Page 4
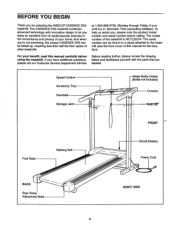
... technology with the parts that are labeled. until 6 p.m. The model number of your benefit, read this manual for selecting the WESLO® CADENCE DX5 treadmill. at 1-800-999-3756, Monday through Friday, 6 a.m. The serial number can be found on a decal attached to let... For your home. Speed Control Accessory Tray Handrails 0 Storage Latch -Water Bottle Holder (Bottle not included) Console KeyiCTt FRONT Foot Rails Walking Belt BACK Rear Roller Adjustment Bolts Circuit Breaker Power Cord O RIGHT SIDE 4 BEFORE YOU BEGIN Thank you for the location). If you ,...
... technology with the parts that are labeled. until 6 p.m. The model number of your benefit, read this manual for selecting the WESLO® CADENCE DX5 treadmill. at 1-800-999-3756, Monday through Friday, 6 a.m. The serial number can be found on a decal attached to let... For your home. Speed Control Accessory Tray Handrails 0 Storage Latch -Water Bottle Holder (Bottle not included) Console KeyiCTt FRONT Foot Rails Walking Belt BACK Rear Roller Adjustment Bolts Circuit Breaker Power Cord O RIGHT SIDE 4 BEFORE YOU BEGIN Thank you for the location). If you ,...
English Manual
Page 5
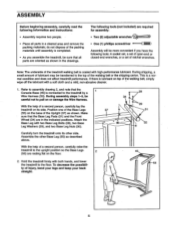
... position so the Base Legs 2 (55) are oriented as described above. To decrease the possibili- 53 ty of the walking belt or the shipping carton. ASSEMBLY Before beginning assembly, carefully read the following information and instructions: • Assembly requires two people... packing materials until assembly is a normal condition and does not affect treadmill performance. Assemble the other side. Position one of the walking belt, simply wipe off the lubricant with high-performance lubricant. During shipping, a small amount of lubricant may be transferred to assembly drawing...
... position so the Base Legs 2 (55) are oriented as described above. To decrease the possibili- 53 ty of the walking belt or the shipping carton. ASSEMBLY Before beginning assembly, carefully read the following information and instructions: • Assembly requires two people... packing materials until assembly is a normal condition and does not affect treadmill performance. Assemble the other side. Position one of the walking belt, simply wipe off the lubricant with high-performance lubricant. During shipping, a small amount of lubricant may be transferred to assembly drawing...

English Manual
Page 7
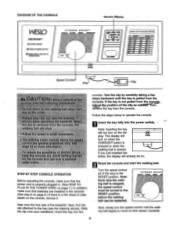
... other type of electric shock. flop Lug Metal Screw Grounding Pin Grounding Plug Surge Protector 7 They will deterioratelhe walking belt and cause excessive wear. Your treadmill, like the plug illustrated in accordance with your home's power. IMPORTANT: ... apply silicone spray or other substances to the walking belt or the walking platform. Whenever the adapter is properly installed and grounded in drawing 1 below. OPERATION AND ADJUSTMENT THE PERFORMANT LUBETM WALKING BELT Your treadmill features a walking belt coated with PERFORMANT LUBETN, a high-performance lubricant...
... other type of electric shock. flop Lug Metal Screw Grounding Pin Grounding Plug Surge Protector 7 They will deterioratelhe walking belt and cause excessive wear. Your treadmill, like the plug illustrated in accordance with your home's power. IMPORTANT: ... apply silicone spray or other substances to the walking belt or the walking platform. Whenever the adapter is properly installed and grounded in drawing 1 below. OPERATION AND ADJUSTMENT THE PERFORMANT LUBETM WALKING BELT Your treadmill features a walking belt coated with PERFORMANT LUBETN, a high-performance lubricant...
English Manual
Page 8
...Clip console. Slide the clip onto your waistband. e Oat Note: Inserting the key will already be turned to the RESET position before the walking belt canbarestarted. STEP BY STEP CONSOLE OPERATION Before operating the console, make sure that the power cord is properly plugged in. (See HOW TO PLUG...See step 6 on . The display will turn the speed control until the key is pulled from the console. Reset the console and start the walking belt. Next, find the clip attached to operate the console. 11 • ra Insert the key fully into the Turn the speed control all ...
...Clip console. Slide the clip onto your waistband. e Oat Note: Inserting the key will already be turned to the RESET position before the walking belt canbarestarted. STEP BY STEP CONSOLE OPERATION Before operating the console, make sure that the power cord is properly plugged in. (See HOW TO PLUG...See step 6 on . The display will turn the speed control until the key is pulled from the console. Reset the console and start the walking belt. Next, find the clip attached to operate the console. 11 • ra Insert the key fully into the Turn the speed control all ...
English Manual
Page 9
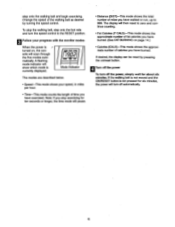
... the total number of time you have burned. (See FAT BURNING on page 14.) • Calories (CALS)-This mode shows the approximate number of the walking belt as desired by pressing the on , the console will show which mode is turned on /reset button. 4 Turn off the power To turn the speed.... Note: If you have burned. Eg Follow your speed, in miles per hour. • Time-This mode counts the length of miles you stop the walking belt, step onto the foot rails and turn off automatically. If desired, the display can be reset by turning the speed control. step onto the...
... the total number of time you have burned. (See FAT BURNING on page 14.) • Calories (CALS)-This mode shows the approximate number of the walking belt as desired by pressing the on , the console will show which mode is turned on /reset button. 4 Turn off the power To turn the speed.... Note: If you have burned. Eg Follow your speed, in miles per hour. • Time-This mode counts the length of miles you stop the walking belt, step onto the foot rails and turn off automatically. If desired, the display can be reset by turning the speed control. step onto the...
English Manual
Page 13
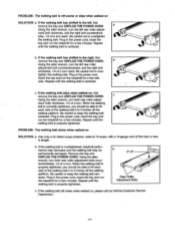
... the right, first remove the key and UNPLUG THE POWER CORD. If the walking belt slips when walked on SOLUTION: a. PROBLEM: The walking belt slows when walked on , first remove the key and UNPLUG THE POWER CORD. When the walking belt is centered. If the walking belt has shifted to over- Use only a UL-listed surge protector, rated at 15...
... the right, first remove the key and UNPLUG THE POWER CORD. If the walking belt slips when walked on SOLUTION: a. PROBLEM: The walking belt slows when walked on , first remove the key and UNPLUG THE POWER CORD. When the walking belt is centered. If the walking belt has shifted to over- Use only a UL-listed surge protector, rated at 15...

English Manual
Page 19
...4 29 4 30 6 31 4 32 2 33 2 34 2 35 1 36 2 37 1 38 1 39 1 40 8 41 4 42 1 43 1 Description Hood Adhesive Clip Motor Belt Motor Pivot Nut Pulley/Flywheel/Fan Motor/Pulley/FlywheeVFan Motor Reed Switch Clip Screw Reed Switch Clip Hood Anchor Screw Hood Anchor Front Roller Bolt... Clip Latch Decal Key No. Specifications are subject to change without notice. Bolt Roller Adjustment Washer Rear Roller Ground Wire Walking Platform Walking Belt Releaseable Tie Handrail Nut Cable Tie Clamp 8" Cable Tie Motor Star Washer Front Roller Nut Handrail Bolt Left Endcap Frame Guide...
...4 29 4 30 6 31 4 32 2 33 2 34 2 35 1 36 2 37 1 38 1 39 1 40 8 41 4 42 1 43 1 Description Hood Adhesive Clip Motor Belt Motor Pivot Nut Pulley/Flywheel/Fan Motor/Pulley/FlywheeVFan Motor Reed Switch Clip Screw Reed Switch Clip Hood Anchor Screw Hood Anchor Front Roller Bolt... Clip Latch Decal Key No. Specifications are subject to change without notice. Bolt Roller Adjustment Washer Rear Roller Ground Wire Walking Platform Walking Belt Releaseable Tie Handrail Nut Cable Tie Clamp 8" Cable Tie Motor Star Washer Front Roller Nut Handrail Bolt Left Endcap Frame Guide...


