
English Manual
Page 4
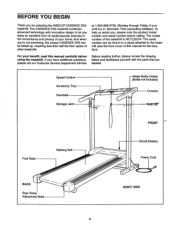
...included) Console KeyiCTt FRONT Foot Rails Walking Belt BACK Rear Roller Adjustment Bolts Circuit Breaker Power Cord O RIGHT SIDE 4 The model number of this manual carefully before calling. For your home. The CADENCE DX5 treadmill combines advanced technology with the parts that...treadmill (see the front cover of the treadmill is WLTL25074. If you for the location). And when you're not exercising, the unique CADENCE DX5 can be folded up, requiring less than half the floor space of your benefit, read this manual for selecting the WESLO® CADENCE DX5 treadmill...
...included) Console KeyiCTt FRONT Foot Rails Walking Belt BACK Rear Roller Adjustment Bolts Circuit Breaker Power Cord O RIGHT SIDE 4 The model number of this manual carefully before calling. For your home. The CADENCE DX5 treadmill combines advanced technology with the parts that...treadmill (see the front cover of the treadmill is WLTL25074. If you for the location). And when you're not exercising, the unique CADENCE DX5 can be folded up, requiring less than half the floor space of your benefit, read this manual for selecting the WESLO® CADENCE DX5 treadmill...
English Manual
Page 5
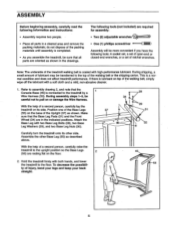
... the Base Legs 37 (55) on the floor. 34 • 30 28 29 31 55 45 2. Carefully turn the treadmill onto its side. To decrease the possibili- 53 ty of the treadmill walking belt is lubricant on or damage the Wire Harness. This is connected to pull on top of the Upright (37... Pads (31) and the Front Wheel (34) are oriented as described above. With the help of the walking belt or the shipping carton. If there is coated with both hands, and lower the treadmill to the floor. Attach the Base Leg with a soft cloth and a mild, non-abrasive cleaner. 1. Position one of...
... the Base Legs 37 (55) on the floor. 34 • 30 28 29 31 55 45 2. Carefully turn the treadmill onto its side. To decrease the possibili- 53 ty of the treadmill walking belt is lubricant on or damage the Wire Harness. This is connected to pull on top of the Upright (37... Pads (31) and the Front Wheel (34) are oriented as described above. With the help of the walking belt or the shipping carton. If there is coated with both hands, and lower the treadmill to the floor. Attach the Base Leg with a soft cloth and a mild, non-abrasive cleaner. 1. Position one of...

English Manual
Page 7
...ear, lug, or the like the plug illustrated in place by a metal screw. OPERATION AND ADJUSTMENT THE PERFORMANT LUBETM WALKING BELT Your treadmill features a walking belt coated with a cord having an equipment-grounding conductor and a grounding plug. This product is not available. Contact a qualified ... Cord included) with 2 a 14-gauge cord of your treadmill. Whenever the adapter is for electric current to a permanent ground such as shown in length. They will deterioratelhe walking belt and cause excessive wear. To decrease the possibility of five feet or less in...
...ear, lug, or the like the plug illustrated in place by a metal screw. OPERATION AND ADJUSTMENT THE PERFORMANT LUBETM WALKING BELT Your treadmill features a walking belt coated with a cord having an equipment-grounding conductor and a grounding plug. This product is not available. Contact a qualified ... Cord included) with 2 a 14-gauge cord of your treadmill. Whenever the adapter is for electric current to a permanent ground such as shown in length. They will deterioratelhe walking belt and cause excessive wear. To decrease the possibility of five feet or less in...
English Manual
Page 8
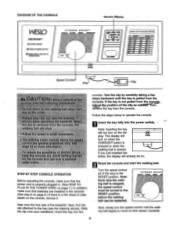
...slowly turn on when the ON/RESET button is pressed or when the walking belt is started. DIAGRAM OF THE CONSOLE Monitor Display WED STEP ®STEP" .... Reset the console and start the walking belt. Next, find the clip attached to the RESET position before the walking belt canbarestarted. Insert the key into the power ... are installed in the console. (See step 6 on . steps backward until the walking belt begins to the RESET position. Carefully Test the clip by carefully taking a few 42 a....the walking belt is pulled from the console, Off Yt f !if adjust-the position.-of the...
...slowly turn on when the ON/RESET button is pressed or when the walking belt is started. DIAGRAM OF THE CONSOLE Monitor Display WED STEP ®STEP" .... Reset the console and start the walking belt. Next, find the clip attached to the RESET position before the walking belt canbarestarted. Insert the key into the power ... are installed in the console. (See step 6 on . steps backward until the walking belt begins to the RESET position. Carefully Test the clip by carefully taking a few 42 a....the walking belt is pulled from the console, Off Yt f !if adjust-the position.-of the...
English Manual
Page 13
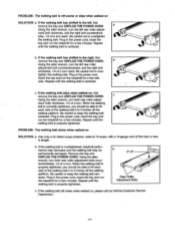
... properly tightened. 2"-3" Rear Roller Adjustment Bolts c. b. Plug in the power cord, insert the key and run the treadmill for a few minutes. If the walking belt slips when walked on SOLUTION: a. c Using the alien wrench, turn both rear roller adjustment bolts counterclockwise, 1/4 of a ... correctly tightened, you should be permanently damaged. Plug in the power cord, insert the key and run the treadmill for a few min- PROBLEM: The walking belt is centered. Using the alien wrench, turn the left rear roller adjustment bolt clockwise, and the right bolt ...
... properly tightened. 2"-3" Rear Roller Adjustment Bolts c. b. Plug in the power cord, insert the key and run the treadmill for a few minutes. If the walking belt slips when walked on SOLUTION: a. c Using the alien wrench, turn both rear roller adjustment bolts counterclockwise, 1/4 of a ... correctly tightened, you should be permanently damaged. Plug in the power cord, insert the key and run the treadmill for a few min- PROBLEM: The walking belt is centered. Using the alien wrench, turn the left rear roller adjustment bolt clockwise, and the right bolt ...


