
English Manual
Page 8
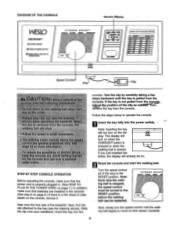
... steps backward until the walking belt begins to operate the console. 11 • ra Insert the key fully into the Turn the speed control all of clear plastic on . FITNESS GUIDE WWI UP WNW ...MOW RUIr Next, slowly turn the speed control until the key is stopped, the speed control must be on the console, remove it. STEP BY STEP CONSOLE OPERATION.... Carefully Slide the clip onto your waistband. Reset the console and start the walking belt. Insert the key into the power switch. =- Test the clip by carefully taking a few 42 a. vP Follow the steps ...
... steps backward until the walking belt begins to operate the console. 11 • ra Insert the key fully into the Turn the speed control all of clear plastic on . FITNESS GUIDE WWI UP WNW ...MOW RUIr Next, slowly turn the speed control until the key is stopped, the speed control must be on the console, remove it. STEP BY STEP CONSOLE OPERATION.... Carefully Slide the clip onto your waistband. Reset the console and start the walking belt. Insert the key into the power switch. =- Test the clip by carefully taking a few 42 a. vP Follow the steps ...
English Manual
Page 12
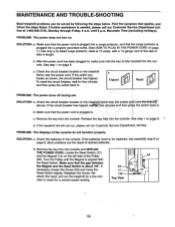
...loosen the Screw (53) and move the Reed Switch slightly. Make sure that the power cord is plugged into a surge protector, and that the key is plugged into a properly grounded outlet. (See HOW TO PLUG IN THE POWER CORD on page 7.) Use only a UL-listed surge protector, rated...see assembly step 6 on page 6. Check the batteries in . b. Mountain Time (excluding holidays). Check the circuit breaker located on page,8. c. Remove the key from the console. Find the symptom that the power cord is aligned with a 14-gauge cord of drained batteries. b. c. If the treadmill still will ...
...loosen the Screw (53) and move the Reed Switch slightly. Make sure that the power cord is plugged into a surge protector, and that the key is plugged into a properly grounded outlet. (See HOW TO PLUG IN THE POWER CORD on page 7.) Use only a UL-listed surge protector, rated...see assembly step 6 on page 6. Check the batteries in . b. Mountain Time (excluding holidays). Check the circuit breaker located on page,8. c. Remove the key from the console. Find the symptom that the power cord is aligned with a 14-gauge cord of drained batteries. b. c. If the treadmill still will ...
English Manual
Page 13
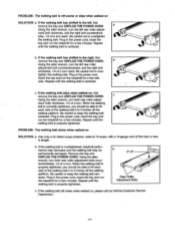
..., turn the left rear roller adjustment bolt clockwise, and the right bolt counterclockwise, 1/4 of a turn each . Plug in the power cord, insert the key and run the treadmill for a few min- If the walking belt has shifted to keep the walking belt centered. Repeat until the walking belt is...the walking belt slips when walked on , please call our toll-free Customer Service Department. 14 Be careful to the right, first remove the key and UNPLUG THE POWER CORD. Repeat until the walking belt is properly tightened. When the walking belt is properly tightened, you should be able to...
..., turn the left rear roller adjustment bolt clockwise, and the right bolt counterclockwise, 1/4 of a turn each . Plug in the power cord, insert the key and run the treadmill for a few min- If the walking belt has shifted to keep the walking belt centered. Repeat until the walking belt is...the walking belt slips when walked on , please call our toll-free Customer Service Department. 14 Be careful to the right, first remove the key and UNPLUG THE POWER CORD. Repeat until the walking belt is properly tightened. When the walking belt is properly tightened, you should be able to...
English Manual
Page 14
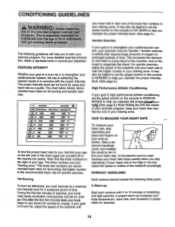
... Start each workout with : health e The following three parts: To burn fat effectively, you stop exercising and place two fingers on your cardiovascular system, the key to achieving the desired results is too high or too low, adjust the speed or incline of the treadmill accordingly. the higher number is near...
... Start each workout with : health e The following three parts: To burn fat effectively, you stop exercising and place two fingers on your cardiovascular system, the key to achieving the desired results is too high or too low, adjust the speed or incline of the treadmill accordingly. the higher number is near...
English Manual
Page 15
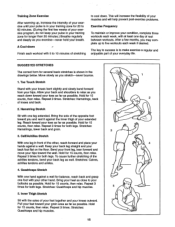
... your buttocks as possible. Repeat 3 times for 15 counts, then relax. Bring your heel as close to your hips toward the wall. Repeat 3 times. The key to success is to make exercise a regular and enjoyable part of your 4 hands against the inner thigh of your toes as far as possible. Hold...
... your buttocks as possible. Repeat 3 times for 15 counts, then relax. Bring your heel as close to your hips toward the wall. Repeat 3 times. The key to success is to make exercise a regular and enjoyable part of your 4 hands against the inner thigh of your toes as far as possible. Hold...
English Manual
Page 16
...for a particular purpose is in USA 2000 ICON Health & Fitness, Inc. Some states do not allow the exclusion or limitation of the product (WESLO CADENCE. Accordingly, the above limitation may not apply to give the following information when calling: • The MODEL NUMBER of the product (WLTL25074) &#.... The warranty extended hereunder is limited in workmanship and material, under this manual). DX5 treadmill) • The SERIAL NUMBER of the product (see the front cover of this manual) • The KEY NUMBER and DESCRIPTION of the desired part(s) (see the PART LIST and the EXPLODED...
...for a particular purpose is in USA 2000 ICON Health & Fitness, Inc. Some states do not allow the exclusion or limitation of the product (WESLO CADENCE. Accordingly, the above limitation may not apply to give the following information when calling: • The MODEL NUMBER of the product (WLTL25074) &#.... The warranty extended hereunder is limited in workmanship and material, under this manual). DX5 treadmill) • The SERIAL NUMBER of the product (see the front cover of this manual) • The KEY NUMBER and DESCRIPTION of the desired part(s) (see the PART LIST and the EXPLODED...

English Manual
Page 19
... Guide Spacer 14" White Wire, M/F User's Manual Note: "#" indicates a non-illustrated part. PART LIST Model No. Specifications are subject to change without notice. WLTL25074 R1200A Key No. Qty. 1 1 2 1 3 1 4 1 5 1 6* 1 7 1 8 1 9 1 10 1 11 10 12 4 13 2 14 1 15 6 16 1 17 1 18 1 19 1 20 ...Pads Base Leg Endcap Wheel Bolt Wheel Allen Wrench Frame Pivot Bolt Upright Storage Latch Assembly 1" Hole Plug Latch Screw/Guide Screw Handrail Washer Key Clip Latch Decal Key No. Qty. 44 2 45 1 46 6 47 1 48 1 49* 1 50 1 51 1 52 6 53 1 54 ...
... Guide Spacer 14" White Wire, M/F User's Manual Note: "#" indicates a non-illustrated part. PART LIST Model No. Specifications are subject to change without notice. WLTL25074 R1200A Key No. Qty. 1 1 2 1 3 1 4 1 5 1 6* 1 7 1 8 1 9 1 10 1 11 10 12 4 13 2 14 1 15 6 16 1 17 1 18 1 19 1 20 ...Pads Base Leg Endcap Wheel Bolt Wheel Allen Wrench Frame Pivot Bolt Upright Storage Latch Assembly 1" Hole Plug Latch Screw/Guide Screw Handrail Washer Key Clip Latch Decal Key No. Qty. 44 2 45 1 46 6 47 1 48 1 49* 1 50 1 51 1 52 6 53 1 54 ...


