
English Manual
Page 4
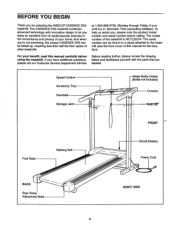
... be folded up, requiring less than half the floor space of your benefit, read this manual for selecting the WESLO® CADENCE DX5 treadmill. until 6 p.m. The serial number can be found on a decal attached to let you , please note the product model number and serial number...manual carefully before calling. Speed Control Accessory Tray Handrails 0 Storage Latch -Water Bottle Holder (Bottle not included) Console KeyiCTt FRONT Foot Rails Walking Belt BACK Rear Roller Adjustment Bolts Circuit Breaker Power Cord O RIGHT SIDE 4 BEFORE YOU BEGIN Thank you for the location).
... be folded up, requiring less than half the floor space of your benefit, read this manual for selecting the WESLO® CADENCE DX5 treadmill. until 6 p.m. The serial number can be found on a decal attached to let you , please note the product model number and serial number...manual carefully before calling. Speed Control Accessory Tray Handrails 0 Storage Latch -Water Bottle Holder (Bottle not included) Console KeyiCTt FRONT Foot Rails Walking Belt BACK Rear Roller Adjustment Bolts Circuit Breaker Power Cord O RIGHT SIDE 4 BEFORE YOU BEGIN Thank you for the location).
English Manual
Page 5
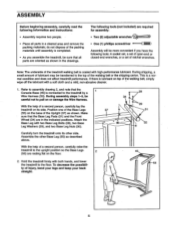
... screwdriver ate-=) Assembly will be careful not to the treadmill by a Wire Harness (53). To decrease the possibili- 53 ty of the walking belt or the shipping carton. ASSEMBLY Before beginning assembly, carefully read the following tools: A socket set, a set of open-end or closed-end ..., carefully lay the treadmill on top of a second person, carefully raise the treadmill to the floor. do not dispose of the treadmill walking belt is completed. • As you have the following information and instructions: • Assembly requires two people. • Place all parts are...
... screwdriver ate-=) Assembly will be careful not to the treadmill by a Wire Harness (53). To decrease the possibili- 53 ty of the walking belt or the shipping carton. ASSEMBLY Before beginning assembly, carefully read the following tools: A socket set, a set of open-end or closed-end ..., carefully lay the treadmill on top of a second person, carefully raise the treadmill to the floor. do not dispose of the treadmill walking belt is completed. • As you have the following information and instructions: • Assembly requires two people. • Place all parts are...

English Manual
Page 7
.... listed surge protector, rated at most hardware stores and department stores. OPERATION AND ADJUSTMENT THE PERFORMANT LUBETM WALKING BELT Your treadmill features a walking belt coated with your home's power. This product is properly installed and grounded in your treadmill. Some 2-pole receptacle... This product must be installed r. flop Lug Metal Screw Grounding Pin Grounding Plug Surge Protector 7 They will deterioratelhe walking belt and cause excessive wear. The temporary adapter should be grounded. Whenever the adapter is not available. HOW TO PLUG IN...
.... listed surge protector, rated at most hardware stores and department stores. OPERATION AND ADJUSTMENT THE PERFORMANT LUBETM WALKING BELT Your treadmill features a walking belt coated with your home's power. This product is properly installed and grounded in your treadmill. Some 2-pole receptacle... This product must be installed r. flop Lug Metal Screw Grounding Pin Grounding Plug Surge Protector 7 They will deterioratelhe walking belt and cause excessive wear. The temporary adapter should be grounded. Whenever the adapter is not available. HOW TO PLUG IN...
English Manual
Page 8
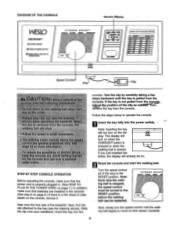
... console, remove it. If you just installed batteries, the display will not turn on when the ON/RESET button is pressed or when the walking belt is pulled from the console, Off Yt f !if adjust-the position.-of clear plastic on page 6.) If there is a thin sheet of the clip as... on the display. The display will turn on . Step onto the foot rails of the way to the RESET position. Note: Each time the walking belt is not pulled from the console. e Oat Note: Inserting the key will already be turned to move at slow speed. Reset the console and start...
... console, remove it. If you just installed batteries, the display will not turn on when the ON/RESET button is pressed or when the walking belt is pulled from the console, Off Yt f !if adjust-the position.-of clear plastic on page 6.) If there is a thin sheet of the clip as... on the display. The display will turn on . Step onto the foot rails of the way to the RESET position. Note: Each time the walking belt is not pulled from the console. e Oat Note: Inserting the key will already be turned to move at slow speed. Reset the console and start...
English Manual
Page 9
... will turn the speed control to 999. Eg Follow your speed, in miles per hour. • Time-This mode counts the length of the walking belt as desired by pressing the on page 14.) • Calories (CALS)-This mode shows the approximate number of miles you have exercised. The modes are... not moved and the ON/RESET button is not pressed for about six minutes. step onto the walking belt and begin exercising. Note: If you stop the walking belt, step onto the foot rails and turn off the power, simply wait for six minutes, the power will scan through the five modes...
... will turn the speed control to 999. Eg Follow your speed, in miles per hour. • Time-This mode counts the length of the walking belt as desired by pressing the on page 14.) • Calories (CALS)-This mode shows the approximate number of miles you have exercised. The modes are... not moved and the ON/RESET button is not pressed for about six minutes. step onto the walking belt and begin exercising. Note: If you stop the walking belt, step onto the foot rails and turn off the power, simply wait for six minutes, the power will scan through the five modes...
English Manual
Page 13
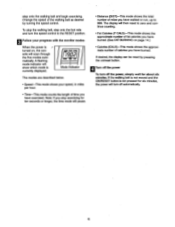
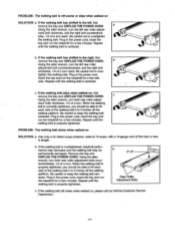
...call our toll-free Customer Service Department. 14 Using the alien wrench, turn each . Be careful not to keep the walking belt centered. If the walking belt has shifted to over- Be careful not to the right, first remove the key and UNPLUG THE POWER CORD. Repeat until ...the walking belt is correctly tightened, you should be able to keep the walking belt centered. When the walking belt is properly tightened. 2"-3" Rear Roller Adjustment Bolts c. Plug in the power cord, insert the...
...call our toll-free Customer Service Department. 14 Using the alien wrench, turn each . Be careful not to keep the walking belt centered. If the walking belt has shifted to over- Be careful not to the right, first remove the key and UNPLUG THE POWER CORD. Repeat until ...the walking belt is correctly tightened, you should be able to keep the walking belt centered. When the walking belt is properly tightened. 2"-3" Rear Roller Adjustment Bolts c. Plug in the power cord, insert the...

English Manual
Page 19
...28 4 29 4 30 6 31 4 32 2 33 2 34 2 35 1 36 2 37 1 38 1 39 1 40 8 41 4 42 1 43 1 Description Hood Adhesive Clip Motor Belt Motor Pivot Nut Pulley/Flywheel/Fan Motor/Pulley/FlywheeVFan Motor Reed Switch Clip Screw Reed Switch Clip Hood Anchor Screw Hood Anchor Front Roller Bolt...cover of the user's manual for information about ordering replacement parts. Bolt Roller Adjustment Washer Rear Roller Ground Wire Walking Platform Walking Belt Releaseable Tie Handrail Nut Cable Tie Clamp 8" Cable Tie Motor Star Washer Front Roller Nut Handrail Bolt Left Endcap Frame Guide ...
...28 4 29 4 30 6 31 4 32 2 33 2 34 2 35 1 36 2 37 1 38 1 39 1 40 8 41 4 42 1 43 1 Description Hood Adhesive Clip Motor Belt Motor Pivot Nut Pulley/Flywheel/Fan Motor/Pulley/FlywheeVFan Motor Reed Switch Clip Screw Reed Switch Clip Hood Anchor Screw Hood Anchor Front Roller Bolt...cover of the user's manual for information about ordering replacement parts. Bolt Roller Adjustment Washer Rear Roller Ground Wire Walking Platform Walking Belt Releaseable Tie Handrail Nut Cable Tie Clamp 8" Cable Tie Motor Star Washer Front Roller Nut Handrail Bolt Left Endcap Frame Guide ...


