
English Manual
Page 5
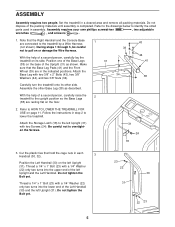
... yet. With the help of the Upright (31) as described. Set the treadmill in step 2 to the treadmill by a Wire Harness (not shown). With the help of a second person, carefully lay the treadmill on the base of a second person, carefully raise the 2 treadmill to the upright position so the Base Legs (38) are connected to...
... yet. With the help of the Upright (31) as described. Set the treadmill in step 2 to the treadmill by a Wire Harness (not shown). With the help of a second person, carefully lay the treadmill on the base of a second person, carefully raise the 2 treadmill to the upright position so the Base Legs (38) are connected to...
English Manual
Page 6
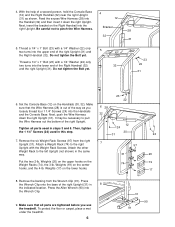
... hooks, and the 4-lb. Be careful not to the left Upright (not shown) in this step. 7. Next, push the Wire Harness down the right Upright. Tighten all parts are tightened before you...Console Base (12) and the Right Handrail (32) near the right Upright (31) as you use the treadmill. Press the Allen Wrench (90) into the Handrail (32) and then insert it down the right Upright... 31 6. Weights (19) on the Right Handrail into the lower end of the right Upright (31) in steps 3 and 5. Do not tighten the Bolt yet. Attach the other Weight Rack to pinch the Wire Harness. ...
... hooks, and the 4-lb. Be careful not to the left Upright (not shown) in this step. 7. Next, push the Wire Harness down the right Upright. Tighten all parts are tightened before you...Console Base (12) and the Right Handrail (32) near the right Upright (31) as you use the treadmill. Press the Allen Wrench (90) into the Handrail (32) and then insert it down the right Upright... 31 6. Weights (19) on the Right Handrail into the lower end of the right Upright (31) in steps 3 and 5. Do not tighten the Bolt yet. Attach the other Weight Rack to pinch the Wire Harness. ...
English Manual
Page 8
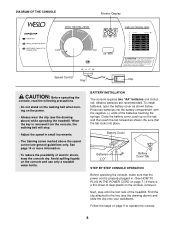
... (not included). Press two batteries into place. Find the clip attached to operate the console. 8 Battery Cover Batteries Battery Cover Tab STEP BY STEP CONSOLE OPERATION Before operating the console, make sure that the tab locks into the battery compartment, with the negative (-) ends of clear ...the drawing above ) while operating the treadmill. Close the battery cover, push up on page 9 to the key (see the drawing above ) and slide the clip onto your waistband. To install batteries, open the battery cover as shown. Next, step onto the foot rails of electric shock...
... (not included). Press two batteries into place. Find the clip attached to operate the console. 8 Battery Cover Batteries Battery Cover Tab STEP BY STEP CONSOLE OPERATION Before operating the console, make sure that the tab locks into the battery compartment, with the negative (-) ends of clear ...the drawing above ) while operating the treadmill. Close the battery cover, push up on page 9 to the key (see the drawing above ) and slide the clip onto your waistband. To install batteries, open the battery cover as shown. Next, step onto the foot rails of electric shock...
English Manual
Page 9
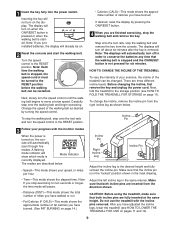
...the walking belt and begin exercising. To stop exercising for six minutes. Step onto the foot rails, stop the walking belt and remove the key. A flashing mode indicator will turn on , the con- Do not use the treadmill with the monitor modes When the power is started. Note: Each ... Pin Adjust the incline leg to the RESET position. Make sure that both incline pins are three different incline levels. CAUTION: Before using the treadmill, make sure that the incline pin is in the "locked" position shown in miles per hour. After you have adjusted the incline legs,...
...the walking belt and begin exercising. To stop exercising for six minutes. Step onto the foot rails, stop the walking belt and remove the key. A flashing mode indicator will turn on , the con- Do not use the treadmill with the monitor modes When the power is started. Note: Each ... Pin Adjust the incline leg to the RESET position. Make sure that both incline pins are three different incline levels. CAUTION: Before using the treadmill, make sure that the incline pin is in the "locked" position shown in miles per hour. After you have adjusted the incline legs,...
English Manual
Page 12
... to be solved by following the steps below. Turn the Pulley until 6 p.m. If necessary, loosen the Screw (42) and move the Reed Switch slightly. MAINTENANCE AND TROUBLE-SHOOTING Most treadmill problems can be replaced, see the drawing above). Important: The treadmill is about 1/8". Make sure that...of the Pulley (68). b. If the switch protrudes as shown, the circuit breaker has tripped. Check the circuit breaker located on the treadmill frame near the power cord. Remove the key from the console. Carefully remove the hood. Locate the Reed Switch (63) and the...
... to be solved by following the steps below. Turn the Pulley until 6 p.m. If necessary, loosen the Screw (42) and move the Reed Switch slightly. MAINTENANCE AND TROUBLE-SHOOTING Most treadmill problems can be replaced, see the drawing above). Important: The treadmill is about 1/8". Make sure that...of the Pulley (68). b. If the switch protrudes as shown, the circuit breaker has tripped. Check the circuit breaker located on the treadmill frame near the power cord. Remove the key from the console. Carefully remove the hood. Locate the Reed Switch (63) and the...


