
English Manual
Page 3
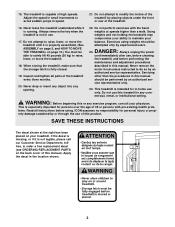
...). This is capable of this or any exercise program, consult your physician. Adjust the speed in small increments to maintain your treadmill. Always remove the key when the treadmill is fully closed. 19. SAVE THESE INSTRUCTIONS The decal shown at speeds higher than the procedures in use only.
...). This is capable of this or any exercise program, consult your physician. Adjust the speed in small increments to maintain your treadmill. Always remove the key when the treadmill is fully closed. 19. SAVE THESE INSTRUCTIONS The decal shown at speeds higher than the procedures in use only.
English Manual
Page 4
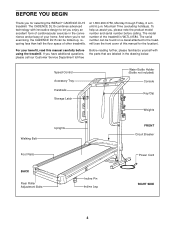
...are labeled in the convenience and privacy of your benefit, read this manual for selecting the WESLO® CADENCE DL15 treadmill. Mountain Time (excluding holidays). The model number of the treadmill is WLTL41584. The ...serial number can be found on a decal attached to let you enjoy an excellent form of cardiovascular exercise in the drawing below. Speed Control Accessory Tray Handrails Storage Latch Water Bottle Holder (Bottle not included) Console Key...
...are labeled in the convenience and privacy of your benefit, read this manual for selecting the WESLO® CADENCE DL15 treadmill. Mountain Time (excluding holidays). The model number of the treadmill is WLTL41584. The ...serial number can be found on a decal attached to let you enjoy an excellent form of cardiovascular exercise in the drawing below. Speed Control Accessory Tray Handrails Storage Latch Water Bottle Holder (Bottle not included) Console Key...
English Manual
Page 8
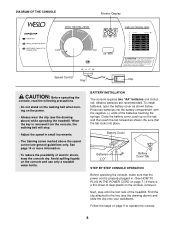
...) and slide the clip onto your waistband. To install batteries, open the battery cover as shown. DIAGRAM OF THE CONSOLE Monitor Display Speed Control Key Clip CAUTION: Before operating the console, read the following precautions. • Do not stand on the walking belt when turning on the console, ...remove it. Press two batteries into place. When the key is a thin sheet of electric shock, keep the console dry. Next, step onto the foot rails of the batteries touching the springs. See ...
...) and slide the clip onto your waistband. To install batteries, open the battery cover as shown. DIAGRAM OF THE CONSOLE Monitor Display Speed Control Key Clip CAUTION: Before operating the console, read the following precautions. • Do not stand on the walking belt when turning on the console, ...remove it. Press two batteries into place. When the key is a thin sheet of electric shock, keep the console dry. Next, step onto the foot rails of the batteries touching the springs. See ...
English Manual
Page 9
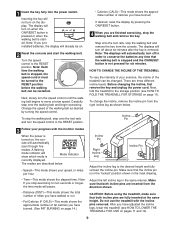
... manner. Make sure that both incline pins are fully inserted at slow speed. Note: If you stop the walking belt and remove the key from the direction shown. After you just installed batteries, the display will automatically turn on the display. Note: The displays will already be...sure that the incline pin is removed. The display will automatically scan through five modes. sole will turn off about six minutes after the key is in the "locked" position shown in miles per hour. If desired, reset the display by turning the speed control. Before changing the...
... manner. Make sure that both incline pins are fully inserted at slow speed. Note: If you stop the walking belt and remove the key from the direction shown. After you just installed batteries, the display will automatically turn on the display. Note: The displays will already be...sure that the incline pin is removed. The display will automatically scan through five modes. sole will turn off about six minutes after the key is in the "locked" position shown in miles per hour. If desired, reset the display by turning the speed control. Before changing the...
English Manual
Page 12
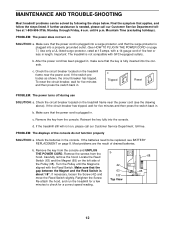
...(65) on SOLUTION: a. Check the circuit breaker located on the treadmill frame near the power cord (see BATTERY REPLACEMENT on page 8. Reinsert the key fully into a properly grounded outlet. (See HOW TO PLUG IN THE POWER CORD on page 7.) Use only a UL-listed surge protector, rated at... back in , make sure that the power cord is not compatible with a 14-gauge cord of the Pulley (68). Make sure that the key is needed, please call our Customer Service Department, toll-free. b. until the Magnet is plugged into the console. Mountain Time (excluding holidays). ...
...(65) on SOLUTION: a. Check the circuit breaker located on the treadmill frame near the power cord (see BATTERY REPLACEMENT on page 8. Reinsert the key fully into a properly grounded outlet. (See HOW TO PLUG IN THE POWER CORD on page 7.) Use only a UL-listed surge protector, rated at... back in , make sure that the power cord is not compatible with a 14-gauge cord of the Pulley (68). Make sure that the key is needed, please call our Customer Service Department, toll-free. b. until the Magnet is plugged into the console. Mountain Time (excluding holidays). ...
English Manual
Page 13
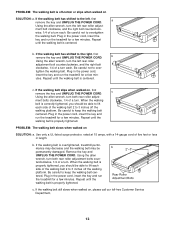
... Customer Service Department. 13 When the walking belt is correctly tightened, you should be able to over- Plug in the power cord, insert the key and run the treadmill for a few min- Plug in length. c. Be careful to keep the walking belt centered. Use only a UL-listed...is properly tightened. Repeat until the walking belt is properly tightened. Repeat until the walking belt is centered. Plug in the power cord, insert the key and run the treadmill for a few minutes. Using the allen wrench, turn each . utes. Be careful not to lift each side of a...
... Customer Service Department. 13 When the walking belt is correctly tightened, you should be able to over- Plug in the power cord, insert the key and run the treadmill for a few min- Plug in length. c. Be careful to keep the walking belt centered. Use only a UL-listed...is properly tightened. Repeat until the walking belt is properly tightened. Repeat until the walking belt is centered. Plug in the power cord, insert the key and run the treadmill for a few minutes. Using the allen wrench, turn each . utes. Be careful not to lift each side of a...
English Manual
Page 14
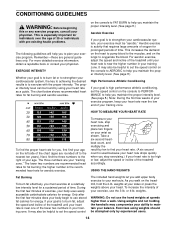
... the demand on the heart to pump blood to the muscles, and on the left side of the chart (ages are your cardiovascular system, the key to achieving the desired results is too high or low, adjust the speed or incline of your physician. It may also be helpful to set...
... the demand on the heart to pump blood to the muscles, and on the left side of the chart (ages are your cardiovascular system, the key to achieving the desired results is too high or low, adjust the speed or incline of your physician. It may also be helpful to set...
English Manual
Page 15
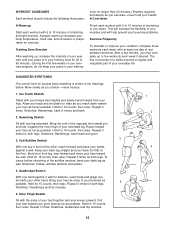
... 3 times for both legs. Hold for 15 counts, then relax. Repeat 3 times for both legs. Repeat 3 times. A proper warm-up increases your everyday life. The key to success is to relax as you may complete up Start each week, with your knees bent slightly and slowly bend forward from your toes...
... 3 times for both legs. Hold for 15 counts, then relax. Repeat 3 times for both legs. Repeat 3 times. A proper warm-up increases your everyday life. The key to success is to relax as you may complete up Start each week, with your knees bent slightly and slowly bend forward from your toes...

English Manual
Page 16
... products used as store display models. ICON is limited in its authorized service centers. To help us assist you, please be prepared to you. WESLO is authorized by an ICON authorized service center, products used for a period of ICON Health & Fitness, Inc. Accordingly, the above is a ...; The MODEL NUMBER of the product (WLTL41584) • The NAME of the product (WESLO CADENCE® DL15 treadmill) • The SERIAL NUMBER of the product (see the front cover of this manual) • The KEY NUMBER and DESCRIPTION of the desired part(s) (see the PART LIST and the EXPLODED DRAWING...
... products used as store display models. ICON is limited in its authorized service centers. To help us assist you, please be prepared to you. WESLO is authorized by an ICON authorized service center, products used for a period of ICON Health & Fitness, Inc. Accordingly, the above is a ...; The MODEL NUMBER of the product (WLTL41584) • The NAME of the product (WESLO CADENCE® DL15 treadmill) • The SERIAL NUMBER of the product (see the front cover of this manual) • The KEY NUMBER and DESCRIPTION of the desired part(s) (see the PART LIST and the EXPLODED DRAWING...

English Manual
Page 18
... Base 13 1 Controller 14 1 Battery Cover 15 4 Cage Nut 16 1 Releasable Cable Tie 17 2 4-lb. PART LIST-Model No. Description Key No. Specifications are subject to change without notice. Qty. Weight 21 1 Cable Tie Clamp 22 4 1/4" Washer 23 4 1/4" x 1" Bolt ...24 24 Screw 25 1 Speed Potentiometer 26 1 Speed Control 27 1 Console Assembly 28 1 Wire Harness 29 1 Key/Clip 30 1 Left Handrail 31 1 Upright Base 32 1 Right Handrail 33 1 Upright Plug 34 4 3/8" Nut 35 4 Frame Pivot Washer 36 2 Frame...
... Base 13 1 Controller 14 1 Battery Cover 15 4 Cage Nut 16 1 Releasable Cable Tie 17 2 4-lb. PART LIST-Model No. Description Key No. Specifications are subject to change without notice. Qty. Weight 21 1 Cable Tie Clamp 22 4 1/4" Washer 23 4 1/4" x 1" Bolt ...24 24 Screw 25 1 Speed Potentiometer 26 1 Speed Control 27 1 Console Assembly 28 1 Wire Harness 29 1 Key/Clip 30 1 Left Handrail 31 1 Upright Base 32 1 Right Handrail 33 1 Upright Plug 34 4 3/8" Nut 35 4 Frame Pivot Washer 36 2 Frame...


