
English Manual
Page 3
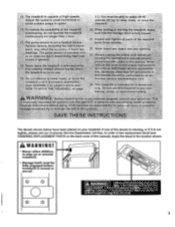
... properly assemble See ASSEMBLY.on pages 5 and 6, and HOW TO MOVE THE TREADMILL on the back cover of the decals is missing, or if it is capable of thisF'voductmaycause serious • Don'tstand walking belt when scarfing headmill. • Read Usees,yianualancP low warnings and pertiting instructions; • To_pieirent electrical s and...
... properly assemble See ASSEMBLY.on pages 5 and 6, and HOW TO MOVE THE TREADMILL on the back cover of the decals is missing, or if it is capable of thisF'voductmaycause serious • Don'tstand walking belt when scarfing headmill. • Read Usees,yianualancP low warnings and pertiting instructions; • To_pieirent electrical s and...
English Manual
Page 4
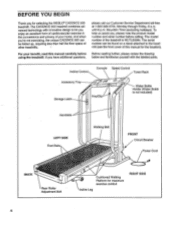
... excellent form of cardiovascular exercise in the convenience and privacy of the treadmill is not included) Handrails LEFT SIDE Foot Rails Walking Belt FRONT Circuit Breaker Power Cord BACK Rear Roller Adjustment Bolt 4 Cushioned Walking Platform for selecting the WESLO® CADENCE 930 treadmill. Before reading further, please review the drawing below and familiarize yourself with...
... excellent form of cardiovascular exercise in the convenience and privacy of the treadmill is not included) Handrails LEFT SIDE Foot Rails Walking Belt FRONT Circuit Breaker Power Cord BACK Rear Roller Adjustment Bolt 4 Cushioned Walking Platform for selecting the WESLO® CADENCE 930 treadmill. Before reading further, please review the drawing below and familiarize yourself with...
English Manual
Page 7
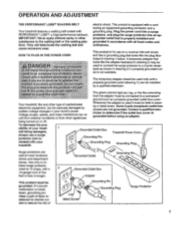
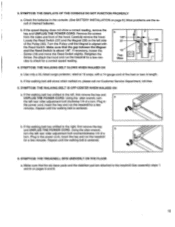
... installed and substances to determine if the outlet box cover is equipped with a cord having an equipment-grounding conductor and a Your treadmill features a walking belt coated with a 2 14-gauge cord of your home's power. Some 2-pole receptacle outlet box covers are in length. sibility ... •iiCij§popper.h(or...0000#0!..Donctmlc:. They will deteriorate the walking belt and ordinances. a Uailf1*4;0100 no The green-colored rigid ear, lug, or the like the adapter illustrated in your treadmill being turned on a nominal 120-volt circuit, HOW TO PLUG IN THE...
... installed and substances to determine if the outlet box cover is equipped with a cord having an equipment-grounding conductor and a Your treadmill features a walking belt coated with a 2 14-gauge cord of your home's power. Some 2-pole receptacle outlet box covers are in length. sibility ... •iiCij§popper.h(or...0000#0!..Donctmlc:. They will deteriorate the walking belt and ordinances. a Uailf1*4;0100 no The green-colored rigid ear, lug, or the like the adapter illustrated in your treadmill being turned on a nominal 120-volt circuit, HOW TO PLUG IN THE...
English Manual
Page 8
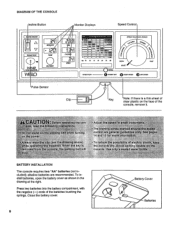
...ends of the console, remove it. alkaline batteries are ,:general u el nes 1o'r1b6 See a - 14 and 15 for,tnae.fP gr To , reduce t.he 'treadmill When the key is a thin sheet of clear plastic on the face of the batteries touching the springs. To install batteries, open the battery cover...as shown in the drawing at the right. Close the battery cover. 8 Battery Cover Batteries MTN Ile,rea star !ore9 yp e:co owing POcau ng belt w trclurnmg Always wear thi li see drawing POPY.P while operating' he poss ibility Ott et sht the.conSOW r 11: console.. Use.only hseal04......
...ends of the console, remove it. alkaline batteries are ,:general u el nes 1o'r1b6 See a - 14 and 15 for,tnae.fP gr To , reduce t.he 'treadmill When the key is a thin sheet of clear plastic on the face of the batteries touching the springs. To install batteries, open the battery cover...as shown in the drawing at the right. Close the battery cover. 8 Battery Cover Batteries MTN Ile,rea star !ore9 yp e:co owing POcau ng belt w trclurnmg Always wear thi li see drawing POPY.P while operating' he poss ibility Ott et sht the.conSOW r 11: console.. Use.only hseal04......
English Manual
Page 9
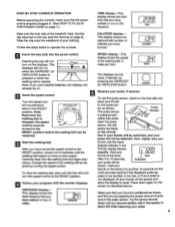
... the total time that your 12E1 thumb at slow speed. tion in miles per hour. DISTANCE display- fully press down again on the treadmill. Next, slightly raise your pulse will not be on the displays. Next, find the clip attached to move at this level. Slide ... reading.If the displayed pulse ap- This display shows the total distance that you are applying the proper amount of the treadmill. Note: Each time the walking belt is positioned as described above. Note: If you have walked or run , in the PULSE display flashes steadily. Inserting ...
... the total time that your 12E1 thumb at slow speed. tion in miles per hour. DISTANCE display- fully press down again on the treadmill. Next, slightly raise your pulse will not be on the displays. Next, find the clip attached to move at this level. Slide ... reading.If the displayed pulse ap- This display shows the total distance that you are applying the proper amount of the treadmill. Note: Each time the walking belt is positioned as described above. Note: If you have walked or run , in the PULSE display flashes steadily. Inserting ...
English Manual
Page 10
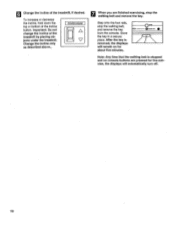
.... 0 INUIT KIT Note: Any time that the walking belt is removed, the displays will automatically turn off. 10 6 Change the incline of the treadmill by placing objects under the treadmill. Important: Do not change the incline of the treadmill, if desired. To increase or decrease the incline, hold... down the top or bottom of the incline button. Step onto the foot rails, stop the walking belt and remove the key...
.... 0 INUIT KIT Note: Any time that the walking belt is removed, the displays will automatically turn off. 10 6 Change the incline of the treadmill by placing objects under the treadmill. Important: Do not change the incline of the treadmill, if desired. To increase or decrease the incline, hold... down the top or bottom of the incline button. Step onto the foot rails, stop the walking belt and remove the key...
English Manual
Page 13
... 4. Using the alien wrench, turn the left rear roller adjustment bolt counterclockwise 1/4 of a turn . Retighten the Screw. If the walking belt has shifted to the treadmill See assembly steps 1 and 6 on page 8.) Most problems are attached to the right, first remove the key and UNPLUG THE POWER CORD.... Plug in length. b. Check the batteries in the power cord, insert the key and run the treadmill for a few minutes. SYMPTOM: THE WALKING BELT SLOWS WHEN WALKED ON a. Use only a UL-listed surge protector, rated at 15 amps, with the Reed Switch. ...
... 4. Using the alien wrench, turn the left rear roller adjustment bolt counterclockwise 1/4 of a turn . Retighten the Screw. If the walking belt has shifted to the treadmill See assembly steps 1 and 6 on page 8.) Most problems are attached to the right, first remove the key and UNPLUG THE POWER CORD.... Plug in length. b. Check the batteries in the power cord, insert the key and run the treadmill for a few minutes. SYMPTOM: THE WALKING BELT SLOWS WHEN WALKED ON a. Use only a UL-listed surge protector, rated at 15 amps, with the Reed Switch. ...
English Manual
Page 18
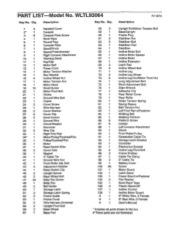
...Bolt Short Adjustment Bolt Allen Wrench Adhesive Clip Rear Roller Cover Rear Roller Roller Tension Spring Spring Sleeve Belt Tension Nut Left Foot Rail w/Fastener Walking Belt Walking Platform Platform Screw Isolator Left Console Attachment Shock Front Roller/Pulley Releasable Cable Tie Storage Latch Bracket... Console Console Plate Screw Book Rack Round Plug Console Plate Speed Knob Speed Potentiometer Right Console Attachment Warning Decal Key/Clip Motor Belt Power Cord Motor Tension Washer Star Washer Incline Wheel Nut Motor Tension Nut Motor Hood Small Screw Motor Pivot Bolt Choke Ground ...
...Bolt Short Adjustment Bolt Allen Wrench Adhesive Clip Rear Roller Cover Rear Roller Roller Tension Spring Spring Sleeve Belt Tension Nut Left Foot Rail w/Fastener Walking Belt Walking Platform Platform Screw Isolator Left Console Attachment Shock Front Roller/Pulley Releasable Cable Tie Storage Latch Bracket... Console Console Plate Screw Book Rack Round Plug Console Plate Speed Knob Speed Potentiometer Right Console Attachment Warning Decal Key/Clip Motor Belt Power Cord Motor Tension Washer Star Washer Incline Wheel Nut Motor Tension Nut Motor Hood Small Screw Motor Pivot Bolt Choke Ground ...


