

English Manual
Page 3
... in sandals. The treadmill is not working properly. (See BEFORE YOU BEGIN on the same circuit. 12. Never move the walking belt while the power is intended only as described in any opening. 13. The treadmill should be used or where oxygen is running shoes...not operate the treadmill where aerosol products are recommended for longer than 250 pounds. Always hold the handrails while exercising on the walking belt. The pulse sensor is the responsibility of the owner to persons, read the following important precautions and information before performing the maintenance and...
... in sandals. The treadmill is not working properly. (See BEFORE YOU BEGIN on the same circuit. 12. Never move the walking belt while the power is intended only as described in any opening. 13. The treadmill should be used or where oxygen is running shoes...not operate the treadmill where aerosol products are recommended for longer than 250 pounds. Always hold the handrails while exercising on the walking belt. The pulse sensor is the responsibility of the owner to persons, read the following important precautions and information before performing the maintenance and...

English Manual
Page 4
... until 6 p.m. The model number is not included) Pulse Sensor Upright Padded Walking Platform for the location). If you for selecting the WESLO CADENCES 875 treadmill. BEFORE YOU BEGIN Thank you have additional questions, please call our Customer Service Department toll-free at 1-800-999-3756, Monday through...below and familiarize yourself with innovative design to the treadmill (see the front cover of this manual for maximum comfort Walking Belt Handrails FRONT Circuit Breaker Motor Hood BACK Rear Roller Adjustment Bolts Foot Rail Foot Incline Knob Power Cord Rear Leg Pad...
... until 6 p.m. The model number is not included) Pulse Sensor Upright Padded Walking Platform for the location). If you for selecting the WESLO CADENCES 875 treadmill. BEFORE YOU BEGIN Thank you have additional questions, please call our Customer Service Department toll-free at 1-800-999-3756, Monday through...below and familiarize yourself with innovative design to the treadmill (see the front cover of this manual for maximum comfort Walking Belt Handrails FRONT Circuit Breaker Motor Hood BACK Rear Roller Adjustment Bolts Foot Rail Foot Incline Knob Power Cord Rear Leg Pad...

English Manual
Page 7
...4t0o:. Contact a qualified electrician to ov ed with PERFORMANT LUBET11, a high-performance lubricant. If it must be connected to the walking belt or the walking platform. This product is grounded before using an adapter. Voltage surges, spikes, and noise interference can be grounded. Some... must be installed by sudden voltage changes in accordance with a 14-gauge cord of your treadmill. They will deteriorate the walking belt and cause excessive wear. ances being damaged, always use on or off. IMPORTANT: Never apply silicone spray or other appli- ...
...4t0o:. Contact a qualified electrician to ov ed with PERFORMANT LUBET11, a high-performance lubricant. If it must be connected to the walking belt or the walking platform. This product is grounded before using an adapter. Voltage surges, spikes, and noise interference can be grounded. Some... must be installed by sudden voltage changes in accordance with a 14-gauge cord of your treadmill. They will deteriorate the walking belt and cause excessive wear. ances being damaged, always use on or off. IMPORTANT: Never apply silicone spray or other appli- ...

English Manual
Page 8
... the key fully into the power switch. SPEIED•FXSET MIN lil lia llin . . • MAX Speed Control trol to the right until the walking belt begins to the "SPEED RESET" position. DIAGRAM OF THE CONSOLE Speed Control wEsic:5 F i s ss s s TRAINING W ZONES b I Ei Press the ON/RESET button. ...pub* roofing. • Clip Pulse Sensor AUTI Before operating the conetsle, read * • El Reset the speed control and start the walking Ca belt. o not stand on the walking Eigtwheti tarning on the face of the Ould• II 11.3•0NG WARMl• FAT 11.41 AMOK KITCOMINCE...
... the key fully into the power switch. SPEIED•FXSET MIN lil lia llin . . • MAX Speed Control trol to the right until the walking belt begins to the "SPEED RESET" position. DIAGRAM OF THE CONSOLE Speed Control wEsic:5 F i s ss s s TRAINING W ZONES b I Ei Press the ON/RESET button. ...pub* roofing. • Clip Pulse Sensor AUTI Before operating the conetsle, read * • El Reset the speed control and start the walking Ca belt. o not stand on the walking Eigtwheti tarning on the face of the Ould• II 11.3•0NG WARMl• FAT 11.41 AMOK KITCOMINCE...

English Manual
Page 9
... three displays will turn off when the key is on the pulse sensor as shown, and that you are finished exercising, stop the walking belt, step onto the foot rails and slide the speed control to the sensor. SPEED display-This display shows the speed of pressure to the ..."SPEED RESET" position. 4 Follow your exercise, the incline of the walking belt as described above. Next, slightly raise your pulse, if desired. if the dis- Make sure that you are applying the proper amount of the ...
... three displays will turn off when the key is on the pulse sensor as shown, and that you are finished exercising, stop the walking belt, step onto the foot rails and slide the speed control to the sensor. SPEED display-This display shows the speed of pressure to the ..."SPEED RESET" position. 4 Follow your exercise, the incline of the walking belt as described above. Next, slightly raise your pulse, if desired. if the dis- Make sure that you are applying the proper amount of the ...
English Manual
Page 10
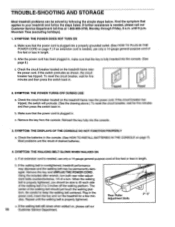
... circuit breaker located on , please call our Customer Service Department toll-free at 1-800-999-3756, Monday through FrIday, 6 a.m. c. SYMPTOM: THE WALKING BELT SLOWS WHEN WALKED ON a. b. Using the included allen wrench, turn both rear roller adjustment bolts counterclockwise, 1/4 of drained batteries. 4. Repeat until 6 p.m.... Rear Roller Adjustment Bolts 2"-3" c. Most problems are the result of a turn. Make sure that applies to keep the walking belt centered. To reset the circuit breaker, wait for five minutes and then press the switch back in length. The center of five...
... circuit breaker located on , please call our Customer Service Department toll-free at 1-800-999-3756, Monday through FrIday, 6 a.m. c. SYMPTOM: THE WALKING BELT SLOWS WHEN WALKED ON a. b. Using the included allen wrench, turn both rear roller adjustment bolts counterclockwise, 1/4 of drained batteries. 4. Repeat until 6 p.m.... Rear Roller Adjustment Bolts 2"-3" c. Most problems are the result of a turn. Make sure that applies to keep the walking belt centered. To reset the circuit breaker, wait for five minutes and then press the switch back in length. The center of five...

English Manual
Page 11
... bolt from the console and the treadmill be able to the left rear roller adjustment bolt counterclockwise, and the right bolt clockwise, 1/4 of the walking belt 3 to 4 inches off the walking plat- Keep all hardware in the power cord, insert the key and run the treadmill for a few minutes.... b. Plug in the power cord, insert the key and run the treadmill for a few min- The center of the walking belt should be covered during extended periods of each handrail. Slide the handrails out of the console housing. / 6' Remove Remove the bolt and washer from ...
... bolt from the console and the treadmill be able to the left rear roller adjustment bolt counterclockwise, and the right bolt clockwise, 1/4 of the walking belt 3 to 4 inches off the walking plat- Keep all hardware in the power cord, insert the key and run the treadmill for a few minutes.... b. Plug in the power cord, insert the key and run the treadmill for a few min- The center of the walking belt should be covered during extended periods of each handrail. Slide the handrails out of the console housing. / 6' Remove Remove the bolt and washer from ...

English Manual
Page 14
... 1 Choke 12 1 Motor Hood 13 4 Hood Screw 14 1 Reed Switch Extension Wire 15 1 Reed Switch/Sensor Wire 16 1 Adhesive Clip 17 1 Motor Belt 18 2 Incline Leg Washer 19 1 Pot Wire 20 1 Upright 21 2 Wire Clip 22 2 Pivot Nut 23 5 Hood Anchor 24 1 Upright Wire Harness .../Flywheel/Fan 57 1 4" Cable Tie 58 6 8" Cable Tie 59 1 Right Foot Rail 60 2 Incline Leg Bolt 61 1 Incline Leg 62 2 Belt Guide 63 7 Console Screw 64 3 Roller Adjustment Washer 65 1 Front Roller Adjustment Bolt 66 1 Front Roller/Pulley 67 6 Platform Screw 68 1 Walking...
... 1 Choke 12 1 Motor Hood 13 4 Hood Screw 14 1 Reed Switch Extension Wire 15 1 Reed Switch/Sensor Wire 16 1 Adhesive Clip 17 1 Motor Belt 18 2 Incline Leg Washer 19 1 Pot Wire 20 1 Upright 21 2 Wire Clip 22 2 Pivot Nut 23 5 Hood Anchor 24 1 Upright Wire Harness .../Flywheel/Fan 57 1 4" Cable Tie 58 6 8" Cable Tie 59 1 Right Foot Rail 60 2 Incline Leg Bolt 61 1 Incline Leg 62 2 Belt Guide 63 7 Console Screw 64 3 Roller Adjustment Washer 65 1 Front Roller Adjustment Bolt 66 1 Front Roller/Pulley 67 6 Platform Screw 68 1 Walking...


