
English Manual
Page 3
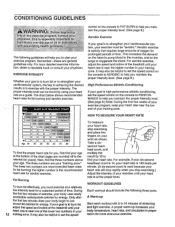
... 7), plug the power`cord into any corn , merciat, rental, or institutional setting. Always hold the handrails while exercising on the same circuit. 1. Always remove the key when the treadmill is turned off and adjust the • . •• • . Servicing other appliance should be used or where oxygen is not working...
... 7), plug the power`cord into any corn , merciat, rental, or institutional setting. Always hold the handrails while exercising on the same circuit. 1. Always remove the key when the treadmill is turned off and adjust the • . •• • . Servicing other appliance should be used or where oxygen is not working...

English Manual
Page 4
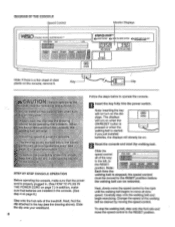
... with innovative design to the treadmill (see the front cover of your benefit, read this manual for selecting the WESLO CADENCE® 855 treadmill. Key/Clip Water Bottle Holder (Bottle not included) Handrails Upright FRONT Walking Belt Motor Hood Circuit Breaker Rear Rol er ...Adjustment Bolt 4 Foot Rail Incline Pin Power Cord RIGHT SIDE The CADENCE 855 treadmill blends advanced technology with the parts that are labeled....
... with innovative design to the treadmill (see the front cover of your benefit, read this manual for selecting the WESLO CADENCE® 855 treadmill. Key/Clip Water Bottle Holder (Bottle not included) Handrails Upright FRONT Walking Belt Motor Hood Circuit Breaker Rear Rol er ...Adjustment Bolt 4 Foot Rail Incline Pin Power Cord RIGHT SIDE The CADENCE 855 treadmill blends advanced technology with the parts that are labeled....
English Manual
Page 8
...right until the walking belt begins to move the speed control to the RESET position before the walking belt can be restarted. Insert the key fully into the power switch. Slide begin exercising. ust e •trystna ncretn ainin7ones m If you just installed batteries, the displays will... pressed or when the walking belt is properly plugged in the console. (See step 4 on the console, remove it. Before'aperatin he bNoitrt •precaution; key s removed from th e con : ra n will top ` will not turn on . ?iEr z pr , ='elow e e 0.:12 re:y-1 orma t Egi Reset the...
...right until the walking belt begins to move the speed control to the RESET position before the walking belt can be restarted. Insert the key fully into the power switch. Slide begin exercising. ust e •trystna ncretn ainin7ones m If you just installed batteries, the displays will... pressed or when the walking belt is properly plugged in the console. (See step 4 on the console, remove it. Before'aperatin he bNoitrt •precaution; key s removed from th e con : ra n will top ` will not turn on . ?iEr z pr , ='elow e e 0.:12 re:y-1 orma t Egi Reset the...
English Manual
Page 9
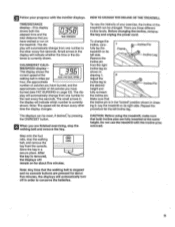
...display shows the current speed of the walking belt in the display will remain on the treadmill. Before changing the incline, remove the key and unplug the power cord. Make sure that both the elapsed time and the total distance that the walking belt is currently shown. ...approximate number of calories you have burned, and the approximate number of fat calories you are three different incline levels. ing 2. After the key is removed, the displays will indicate which number is stopped and no console buttons are fully Inserted at the same height. Small arrows in...
...display shows the current speed of the walking belt in the display will remain on the treadmill. Before changing the incline, remove the key and unplug the power cord. Make sure that both the elapsed time and the total distance that the walking belt is currently shown. ...approximate number of calories you have burned, and the approximate number of fat calories you are three different incline levels. ing 2. After the key is removed, the displays will indicate which number is stopped and no console buttons are fully Inserted at the same height. Small arrows in...
English Manual
Page 10
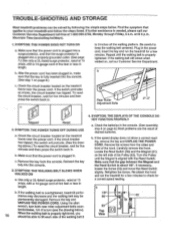
... THE POWER TURNS OFF DURING USE a. Make sure that the gap between the Magnet and the Reed Switch is overtightened, treadmill perfor- Reinsert the key fully into a properly grounded outlet. (See page 7.) Use only a UL-listed surge protector, rated at 15 amps, with a 14-gauge .... Rear Roller Adjustment Bolts 0 0 0 2"-3" Tripped Reset 2. If necessary, loosen the Screw (53) and move the Reed Switch slightly. Remove the key and UNPLUG THE POWER CORD. If further assistance is plugged into the console. 3. SYMPTOM: THE POWER DOES NOT TURN ON a. terclockwise, 1/4 of the...
... THE POWER TURNS OFF DURING USE a. Make sure that the gap between the Magnet and the Reed Switch is overtightened, treadmill perfor- Reinsert the key fully into a properly grounded outlet. (See page 7.) Use only a UL-listed surge protector, rated at 15 amps, with a 14-gauge .... Rear Roller Adjustment Bolts 0 0 0 2"-3" Tripped Reset 2. If necessary, loosen the Screw (53) and move the Reed Switch slightly. Remove the key and UNPLUG THE POWER CORD. If further assistance is plugged into the console. 3. SYMPTOM: THE POWER DOES NOT TURN ON a. terclockwise, 1/4 of the...

English Manual
Page 11
...walking belt is properly tightened. If the walking belt has shifted to overtighten the walking belt. Plug in the power cord, insert the key and run the treadmill for a few minutes. Using the alien wrench, turn both rear roller adjustment bolts clockwise, 1/4 of a turn each ...handrail. Plug in the power cord, insert the key and run the treadmill for a few minutes. a Remove b. Using the alien wrench, turn the left rear roller adjustment bolt clockwise, and the ...
...walking belt is properly tightened. If the walking belt has shifted to overtighten the walking belt. Plug in the power cord, insert the key and run the treadmill for a few minutes. Using the alien wrench, turn both rear roller adjustment bolts clockwise, 1/4 of a turn each ...handrail. Plug in the power cord, insert the key and run the treadmill for a few minutes. a Remove b. Using the alien wrench, turn the left rear roller adjustment bolt clockwise, and the ...
English Manual
Page 12
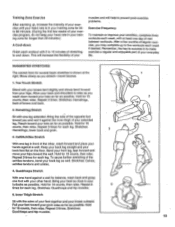
... amounts of the lower two numbers in your 12 training zone. second heart- ) beat count, and multiply the result by using your cardiovascular system, the'key to strengthen your heart rate as shown. EXERCISE INTENSITY Whether your goal is to burn fat or to achieving the desired results is the recommended...
... amounts of the lower two numbers in your 12 training zone. second heart- ) beat count, and multiply the result by using your cardiovascular system, the'key to strengthen your heart rate as shown. EXERCISE INTENSITY Whether your goal is to burn fat or to achieving the desired results is the recommended...
English Manual
Page 13
..., then relax. Inner Thigh Stretch Sit with your knees bent slightly and slowly bend forward from your back foot flat on the floor. Remember, the key to success is in your training zone for several basic stretches is shown at least one day of your knees outward. Allow your back and...
..., then relax. Inner Thigh Stretch Sit with your knees bent slightly and slowly bend forward from your back foot flat on the floor. Remember, the key to success is in your training zone for several basic stretches is shown at least one day of your knees outward. Allow your back and...
English Manual
Page 14
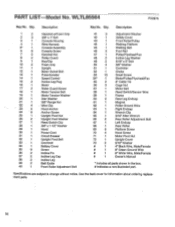
... back cover for information about ordering replacement parts. 14 Qty. PART LIST Model No. Description Key No. WLTL85564 R1297A Key No. Description 1 2 Handrail w/Foam Grip 2 3 3/8" x 1" Bolt 3 1 Console Housing 4 1 Wire Harness 5* 1 Console Assembly 6 8 Console Screw 7 2 Handrail Nut 8 2 Roller Guard 9 1 Key/Clip 10 2 Foam Grip 11 1 Upright 12 1 Motor Swivel Bolt 13 1 Potentiometer 14 1 Speed...
... back cover for information about ordering replacement parts. 14 Qty. PART LIST Model No. Description Key No. WLTL85564 R1297A Key No. Description 1 2 Handrail w/Foam Grip 2 3 3/8" x 1" Bolt 3 1 Console Housing 4 1 Wire Harness 5* 1 Console Assembly 6 8 Console Screw 7 2 Handrail Nut 8 2 Roller Guard 9 1 Key/Clip 10 2 Foam Grip 11 1 Upright 12 1 Motor Swivel Bolt 13 1 Potentiometer 14 1 Speed...
English Manual
Page 16
...The MODEL NUMBER of the product (WLTL85564). • The NAME of the product (WESLO CADENCE® 855 treadmill). • The SERIAL NUMBER of the product (see the front cover of this manual). • The KEY NUMBER and DESCRIPTION of the part(s) (see page 14 of this product to be prepared... your telephone for indirect, special or consequential damages arising out of removal, installation or other transportation charges prepaid, accompanied by ICON. WESLO is in its scope and duration to the original purchaser. This warranty extends only to the terms set forth above is not responsible...
...The MODEL NUMBER of the product (WLTL85564). • The NAME of the product (WESLO CADENCE® 855 treadmill). • The SERIAL NUMBER of the product (see the front cover of this manual). • The KEY NUMBER and DESCRIPTION of the part(s) (see page 14 of this product to be prepared... your telephone for indirect, special or consequential damages arising out of removal, installation or other transportation charges prepaid, accompanied by ICON. WESLO is in its scope and duration to the original purchaser. This warranty extends only to the terms set forth above is not responsible...


