

English Manual
Page 4
... shock. 3. To reduce the possibility of 6 feet or less in a commercial environment will invalidate the warranty. 11. Never allow more amps. Always remove the safety key when the treadmill is for longer than the procedures in this could become caught in this manual. The treadmill should be used without a fuse carrier...
... shock. 3. To reduce the possibility of 6 feet or less in a commercial environment will invalidate the warranty. 11. Never allow more amps. Always remove the safety key when the treadmill is for longer than the procedures in this could become caught in this manual. The treadmill should be used without a fuse carrier...

English Manual
Page 5
The CADENCE 825 treadmill blends advanced technology with the parts that are labeled. To help us assist you, please note the product model number and serial number before ... you enjoy an excellent form of cardiovascular exercise in the convenience and privacy of your benefit, read this manual for selecting the WESLO CADENCE® 825 treadmill. Console Speed Control Knob Safety Key/Clip Handrails O O Handrail Upright FRONT Walking Belt Roller Guards Motor Hood Circuit Breaker BACK Rear Roller Adjustment Bolts Foot Rail RIGHT...
The CADENCE 825 treadmill blends advanced technology with the parts that are labeled. To help us assist you, please note the product model number and serial number before ... you enjoy an excellent form of cardiovascular exercise in the convenience and privacy of your benefit, read this manual for selecting the WESLO CADENCE® 825 treadmill. Console Speed Control Knob Safety Key/Clip Handrails O O Handrail Upright FRONT Walking Belt Roller Guards Motor Hood Circuit Breaker BACK Rear Roller Adjustment Bolts Foot Rail RIGHT...

English Manual
Page 8
...pause before operating the console. Battery Cover Battery Clip TURNING ON THE POWER Step onto the foot rails of the treadmill. Insert the safety key into the battery clip. The power indicator will already appear. alkaline batteries are familiar with the operation of the treadmill. Press the batteries into... the battery clip in the console and close the battery cover. To stop the walking belt, turn the speed control knob to the safety key, and slide the clip onto the waistband of your clothing. Change the speed of the walking belt as desired by a cord to "RESET...
...pause before operating the console. Battery Cover Battery Clip TURNING ON THE POWER Step onto the foot rails of the treadmill. Insert the safety key into the battery clip. The power indicator will already appear. alkaline batteries are familiar with the operation of the treadmill. Press the batteries into... the battery clip in the console and close the battery cover. To stop the walking belt, turn the speed control knob to the safety key, and slide the clip onto the waistband of your clothing. Change the speed of the walking belt as desired by a cord to "RESET...
English Manual
Page 9
...appear again when the ON/CLEAR button is pressed, or the walking belt is restarted. Turn the power off the power, remove the safety key from the right side of the motivational fitness monitor provide continuous exercise feedback. Make sure that you have walked or run. SPEED-This display shows...four displays of the Incline Leg (40). (See Drawing 2.) 2 3. TURNING OFF THE POWER To turn off and unplug the pOwer cord. Store the safety key in an open area. 1. The four displays will darken. The displays can be reset and will darken, although the power will go into a pause mode...
...appear again when the ON/CLEAR button is pressed, or the walking belt is restarted. Turn the power off the power, remove the safety key from the right side of the motivational fitness monitor provide continuous exercise feedback. Make sure that you have walked or run. SPEED-This display shows...four displays of the Incline Leg (40). (See Drawing 2.) 2 3. TURNING OFF THE POWER To turn off and unplug the pOwer cord. Store the safety key in an open area. 1. The four displays will darken. The displays can be reset and will darken, although the power will go into a pause mode...

English Manual
Page 10
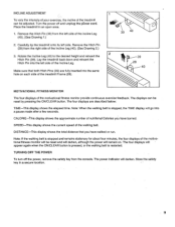
... walking belt is properly tightened. Various indicators on the console should be solved by following the simple steps below. Reinsert the safety key fully into a properly earthed outlet. (See PLUGGING IN THE POWER CORD on the treadmill frame near the power cord. Reapply lubricant... after every 10 hours of use . Remove the safety key and UNPLUG THE POWER CORD. 3-4" Using the alien wrench, turn both rear roller adjustment bolts counterclockwise, 1/4 of a turn. b. b. Various...
... walking belt is properly tightened. Various indicators on the console should be solved by following the simple steps below. Reinsert the safety key fully into a properly earthed outlet. (See PLUGGING IN THE POWER CORD on the treadmill frame near the power cord. Reapply lubricant... after every 10 hours of use . Remove the safety key and UNPLUG THE POWER CORD. 3-4" Using the alien wrench, turn both rear roller adjustment bolts counterclockwise, 1/4 of a turn. b. b. Various...
English Manual
Page 11
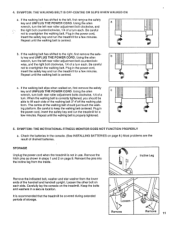
...is recommended that the treadmill be able to the left rear roller adjustment bolt counterclock- Carefully lay the console on , first remove the safety key and UNPLUG THE POWER CORD. wise, and the right bolt clockwise, 1/4 of the handrail and handrail upright. M c. Plug in the ... treadmill is properly tightened. 5. Reinsert the pins into the incline leg from the lower ends of a turn the left , first remove the safety key and UNPLUG THE POWER CORD. I j ing platform. C Loosen Remove Remove 11 Remove the hitch pins as shown in a secure location. 4....
...is recommended that the treadmill be able to the left rear roller adjustment bolt counterclock- Carefully lay the console on , first remove the safety key and UNPLUG THE POWER CORD. wise, and the right bolt clockwise, 1/4 of the handrail and handrail upright. M c. Plug in the ... treadmill is properly tightened. 5. Reinsert the pins into the incline leg from the lower ends of a turn the left , first remove the safety key and UNPLUG THE POWER CORD. I j ing platform. C Loosen Remove Remove 11 Remove the hitch pins as shown in a secure location. 4....

English Manual
Page 12
...% of your maximum heart rate as you may complete up to five workouts each workout with 5 to 10 minutes of stretching to cool down . The key to success is known as you to plan your exercise program. This will help you exercise-never hold your breath. CONDITIONING GUIDELINES The following guidelines...
...% of your maximum heart rate as you may complete up to five workouts each workout with 5 to 10 minutes of stretching to cool down . The key to success is known as you to plan your exercise program. This will help you exercise-never hold your breath. CONDITIONING GUIDELINES The following guidelines...

English Manual
Page 14
Specifications are subject to change without notice. See the back 14 cover for information about ordering replacement parts. WBTL82550 Key No. Description Key No. Qty. Qty. 1 1 2 8 3 2 4 1 5 10 6 1 7 1 8 1 9 4 10 4 11 4 12 1 13 1 14 8 15 1 16 2 17 2 18 2 19 2 20 4 21 3 ...34 1 35 1 36 2 37 1 38 2 39 2 40 1 41 1 42 1 Left Handrail Handrail Cage Nut Handrail Bolt Safety Key Clip Small Screw Console Speed Control Knob Right Handrail Hood Anchor Screw 3/8" Star Washer Circuit Breaker Receptacle Safety Cover Screw Front Roller Adjustment Bolt ...
Specifications are subject to change without notice. See the back 14 cover for information about ordering replacement parts. WBTL82550 Key No. Description Key No. Qty. Qty. 1 1 2 8 3 2 4 1 5 10 6 1 7 1 8 1 9 4 10 4 11 4 12 1 13 1 14 8 15 1 16 2 17 2 18 2 19 2 20 4 21 3 ...34 1 35 1 36 2 37 1 38 2 39 2 40 1 41 1 42 1 Left Handrail Handrail Cage Nut Handrail Bolt Safety Key Clip Small Screw Console Speed Control Knob Right Handrail Hood Anchor Screw 3/8" Star Washer Circuit Breaker Receptacle Safety Cover Screw Front Roller Adjustment Bolt ...

English Manual
Page 16
... product (WBTL82550). 2. Printed in USA The KEY NUMBER of the part(s) from page 14 of this manual. 5. If possible, place the treadmill near your retailer for easy reference when calling. Part No. 124186 R0495A 0 1995 Icon Health & Fitness, Inc. The MODEL NUMBER of the product (WESLO CADENCES 825 treadmill). 3. ORDERING REPLACEMENT PARTS To order...
... product (WBTL82550). 2. Printed in USA The KEY NUMBER of the part(s) from page 14 of this manual. 5. If possible, place the treadmill near your retailer for easy reference when calling. Part No. 124186 R0495A 0 1995 Icon Health & Fitness, Inc. The MODEL NUMBER of the product (WESLO CADENCES 825 treadmill). 3. ORDERING REPLACEMENT PARTS To order...


