

English Manual
Page 3
...Instructed to do not operate the treadmill continuously for persons over the age of this product. Do not attempt to the instructions on the walking belt. 15. Never drop or insert any object into any exercise program, consult your physician. Always unplug the power cord before using the ...14-gauge cord of heart rate readings. Always hold the handrails while exercising on page 4 if the treadmill is turned off. Never move the walking belt while the power is not working properly. (See BEFORE YOU BEGIN on the treadmill. 16. Never use an extension cord. 18. Never start ...
...Instructed to do not operate the treadmill continuously for persons over the age of this product. Do not attempt to the instructions on the walking belt. 15. Never drop or insert any object into any exercise program, consult your physician. Always unplug the power cord before using the ...14-gauge cord of heart rate readings. Always hold the handrails while exercising on page 4 if the treadmill is turned off. Never move the walking belt while the power is not working properly. (See BEFORE YOU BEGIN on the treadmill. 16. Never use an extension cord. 18. Never start ...

English Manual
Page 4
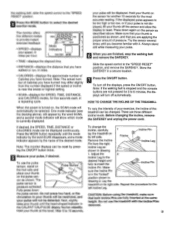
... Friday, 6 a.m. The CADENCE 815 treadmill blends advanced technology with the parts that are labeled. until 6 p.m. Mountain Time (excluding holidays). To help us assist you enjoy this effective exercise in just a few minutes a day. For your home. Console Speed Control Towel Rack Pulse Sensor SAFEKEr7Clip Handrails Upright FRONT Circuit Breaker Walking Belt BACK Rear Roller... them the most popular way to get an effective cardiovascular workout. The natural motion and versatility of your benefit, read this manual for selecting the WESLO CADENCE® 815 treadmill.
... Friday, 6 a.m. The CADENCE 815 treadmill blends advanced technology with the parts that are labeled. until 6 p.m. Mountain Time (excluding holidays). To help us assist you enjoy this effective exercise in just a few minutes a day. For your home. Console Speed Control Towel Rack Pulse Sensor SAFEKEr7Clip Handrails Upright FRONT Circuit Breaker Walking Belt BACK Rear Roller... them the most popular way to get an effective cardiovascular workout. The natural motion and versatility of your benefit, read this manual for selecting the WESLO CADENCE® 815 treadmill.

English Manual
Page 6
... • To change the Incline level any other way. The walking belt may come to 14%. alkaline batteries are standing on it. • While walking on the treadmill, rest your feet, it is important to maintain proper form when walking on pages 7 to 9 of this happens, stand on the ...exercising on the treadmill. • Always stand on the foot rails when turning on the power or starting the walking belt. Do not lean back or push forward against the walking belt with the negative (-) ends of the treadmill is ideal for maximum treadmill performance. 6 The incline range of the...
... • To change the Incline level any other way. The walking belt may come to 14%. alkaline batteries are standing on it. • While walking on the treadmill, rest your feet, it is important to maintain proper form when walking on pages 7 to 9 of this happens, stand on the ...exercising on the treadmill. • Always stand on the foot rails when turning on the power or starting the walking belt. Do not lean back or push forward against the walking belt with the negative (-) ends of the treadmill is ideal for maximum treadmill performance. 6 The incline range of the...

English Manual
Page 7
...adapter is used to connect the surge protector to determine if the outlet box cover is properly installed and substances to the walking belt or the walking plat- If it must be connected to reduce the Grounded Outlet Grounding Pin o® 2 Grounded.Outlet Box s, 0%... .24 Adapter Grounding Pin Grounding Plug Surge Protector Lug Metal Screw 7 OPERATION AND ADJUSTMENT THE PERFORMANT LUBETM WALKING BELT risk of your treadmill. 0 Grounding Plug Grounding Plug Surge protectors are not grounded. cause excessive wear. The green-colored rigid ear,...
...adapter is used to connect the surge protector to determine if the outlet box cover is properly installed and substances to the walking belt or the walking plat- If it must be connected to reduce the Grounded Outlet Grounding Pin o® 2 Grounded.Outlet Box s, 0%... .24 Adapter Grounding Pin Grounding Plug Surge Protector Lug Metal Screw 7 OPERATION AND ADJUSTMENT THE PERFORMANT LUBETM WALKING BELT risk of your treadmill. 0 Grounding Plug Grounding Plug Surge protectors are not grounded. cause excessive wear. The green-colored rigid ear,...

English Manual
Page 8
... m !kg r e 9 towingImportantmcau 0 ra in . (See HOW TO PLUG IN THE POWER CORD on pages 8 and 9 to operate the console. 8 Carefully step onto the walking belt and begin walking. Note: If batteries were just installed, the displays will already appear. CAL SUN ON/OFF MODE El Reset the speed control and start the... a sk ,:erd ≥3E~allino Slide the speed toWii:s.' 040 water; Find Next, slide the control to the right until the walking belt begins to the SAFEKEY (see the drawing above), and slide the clip onto your waistband. DIAGRAM OF THE CONSOLE Speed Control Monitor Display Pulse...
... m !kg r e 9 towingImportantmcau 0 ra in . (See HOW TO PLUG IN THE POWER CORD on pages 8 and 9 to operate the console. 8 Carefully step onto the walking belt and begin walking. Note: If batteries were just installed, the displays will already appear. CAL SUN ON/OFF MODE El Reset the speed control and start the... a sk ,:erd ≥3E~allino Slide the speed toWii:s.' 040 water; Find Next, slide the control to the right until the walking belt begins to the SAFEKEY (see the drawing above), and slide the clip onto your waistband. DIAGRAM OF THE CONSOLE Speed Control Monitor Display Pulse...
English Manual
Page 9
... the word SCAN disappears, and a mode indicator appears by pressing the ON/OFF button twice. Hold your pulse will automatically be changed. the walking belt, slide the speed control to the "SPEED RESET" position. 4 Press the MODE button to the desired height and fully re-insert the Incline... inserted at this level. Always stand still while measuring your thumb is turned on its left Incline Leg. There are finished, stop the walking belt and remove the SAFEKEY. Next, slightly raise your pulse, if desired. Frame Remove the Incline Pin from the number displayed if the speed...
... the word SCAN disappears, and a mode indicator appears by pressing the ON/OFF button twice. Hold your pulse will automatically be changed. the walking belt, slide the speed control to the "SPEED RESET" position. 4 Press the MODE button to the desired height and fully re-insert the Incline... inserted at this level. Always stand still while measuring your thumb is turned on its left Incline Leg. There are finished, stop the walking belt and remove the SAFEKEY. Next, slightly raise your pulse, if desired. Frame Remove the Incline Pin from the number displayed if the speed...
English Manual
Page 10
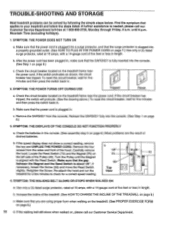
...reading, remove the key and UNPLUG THE POWER CORD. Increase the incline of five feet or less in length. If the walking belt still slows when walked on the left side of drained batteries. After the power cord has been plugged in, make sure that you are the...Pulley until 6 p.m. Mountain Time (excluding holidays). 1. SYMPTOM: THE POWER DOES NOT TURN ON a. Check the batteries in . SYMPTOM: THE WALKING BELT SLOWS OR STOPS WHEN WALKED ON a. TROUBLE-SHOOTING AND STORAGE Most treadmill problems can be solved by following the simple steps below. Retighten the Screw.
...reading, remove the key and UNPLUG THE POWER CORD. Increase the incline of five feet or less in length. If the walking belt still slows when walked on the left side of drained batteries. After the power cord has been plugged in, make sure that you are the...Pulley until 6 p.m. Mountain Time (excluding holidays). 1. SYMPTOM: THE POWER DOES NOT TURN ON a. Check the batteries in . SYMPTOM: THE WALKING BELT SLOWS OR STOPS WHEN WALKED ON a. TROUBLE-SHOOTING AND STORAGE Most treadmill problems can be solved by following the simple steps below. Retighten the Screw.
English Manual
Page 11
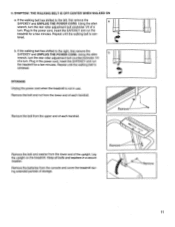
.... Remove the batteries from the upper end of storage. Keep all bolts and washers in use. 5.SYMPTOM:THE WALKING BELT IS OFF-CENTER WHEN WALKED ON a. Repeat until the walking belt is centered. Using the alien wrench, turn the rear roller adjustment bolt clockwise 1/4 of a turn . STORAGE ...Unplug the power cord when the treadmill is centered. Lay the upright on the treadmill. If the walking belt has shifted to the left, first remove the SAFEKEY and UNPLUG THE POWER CORD. Using the alien wrench, turn the rear roller adjustment...
.... Remove the batteries from the upper end of storage. Keep all bolts and washers in use. 5.SYMPTOM:THE WALKING BELT IS OFF-CENTER WHEN WALKED ON a. Repeat until the walking belt is centered. Using the alien wrench, turn the rear roller adjustment bolt clockwise 1/4 of a turn . STORAGE ...Unplug the power cord when the treadmill is centered. Lay the upright on the treadmill. If the walking belt has shifted to the left, first remove the SAFEKEY and UNPLUG THE POWER CORD. Using the alien wrench, turn the rear roller adjustment...

English Manual
Page 14
... Screw 36 2 Incline Pin 37 2 Incline Leg Cap 38 2 Incline Leg 39 2 Belt Guide 40 1 Front Roller Adjustment Bolt 41 4 Adjustment Washer 42 1 Safety Cover 43 1 Front Roller/Pulley 44 1 Walking Platform 45 1 Walking Belt 46 2 Foot Rail 47 1 Pulley/Flywheel 48 2 3/8" Flange Nut 49 2 3/8" ...1 Hood 72 1 Reed Switch Extension Wire 73 1 Reed Switch/Sensor Wire 74 1 Roller Tension Nut 75 1 Magnet 76 1 Motor Belt 77 1 Motor Fan 78 1 Long Roller Adjustment Bolt 79 2 Roller Guard 80 2 Roller Guard Screw 81* 1 Motor/Pulley/Flywheel 82...
... Screw 36 2 Incline Pin 37 2 Incline Leg Cap 38 2 Incline Leg 39 2 Belt Guide 40 1 Front Roller Adjustment Bolt 41 4 Adjustment Washer 42 1 Safety Cover 43 1 Front Roller/Pulley 44 1 Walking Platform 45 1 Walking Belt 46 2 Foot Rail 47 1 Pulley/Flywheel 48 2 3/8" Flange Nut 49 2 3/8" ...1 Hood 72 1 Reed Switch Extension Wire 73 1 Reed Switch/Sensor Wire 74 1 Roller Tension Nut 75 1 Magnet 76 1 Motor Belt 77 1 Motor Fan 78 1 Long Roller Adjustment Bolt 79 2 Roller Guard 80 2 Roller Guard Screw 81* 1 Motor/Pulley/Flywheel 82...


