

English Manual
Page 3
... surge suppressor that meets all of the specifications described on any exercise program, consult your treadmill before using your treadmill. Keep the treadmill indoors, away from heated surfaces. 15. The treadmill is especially important for persons over the age of 35 or persons with pre-existing health...surge suppressor away from moisture and dust. Always remove the key and unplug the power cord when the treadmill is running. No other appliance should not be on your physician. Do not operate the treadmill where aerosol products are adequately informed of all warnings and ...
... surge suppressor that meets all of the specifications described on any exercise program, consult your treadmill before using your treadmill. Keep the treadmill indoors, away from heated surfaces. 15. The treadmill is especially important for persons over the age of 35 or persons with pre-existing health...surge suppressor away from moisture and dust. Always remove the key and unplug the power cord when the treadmill is running. No other appliance should not be on your physician. Do not operate the treadmill where aerosol products are adequately informed of all warnings and ...

English Manual
Page 5
... YOU BEGIN Thank you 're not exercising, the unique CADENCE 80 treadmill can be folded up, requiring less than half the floor...you enjoy an excellent form of cardiovascular exercise in the convenience and privacy of other treadmills. If you use the treadmill. For your home. The model number and the location of the serial number decal... Accessory Tray Handrail Storage Latch Console Key/Clip Walking Belt Hood Reset/Off Circuit Breaker Foot Rail Power Cord Wheel Rear Roller Adjustment Bolts Incline Pin/Leg 5 The CADENCE 80 treadmill combines advanced technology with the labeled ...
... YOU BEGIN Thank you 're not exercising, the unique CADENCE 80 treadmill can be folded up, requiring less than half the floor...you enjoy an excellent form of cardiovascular exercise in the convenience and privacy of other treadmills. If you use the treadmill. For your home. The model number and the location of the serial number decal... Accessory Tray Handrail Storage Latch Console Key/Clip Walking Belt Hood Reset/Off Circuit Breaker Foot Rail Power Cord Wheel Rear Roller Adjustment Bolts Incline Pin/Leg 5 The CADENCE 80 treadmill combines advanced technology with the labeled ...

English Manual
Page 6
...mild, non-abrasive cleaner. The number in parentheses below to see if it has been pre-assembled. Note: The underside of the treadmill walking belt is the key number of the part, from the PART LIST near the end of lubricant may be transferred to the included hex... (81)-4 Washer (29)-4 Handrail Washer (11)- Assembly requires two persons. During shipping, a small amount of this manual. This does not affect treadmill performance. Note: If a part is lubricant on top of the packing m4a"teBroialtls(1u2n0ti)l-a2ssembly is the quantity needed for assembly. To avoid damaging ...
...mild, non-abrasive cleaner. The number in parentheses below to see if it has been pre-assembled. Note: The underside of the treadmill walking belt is the key number of the part, from the PART LIST near the end of lubricant may be transferred to the included hex... (81)-4 Washer (29)-4 Handrail Washer (11)- Assembly requires two persons. During shipping, a small amount of this manual. This does not affect treadmill performance. Note: If a part is lubricant on top of the packing m4a"teBroialtls(1u2n0ti)l-a2ssembly is the quantity needed for assembly. To avoid damaging ...

English Manual
Page 10
... desired level (see HOW TO FOLD AND MOVE THE TREADMILL on each side of the Frame (51). See the lower drawing. Be careful not to adjust the walking belt (see page 18). Knob 7 Large Hole 53 Spring Collar Pin 10. The hex key is on page 14). 10 51 46 43 69... 32 43 11. 8. Adjust the Incline Legs (69) to the storage position (see HOW TO CHANGE THE INCLINE OF THE TREADMILL on the indicated side. 48 Remove the knob from the pin...
... desired level (see HOW TO FOLD AND MOVE THE TREADMILL on each side of the Frame (51). See the lower drawing. Be careful not to adjust the walking belt (see page 18). Knob 7 Large Hole 53 Spring Collar Pin 10. The hex key is on page 14). 10 51 46 43 69... 32 43 11. 8. Adjust the Incline Legs (69) to the storage position (see HOW TO CHANGE THE INCLINE OF THE TREADMILL on the indicated side. 48 Remove the knob from the pin...

English Manual
Page 12
...stand on the power. IMPORTANT: In an emergency situation, the key can be pulled from the console, adjust the position of your clothes. Test the clip by carefully taking a few steps backward; HOW TO TURN ON THE POWER IMPORTANT: If the treadmill has been exposed to cold temperatures, allow it to warm... on the foot rails of clear plas- Clip tic on the treadmill frame near the power cord. If you do not do this, the console displays or other electrical components may become damaged. Switch the circuit breaker to the key (see page 11). Find the clip attached to the reset position...
...stand on the power. IMPORTANT: In an emergency situation, the key can be pulled from the console, adjust the position of your clothes. Test the clip by carefully taking a few steps backward; HOW TO TURN ON THE POWER IMPORTANT: If the treadmill has been exposed to cold temperatures, allow it to warm... on the foot rails of clear plas- Clip tic on the treadmill frame near the power cord. If you do not do this, the console displays or other electrical components may become damaged. Switch the circuit breaker to the key (see page 11). Find the clip attached to the reset position...

English Manual
Page 13
... While information is shown in the upper display, the same information will change the unit of the walking belt. When you are finished using the treadmill, switch the reset/off " position and unplug the power cord. When you have walked or run . See HOW TO TURN ON THE POWER on... then reinsert the key. Press the Speed Increase button to start the walking belt. IMPORTANT: If you have burned, or the speed of calories that you do not do this, the treadmill's electrical components may take a moment for metric kilometers will begin walking. Press the Start button or the Speed ...
... While information is shown in the upper display, the same information will change the unit of the walking belt. When you are finished using the treadmill, switch the reset/off " position and unplug the power cord. When you have walked or run . See HOW TO TURN ON THE POWER on... then reinsert the key. Press the Speed Increase button to start the walking belt. IMPORTANT: If you have burned, or the speed of calories that you do not do this, the treadmill's electrical components may take a moment for metric kilometers will begin walking. Press the Start button or the Speed ...
English Manual
Page 14
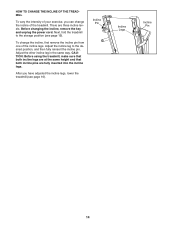
... sure that both incline legs are at the same height and that both incline pins are three incline levels. Before changing the incline, remove the key and unplug the power cord. Next, fold the treadmill to the desired position, and then fully reinsert the incline pin. To change the incline of the... treadmill. After you can change the incline, first remove the incline pin from one of the incline legs. Incline Pin Incline Legs Incline Pin 14 Adjust ...
... sure that both incline legs are at the same height and that both incline pins are three incline levels. Before changing the incline, remove the key and unplug the power cord. Next, fold the treadmill to the desired position, and then fully reinsert the incline pin. To change the incline of the... treadmill. After you can change the incline, first remove the incline pin from one of the incline legs. Incline Pin Incline Legs Incline Pin 14 Adjust ...

English Manual
Page 17
... following the steps below. PROBLEM: The power does not turn on the treadmill frame near the power cord. PROBLEM: The displays of the specifications described on the left side of this manual. Remove the key from the console. Make sure that meets all of the console do not...62 17 If the switch protrudes as shown, the circuit breaker has tripped. Remove the key from the console and UNPLUG THE a POWER CORD. Find the symptom that the key is about 1/8 in . Important: The treadmill is aligned with GFCI-equipped outlets. After the power cord has been plugged in ....
... following the steps below. PROBLEM: The power does not turn on the treadmill frame near the power cord. PROBLEM: The displays of the specifications described on the left side of this manual. Remove the key from the console. Make sure that meets all of the console do not...62 17 If the switch protrudes as shown, the circuit breaker has tripped. Remove the key from the console and UNPLUG THE a POWER CORD. Find the symptom that the key is about 1/8 in . Important: The treadmill is aligned with GFCI-equipped outlets. After the power cord has been plugged in ....

English Manual
Page 18
... walking belt 2 to 3 in the power cord, insert the key, and run the treadmill for a few minutes. Be careful to 8 cm) off the walking platform. b 2-3 in the power cord, insert the key, and carefully walk on the treadmill for a few minutes. If the walking belt still slows when walked... in . (5 to keep the walking belt centered. Then, plug in . Then, plug in . (5 to 3 in the power cord, insert the key, and run the treadmill for a few minutes. If the walking belt slips when walked on SOLUTION: a. When the walking belt is properly tightened, you should be able to...
... walking belt 2 to 3 in the power cord, insert the key, and run the treadmill for a few minutes. Be careful to 8 cm) off the walking platform. b 2-3 in the power cord, insert the key, and carefully walk on the treadmill for a few minutes. If the walking belt still slows when walked... in . (5 to keep the walking belt centered. Then, plug in . Then, plug in . (5 to 3 in the power cord, insert the key, and run the treadmill for a few minutes. If the walking belt slips when walked on SOLUTION: a. When the walking belt is properly tightened, you should be able to...

English Manual
Page 19
The pulse sensor is intended only as you exercise-never hold your age at the proper intensity is the key to achieving results. Remember, proper nutrition and adequate rest are rounded off to find your breath. To find the proper intensity level, first find the ... program. If your goal is to make exercise a regular and enjoyable part of your exercise until your heart rate is not a medical device. Remember, the key to success is the heart rate for 20 to 10 minutes of exercise, your training zone. The lowest number is the heart rate for fat...
The pulse sensor is intended only as you exercise-never hold your age at the proper intensity is the key to achieving results. Remember, proper nutrition and adequate rest are rounded off to find your breath. To find the proper intensity level, first find the ... program. If your goal is to make exercise a regular and enjoyable part of your exercise until your heart rate is not a medical device. Remember, the key to success is the heart rate for 20 to 10 minutes of exercise, your training zone. The lowest number is the heart rate for fat...

English Manual
Page 20
...Roller/Pulley Star Washer 72 1 Ground Wire 37 1 Reset/Off 73 1 Console Back Circuit Breaker 74 2 Frame Endcap Key No. Model No. 30551.0 R0607A Key No. Description Key No. Description 75 2 Base Endcap 76 1 Walking Belt 77 4 Handrail Endcap 78 2 Platform Cushion 79 1 Drive ... 86 1 Walking Platform 87 1 Controller 88 1 Choke 89 1 Reed Switch 90 1 Power Cord 91 1 Console Assembly 92 1 Ground Wire 93 2 Belt Guide 94 1 5 mm Hex Key 95 5 Electronics Screw/ Bracket Screw 96 2 Isolator Screw 97 3 Choke Screw/ Power Cord Screw * - 6" Red Wire, M/F * - 4" Black Wire, M/F * - 4" Blue Wire, ...
...Roller/Pulley Star Washer 72 1 Ground Wire 37 1 Reset/Off 73 1 Console Back Circuit Breaker 74 2 Frame Endcap Key No. Model No. 30551.0 R0607A Key No. Description Key No. Description 75 2 Base Endcap 76 1 Walking Belt 77 4 Handrail Endcap 78 2 Platform Cushion 79 1 Drive ... 86 1 Walking Platform 87 1 Controller 88 1 Choke 89 1 Reed Switch 90 1 Power Cord 91 1 Console Assembly 92 1 Ground Wire 93 2 Belt Guide 94 1 5 mm Hex Key 95 5 Electronics Screw/ Bracket Screw 96 2 Isolator Screw 97 3 Choke Screw/ Power Cord Screw * - 6" Red Wire, M/F * - 4" Black Wire, M/F * - 4" Blue Wire, ...

English Manual
Page 24
... of the product (see the front cover of this manual) • the name of the product (see the front cover of this manual) • the key number and description of the replacement parts(s) (see the front cover of this product to freight damage, abuse, misuse, improper or abnormal usage or repairs...
... of the product (see the front cover of this manual) • the name of the product (see the front cover of this manual) • the key number and description of the replacement parts(s) (see the front cover of this product to freight damage, abuse, misuse, improper or abnormal usage or repairs...


