
English Manual
Page 3
... be used or where oxygen is not working properly. (See MAINTENANCE AND TROUBLESHOOTING on the same circuit. Always remove the key and unplug the power cord when the treadmill is the responsibility of the owner to ensure that the storage latch is damaged, the walking belt may result in damage ... should not be able to safely lift 45 pounds (20 kg) to the control system of 12 and pets away from the treadmill at a time. 15. Use the treadmill only as described. 3. Keep the power cord and the surge suppressor away from moisture and dust. Wear appropriate exercise clothes when...
... be used or where oxygen is not working properly. (See MAINTENANCE AND TROUBLESHOOTING on the same circuit. Always remove the key and unplug the power cord when the treadmill is the responsibility of the owner to ensure that the storage latch is damaged, the walking belt may result in damage ... should not be able to safely lift 45 pounds (20 kg) to the control system of 12 and pets away from the treadmill at a time. 15. Use the treadmill only as described. 3. Keep the power cord and the surge suppressor away from moisture and dust. Wear appropriate exercise clothes when...
English Manual
Page 6
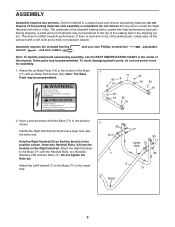
Note: The underside of the treadmill walking belt is inside the Right Handrail until assembly is in the same way. 2 30 12 7 17 Large 12 Hole 30 17 30 6 71 Bend 6 Assembly requires the included hex key wrench , and wire cutters . Attach the Right Handrail to the Base...shipping carton. Attach the Left Handrail (7) to . Identify the Right Handrail (6) which has a large hole near the lower end. Set the treadmill in the position shown. and your own Phillips screwdriver , adjustable Note: To identify small parts used during assembly, see the PART IDENTIFICATION CHART ...
Note: The underside of the treadmill walking belt is inside the Right Handrail until assembly is in the same way. 2 30 12 7 17 Large 12 Hole 30 17 30 6 71 Bend 6 Assembly requires the included hex key wrench , and wire cutters . Attach the Right Handrail to the Base...shipping carton. Attach the Left Handrail (7) to . Identify the Right Handrail (6) which has a large hole near the lower end. Set the treadmill in the position shown. and your own Phillips screwdriver , adjustable Note: To identify small parts used during assembly, see the PART IDENTIFICATION CHART ...
English Manual
Page 8
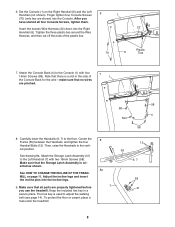
... the excess Wire Harness (22) down into the incline legs. 9. After you use the treadmill. Center the Frame (55) between the Handrails, and tighten the four Handrail Bolts (12). Keep the included hex key in the side of the plastic ties. Attach the Console Back (4) to adjust the walking ...belt (see page 14). To protect the floor or carpet, place a mat under the treadmill. 8 8a 7 12 55 6, 7 58 41 8 Plastic 70 6 Ties 7....
... the excess Wire Harness (22) down into the incline legs. 9. After you use the treadmill. Center the Frame (55) between the Handrails, and tighten the four Handrail Bolts (12). Keep the included hex key in the side of the plastic ties. Attach the Console Back (4) to adjust the walking ...belt (see page 14). To protect the floor or carpet, place a mat under the treadmill. 8 8a 7 12 55 6, 7 58 41 8 Plastic 70 6 Ties 7....
English Manual
Page 9
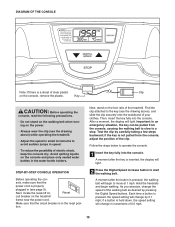
... DIAGRAM OF THE CONSOLE Note: If there is a sheet of your clothes. Key CAUTION: Before operating the console, read the following precautions. • Do not stand on the walking belt when turning on the treadmill frame near the power cord. sole, make sure that the circuit breaker is...by carefully taking a few steps backward; Important: In an emergency situation, the key can be pulled from the console, adjust the position of the treadmill. Follow the steps below to move at 1 mph. A moment after the key is in speed. • To reduce the possibility of 0.5 mph. 10 ...
... DIAGRAM OF THE CONSOLE Note: If there is a sheet of your clothes. Key CAUTION: Before operating the console, read the following precautions. • Do not stand on the walking belt when turning on the treadmill frame near the power cord. sole, make sure that the circuit breaker is...by carefully taking a few steps backward; Important: In an emergency situation, the key can be pulled from the console, adjust the position of the treadmill. Follow the steps below to move at 1 mph. A moment after the key is in speed. • To reduce the possibility of 0.5 mph. 10 ...

English Manual
Page 11
...legs are at the same height and that you are finished exercising, remove the key from one of measurement is selected, hold down the Stop button, insert the key into the incline legs. Next, fold the treadmill to the desired height, and fully reinsert Incline Pin the incline pin. Adjust the... unit of calories you have adjusted the incline legs, lower the treadmill (see page 12). The priority display can show the elapsed time, the distance that you are most interested in the same way. Put the key in the lower left corner of the display can show the elapsed...
...legs are at the same height and that you are finished exercising, remove the key from one of measurement is selected, hold down the Stop button, insert the key into the incline legs. Next, fold the treadmill to the desired height, and fully reinsert Incline Pin the incline pin. Adjust the... unit of calories you have adjusted the incline legs, lower the treadmill (see page 12). The priority display can show the elapsed time, the distance that you are most interested in the same way. Put the key in the lower left corner of the display can show the elapsed...
English Manual
Page 12
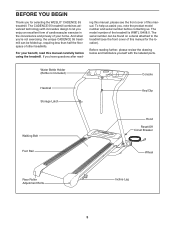
...Key/Clip Walking Belt Foot Rail Hood Reset/Off Circuit Breaker Wheel Rear Roller Adjustment Bolts Incline Leg 5 ing this manual carefully before contacting us. Before reading further, please review the drawing below and familiarize yourself with innovative design to let you ʼre not exercising, the unique CADENCE 55 treadmill... selecting the WESLO® CADENCE 55 treadmill. To help us assist you for the location). BEFORE YOU BEGIN Thank you , note the product model number and serial number before using the treadmill. The CADENCE 55 treadmill combines advanced ...
...Key/Clip Walking Belt Foot Rail Hood Reset/Off Circuit Breaker Wheel Rear Roller Adjustment Bolts Incline Leg 5 ing this manual carefully before contacting us. Before reading further, please review the drawing below and familiarize yourself with innovative design to let you ʼre not exercising, the unique CADENCE 55 treadmill... selecting the WESLO® CADENCE 55 treadmill. To help us assist you for the location). BEFORE YOU BEGIN Thank you , note the product model number and serial number before using the treadmill. The CADENCE 55 treadmill combines advanced ...
English Manual
Page 13
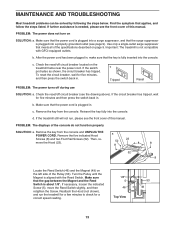
...5 46 Top View 53 49 13 Make sure that the power cord is needed, please see page 9). b. c. MAINTENANCE AND TROUBLESHOOTING Most treadmill problems can be solved by following the steps below. If further assistance is plugged into the console. To reset the circuit breaker, wait for ... a properly grounded outlet (see the front cover of the specifications described on the treadmill frame near the power cord. Remove the key from the console and UNPLUG THE POWER CORD. Reinsert the key fully into a surge suppressor, and that meets all of this manual. Then, remove...
...5 46 Top View 53 49 13 Make sure that the power cord is needed, please see page 9). b. c. MAINTENANCE AND TROUBLESHOOTING Most treadmill problems can be solved by following the steps below. If further assistance is plugged into the console. To reset the circuit breaker, wait for ... a properly grounded outlet (see the front cover of the specifications described on the treadmill frame near the power cord. Remove the key from the console and UNPLUG THE POWER CORD. Reinsert the key fully into a surge suppressor, and that meets all of this manual. Then, remove...
English Manual
Page 14
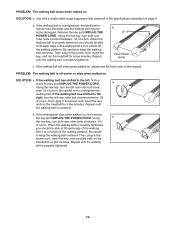
...page 9. If the walking belt is properly tightened. Then, plug in the power cord, insert the key, and run the treadmill for a few minutes. Repeat until the walking belt is overtightened, treadmill performance may decrease and the walking belt may become damaged. wise 1/2 of a turn . Repeat until...of a turn . If the walking belt still slows when walked on SOLUTION: a. Then, plug in the power cord, insert the key, and run the treadmill for a few minutes. When the walking belt is properly tightened. 14 PROBLEM: The walking belt is centered. Be careful to the left...
...page 9. If the walking belt is properly tightened. Then, plug in the power cord, insert the key, and run the treadmill for a few minutes. Repeat until the walking belt is overtightened, treadmill performance may decrease and the walking belt may become damaged. wise 1/2 of a turn . Repeat until...of a turn . If the walking belt still slows when walked on SOLUTION: a. Then, plug in the power cord, insert the key, and run the treadmill for a few minutes. When the walking belt is properly tightened. 14 PROBLEM: The walking belt is centered. Be careful to the left...
English Manual
Page 15
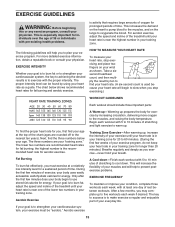
... the body temperature. the highest number is the recommended heart rate for 20 to make exercise a regular and enjoyable part of the treadmill until your heart rate is activity that requires large amounts of oxygen for fat burning; After a few minutes of stretching to strengthen ...-After warming up . This increases the demand on the heart to pump blood to the muscles, and on your cardiovascular system, the key to achieving the desired results is in your exercise program. EXERCISE GUIDELINES WARNING: Before beginning this or any exercise program, consult your physician...
... the body temperature. the highest number is the recommended heart rate for 20 to make exercise a regular and enjoyable part of the treadmill until your heart rate is activity that requires large amounts of oxygen for fat burning; After a few minutes of stretching to strengthen ...-After warming up . This increases the demand on the heart to pump blood to the muscles, and on your cardiovascular system, the key to achieving the desired results is in your exercise program. EXERCISE GUIDELINES WARNING: Before beginning this or any exercise program, consult your physician...
English Manual
Page 19
ORDERING REPLACEMENT PARTS To order replacement parts, please see the PART LIST and the EXPLODED DRAWING in the center of this manual) Part No. 274599 R0908A Printed in China © 2008 ICON IP, Inc. To help us assist you, be prepared to give the following information: • the MODEL NUMBER of the product (WMTL19408.0) • the NAME of the product (WESLO CADENCE 55 treadmill) • the SERIAL NUMBER of the product (see the front cover of this manual) • the KEY NUMBER and DESCRIPTION of the desired part(s) (see the front cover of this manual.
ORDERING REPLACEMENT PARTS To order replacement parts, please see the PART LIST and the EXPLODED DRAWING in the center of this manual) Part No. 274599 R0908A Printed in China © 2008 ICON IP, Inc. To help us assist you, be prepared to give the following information: • the MODEL NUMBER of the product (WMTL19408.0) • the NAME of the product (WESLO CADENCE 55 treadmill) • the SERIAL NUMBER of the product (see the front cover of this manual) • the KEY NUMBER and DESCRIPTION of the desired part(s) (see the front cover of this manual.


